Search Results: Rochelle Masella

Heatless stretching is a damage-free way to add length or volume to your curls.There are certain methods in my hairstyling that will make my curls to appear more stretched and elongated. Sometimes, it’s due to the styling products and tools I use; other times it’s just my everyday routine. I have found that my fine 3C curls stretch very easily so I’m especially particular with my techniques. They change from mild to moderate because on wash day, I like to keep my curls tight and let them loosen up as the days pass. My day 1 stretching technique will be totally different than day 4. So as my curls stretch, so do my techniques.
1. Clipping Technique
On day 1, I’m focused on keeping my curls defined without a ton of shrinkage. Duckbill or double prong clips can be used to provide a very mild form of stretching. It’s an easy way to keep the curls you want stretched while letting the others shrink.
After washing my hair, I like to use my Jane Carter Curl Defining Cream to style. This moisturizing cream keeps my curls defined and helps fight shrinkage. Made with shea butter, avocado and jojoba oil it leaves my curls soft and not crunchy. I start by raking this throughout my hair and scrunching my curls. Then, I like to add double prong clips randomly along my ends to maintain the length while it drys. The finished look is elongated curls that are shiny and defined without frizz.
2. Pineapple Technique
The pineapple technique is by far the easiest form of stretching for me because it is a normal part of my bedtime routine. At the end of day 1–and for the remaining days of the week–I do this to preserve my style. I start by placing all of my curls in a loose ponytail at the front of my head and secure them with a smooth elastic or scrunchie. Even though it is mild tension, the ponytail stretches out the roots and provides length.
3. Braiding Technique
Braiding is an effective method of stretching, especially if I’m looking to loosen up my curl pattern. It’s also a great prep for any other heatless styles like flexi-rod or perm-rod sets.
After day 3 or 4 when my hair has naturally stretched, I part my hair into 4-5 sections and begin braiding. To intensify the stretch, I like to pin my braids against my scalp using bobby pins. Normally, I don’t add any product to my braids but I love adding CURLS Blueberry Bliss Curl Control Paste along my hairline for smooth edges in the morning.
To protect against friction and keep my braids in place, I wear a satin scarf to bed. In the morning when I take down my braids, I’ll use a tiny amount of jojoba oil to separate. Lastly, I gently shake out the style to reveal my beachy waves.
[prodmod]
Watch my video
Follow me on Instagram @DiscoCurls
My inspiration started a long time ago with Diana Ross to more currently Solange Knowles and Esperaza Spalding. When I look at their hair, I see freedom.
It was only last year that I began to notice my curls were in much better shape.
I have been natural for several years but it’s safe to say that last year, the damage from my youth was virtually gone. Now in 2016, I feel that I understand my curls, know what works best for them and embrace my style. Some of my hair goals this year are to step out of my current routine and challenge myself with new products, styles and trends. So far, I’m enjoying the process and looking forward to trying out even more.
SheaMoisture Jamaican Black Castor Oil Strengthen, Grow & Restore Shampoo
About every 3rd wash day, I like to use a clarifying shampoo to remove any buildup on my scalp. Many of my past clarifying shampoos cleansed very well but left my curls feeling dry and brittle. This sulfate-free shampoo cleans my scalp so well and leaves my curls soft and manageable. I love that it contains apple cider vinegar to balance my scalp’s PH level and Jamaican black castor oil to help promote growth.
Hello Curly Fluffy Soft Styler
This was a beautiful surprise for my curls! Coming from a lover of big hair, I was so pleased with the results. The Fluffy Soft Styler is lightweight, kept my curls soft and is the perfect styler for my wash and go’s. Infused with avocado and safflower oil, this beautifully fragranced styler didn’t weigh my curls down one bit! Best of all it’s free or parabens, mineral oil, sulfates and petroleum. My application process is simple by raking the styler through damp, clean hair and letting it air dry.
Embracing The Frizz
Perfectly defined curls are gorgeous but there is something about wild, carefree and a bit frizzy that I find beautiful. It’s the imperfections that make it perfection. My inspiration started a long time ago with Diana Ross to more currently Solange Knowles and Esperaza Spalding. When I look at their hair, I see freedom. The freedom to express one’s self….unapologetically. My wash and go’s are less frequent for this very reason. By day 3 or 4 my curls are stretched, less defined with major volume.
Dressing Up My Curls
Hair accessories can instantly change the mood of any casual hair style. I love incorporating them during my lazy days but my collection feels a little dated. That’s why I had to include one of my favorite style and beauty vloggers to this list. Charmaine Daudu (AKA Charmsie“> is especially creative when it comes to hair hardware. She’s not afraid to wear a gilded crown, use a necklace or wrap her hair in beautiful fabrics to achieve her unique look. With her background and passion for fashion, I can count on her to keep me up to date with the latest trends.
[prodmod]
Braided Headband | Protective Holiday Hairstyle
DIY Crowns: How To Make Your Own Crown Or Headpiece For Festive Occasions
What are your favorite products for fine hair?
Follow Charmaine (pictured above”> on Instagram @Charmsie & YouTube misscharmsie
If you didn’t know by now, NaturallyCurly has a Q&A section that many readers can leave questions to their unsolved curl mysteries. For most textured hair people, having multiple curl patterns can be confusing–especially when it comes to how to style and which products work best.
Question
“Help! My hair is several different types and I don’t know how to style.
I have some hair that is wavy, some small loose curls, and some that have tight curls. I don’t know how to style it because it is poofy and it lacks any type of shape. My roots are very straight and smooth. I’ve perfected straightening and curling it and I love it like that but I’m tired of frying it and it takes so much time to do. I want to embrace my curls but I don’t know how!! I try “plopping” and using t-shirts to dry my hair which helps but obviously not enough. HELP.” -user Kelly.Chris
Answer
According to Shai Amiel, a Los Angeles based curly hairstylist, “The best way to bring out the bounce of the natural curl is by eliminating some of the dead ends that weigh the hair down. I’d definitely recommend cutting some of the dead ends. The shorter you go the more body and bounce you will get.”
When asked about his favorite products and styling techniques he said, “I’d use a light hold gel to give the hair some tightness in order for you to maximize the curl pattern. For best results, diffuse curls upside down. It’s best to trust a curly hair specialist to cut it properly and treat it to bring back some elasticity that has been compromised by excessive straightening and color.”

Question
“Wavy or Curly or Both?
My hair is a combination of S shape waves and also a variety of curls that coil around sidewalk chalk, a sharpie, and a straw. Should I look for products for wavy hair or curly hair?” -user azpoochAnswer
Not all products labeled for wavy or curly hair are made the same. The key is to look at the ingredients listed. Because your hair has different textures some areas may require more moisture than others. However, certain products made for curly hair may contain heavier oils and butters that can weigh your hair down even more. Using products that contain more lightweight ingredients will be your best bet. Gentle sulfate-free shampoos will cleanse without stripping the hair. Follow up with a moisturizing conditioner and style with lightweight gels and creams.
Briogeo Be Gentle, Be Kind Green Tea Shampoo
- Sulfate-free cleanser that is suitable for all hair types
- Enriched with Green Tea antioxidants, B5 & E vitamins
- Paraben and silicone free
DevaCurl One Condition
- A rich and creamy daily conditioner that delivers maximum hydration
- Key ingredients include rosemary, lemongrass, olive oil and hops
- Free of sulfates, parabens, silicones, paraffin, mineral oil, phthalates and DEA/MEA/TEA
DevaCurl Light Defining Gel
- A light-hold moisturizing gel that provides definition while preventing frizz
- Key ingredients include chamomile, wheat and soy proteins
- Free of sulfates, parabens, silicones, paraffin, mineral oil, phthalates, alcohol, DEA/MEA/TEA
Do you have a question for myself or the NaturallyCurly community? Post it in the ASK section now.
Photos courtesy of franckreporter (Getty Images”>
Primarily thought of as a male disease, hair loss affects more women than one would imagine. According to the American Hair Loss Association, women actually make up forty percent of American hair loss sufferers. Any form of major hair loss is considered alopecia. The most common form of hair loss is androgenetic alopecia; this form of pattern baldness is found in both men and women.
It was first believed that the hormone testosterone was the leading factor in hair loss, but within the last few decades scientists have discovered that it’s the androgen hormone DHT that is the biggest contributor to hair loss.
Within the last few decades scientists have discovered that it’s the androgen hormone DHT that is the biggest contributor to hair loss.
What is DHT?
The American Hair Loss Association describes Dihydrotestosterone, DHT, as a derivative of the male hormone testosterone. Testosterone with the help of the enzyme Type II 5-alpha-reductase converts to DHT.
When the levels of DHT increase, it shrinks and damages hair follicles making it difficult for healthy hair to survive and grow. Even with the lower levels of testosterone that women carry, DHT can still affect hair growth.
Can your shampoo save the day?
The FDA has only approved one over the counter medication that is considered effective in fighting women’s hair loss. Minoxidil, also known as Rogaine, is a topical or foaming solution that when applied to the scalp is used to stimulate hair growth in both adult men and women.
Many brands make shampoos now that claim to include key ingredients to help with hair loss by reducing and blocking DHT.
The benefits of some of these shampoos are that they may contain DHT blockers, increase blood circulation to the scalp, increase hair growth, remove scalp fungus and clear dead skin cells from the scalp.
The commonality in the majority of these shampoos include the use of saw palmetto nettle extract, pumpkin seed oil, azelaic acid and B-Complex vitamins like biotin and vitamin B5 (Pantothenic Acid”>. Each ingredient contains its own unique benefit to the health of the hair.
Pura D’or Organic Argan Oil Anti Hair Loss Shampoo
$24.99 on Amazon
- gentle, color safe, and organic formula that contains 12 advanced DHT blockers to stop premature hair loss and stimulate follicles.
-
reduces excessive shedding and beneficial on thinning hair and receding hairlines.
-
free of SLS, Parabens and other harsh chemicals.
- contains a B vitamin complex, biotin, nettle extract, saw palmetto, he shou wu (Fo-Ti”> and other natural ingredients to help strengthen hair strands.
Regenepure DR Doctor Recommended Hair Loss Shampoo for Hair Growth and Scalp Treatment
$25.00 Amazon
-
sulfate-free shampoo, free of harmful chemicals parabens and SLS
-
contains 1% ketoconazole, a powerful anti-fungal that is often used for dandruff treatment and help hair regrow.
-
packed with other beneficial elements, including saw palmetto extract, vitamin B6 and zinc oxide. Niacin, caffeine and linoleic acid, which stimulate the scalp, while emu and jojoba oils keep the skin supple and rejuvenated and help in nourishing the scalp by turning dry and damaged hair into fuller and thicker hair.
What shampoos have you found effective in reducing DHT?
photos courtesy of hellos8 (Getty Images”> and Pura D’orI have always wanted to see what my hair would look like at this length. I love that I can switch from longer to shorter overnight.
Have you ever wanted to see what your hair would look like at a shorter length? Curious to see what you’ll look like with the big chop?
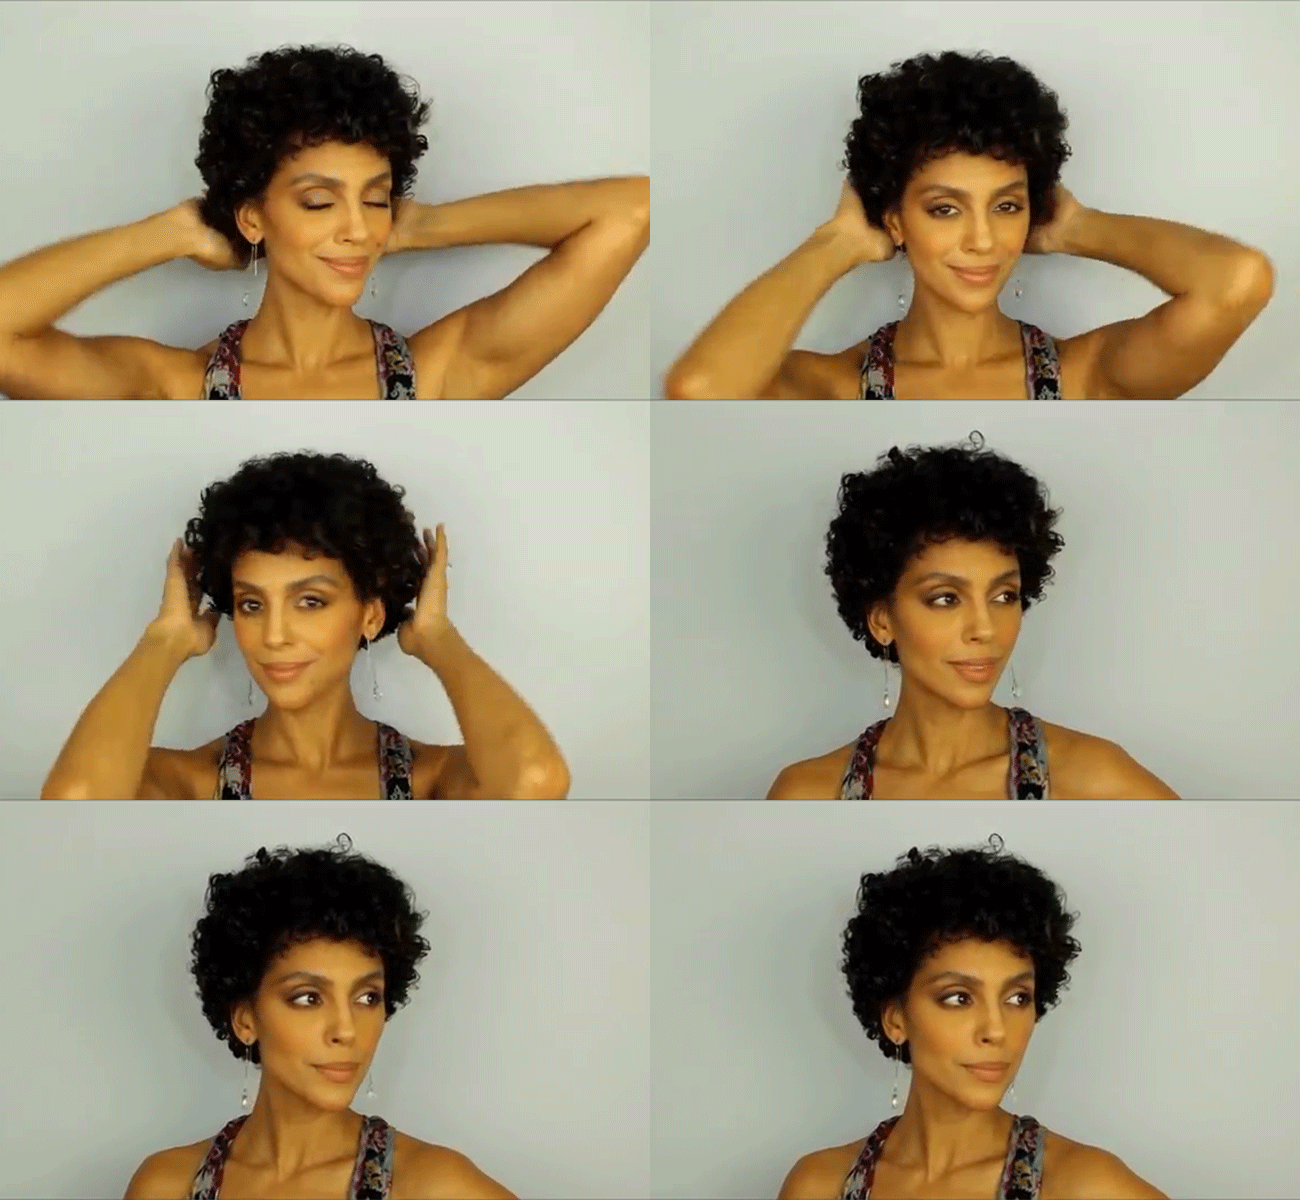
Here is a temporary solution that can be done overnight and without heat. I personally have always wanted to see what my hair would look like at this length and I love that I can switch from a longer to shorter style. This style will more than likely work best on medium hair lengths with layers. However, I found that using perm rods and flexi rods in different sizes gave me a fabulous tapered Afro.
What You’ll Need:
- Salon Care Curved Perm Rods Mini Red ⅛ Inch 3mm
- Salon Care Curved Perm Rods Long Yellow 5/16 Inch 5mm
- Hot Tools Pro Curls Spongy Rod Rollers 5/8 Diameter, 7 3/4 Long
- Styling comb
- Sectioning comb
- Sectioning clips
- Bobby Pins
- CURLS Blueberry Curl Control Paste
- CURLS Goddess Curls Botanical Gelle
- Silk scarf (for overnight sets”>
Prep (the night before”>
1. Start on either freshly washed or dry hair (I started on dry hair to make sure it dried faster”>.
2. Begin at the nape of your neck, making a small horizontal section.
3. Add a dollop of the botanical gelle and rake through the section making sure to clear any tangles.
4. Split each section into 3 or more ½ inch sections.
5. Wrap and secure each section using the smallest perm rods. Repeat this process for the first 3 bottom rows.
6. Increase the size of the perm rod as you get higher. When you get to the crown, switch to flexi rods or large perm rods (to create looser curls”>. After all rods are installed, wrap your head in a scarf and sleep in them overnight or until 100% air dried.
Takedown + styling (the next morning”>
7. The next morning, take down your scarf and begin to unravel each perm rod. You will find that the curls in the perm rods will be extra tight and close to the scalp. The curls left in the flexi rods will be looser and together this will create a tapered look.
8. Using your fingers, begin separating each curl with a small amount of the control paste. Be sure to separate each curl 2 to 3 times to ensure lots of volume.
9. Use a lifting comb to add more volume at the root. To create the look of a tapered afro, pick lightly on the bottom half so that the curls stay tighter to the scalp.
10. Pin any loose, longer curls that are out of place. Lastly, use a larger pick at the crown to create the illusion of a tapered haircut. Depending on the length and type of haircut you have, bobby pins will probably be necessary.
Watch the full tutorial here
Subscribe to my YouTube channel DiscoCurlsTV (and thumbs up if you liked the video”>!
[prodmod]Try this and let us know how it turns out in the comments below.
You don’t have to limit your fun flirty looks to Valentine’s Day
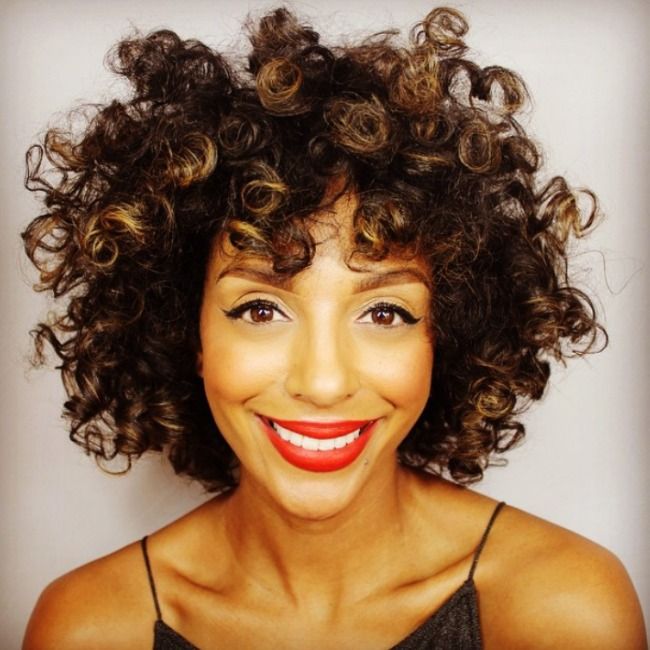
Try out this heatless flexi-rod set on your curls! My fine 3c curls had no problem taking on this style–it was so easy to do. Best of all, it doesn’t call for using damaging heat tools. The end result will leave you with soft, fluffy curls that will demand all the attention in a room.
[prodmod]
What You’ll Need:
- 1 to 2 packages of flexi rods (I used Hot Tools Pro Curls Spongy Rod Rollers 5/8 Diameter, 7 3/4 Long”>
- an elastic band
- a comb
- a pick
- a spray bottle of water
- your favorite edge control (I used Curls Blueberry Bliss Curl Control Paste“>
Directions
This works best on curly hair that is finer in texture.
1. It’s important to know that less is more for this style to be successful–washing and styling factor into this. After washing my hair, I make sure to use lightweight products in my styling process. In the days leading up to this style, I used:
- leave-in conditioner: Curls Quenched Curls-Curl Moisturizer
- styling products: Samy Fat Hair Thickening Cream and Curls Creme Brule Styling Cream.
2. I let my hair air dry and add absolutely no products to my hair for the next couple of days.
3. By the 3rd or 4th day, I gently detangle any knots until I serve up Diana Ross realness! I find that when my hair dries, my stretched look is flat and the final look doesn’t come out the same. That’s why I can’t stress it enough, less is more!
4. Using my comb, I section off the top half of my hair and secure it with my elastic. Next, I make 1 inch sections and spray it with water. I also run my comb through again to make sure that it’s not tangled.
5. Using a flexi-rod, I wrap each section from the ends up to my roots and bend them to secure. Repeat this process on the entire head. Lastly, wrap a silk scarf over the flexi-rods and leave on overnight.
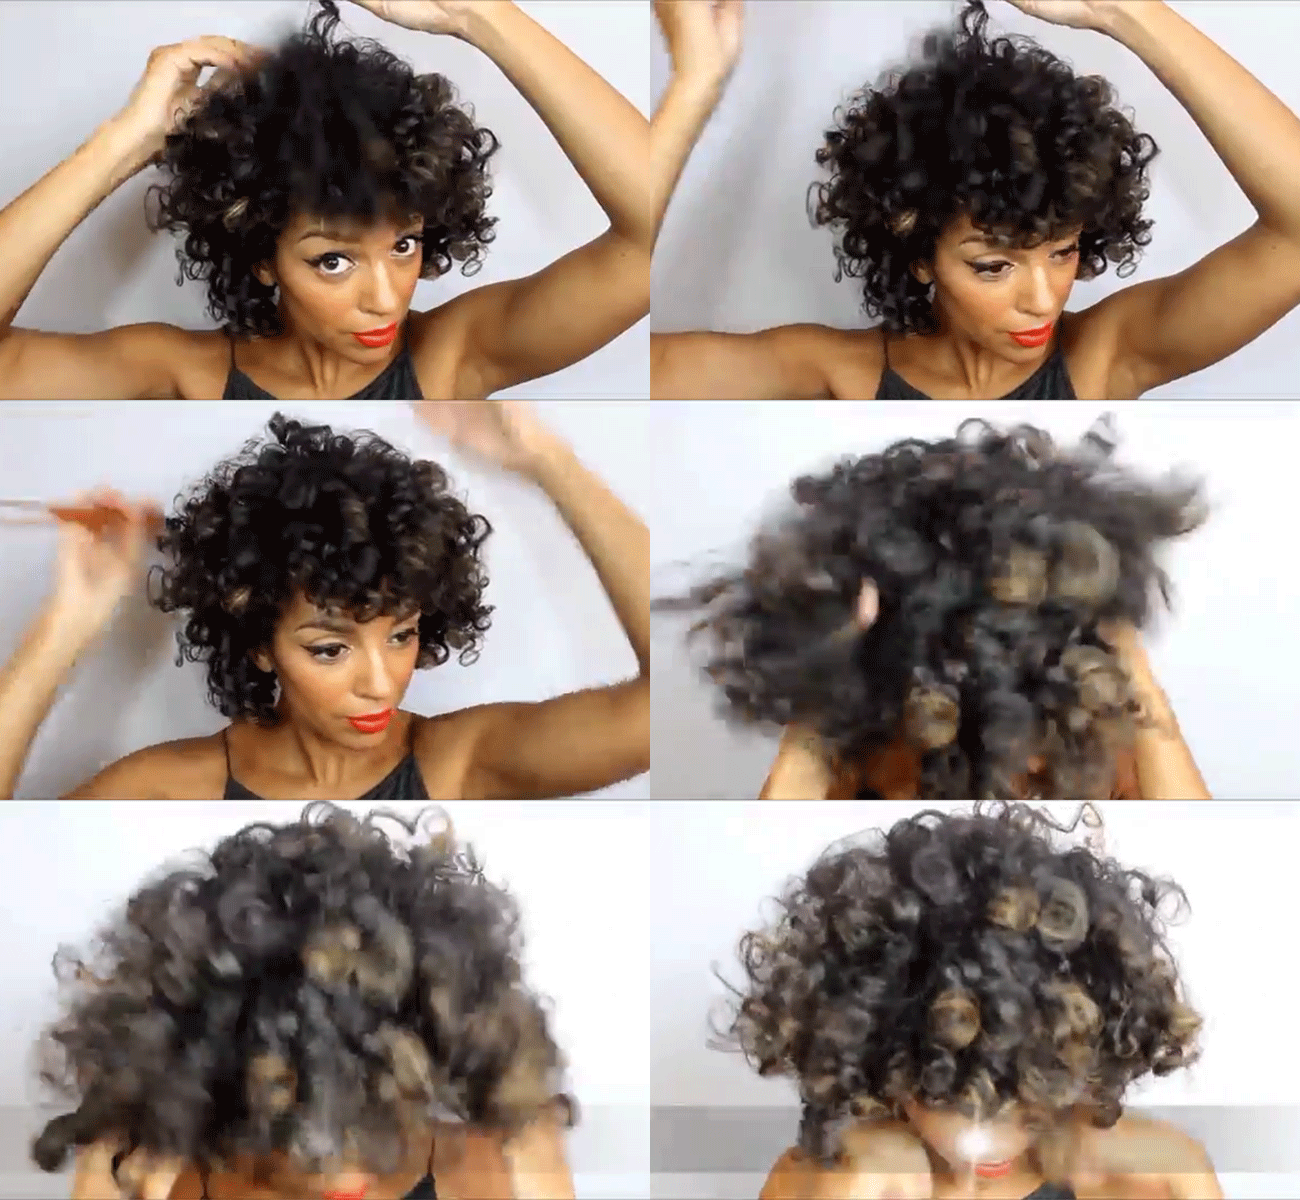
6. In the morning, I remove my scarf and unravel each flexi-rod. Using my Blueberry Bliss Curl Control Paste, I add the tiniest amount to help separate my curls and give it a more piecey look. Don’t be afraid to separate each curl a few times to make it more natural.
7. I use a pick at the roots to fluff and add extra volume. 8. Lastly, I use my hands to gently shake out the roots. This makes my hair softer and loosens up the curl pattern. You can also spritz your curls with a flexible hairspray but I didn’t feel the need to.The final result
I have a head full of soft, beautiful curls that will make your date do a double take! Complete the look with a classic cat eye and a bold red lip that will be sure to have all the attention on you.
Watch my video
Subscribe to my YouTube channel, DiscoCurls | Follow me on Instagram: @discocurls
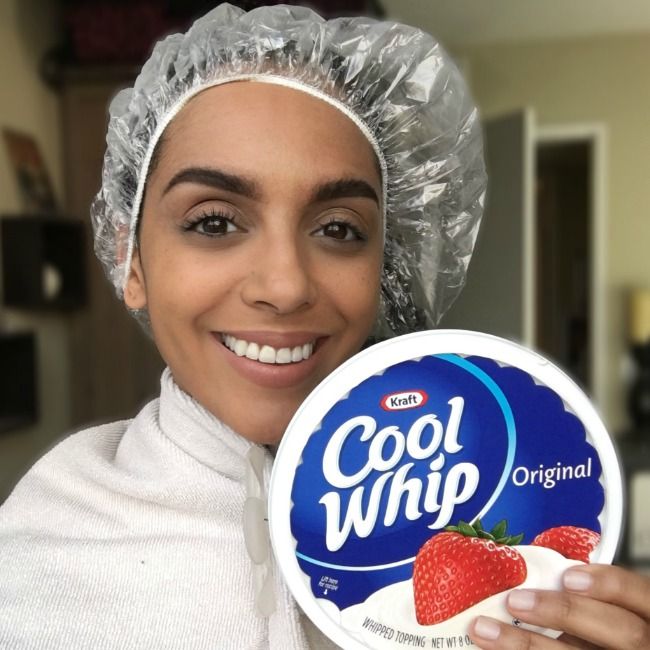
[prodmod]On my quest to discover new and interesting beauty products, I’ve been introduced to something I never imagined I would put in my hair. I’m a big fan of multi-purpose products so when I heard that you can use Cool Whip as a deep conditioner, I jumped on the experimental train. I’ll try anything once and this sounded fun and easy.
I didn’t necessarily mix anything together to make it a true DIY–the simple fact that I’m using something from the kitchen made it enough for me. I’ll try anything once, and this sounded fun and easy.
Although Cool Whip contains ingredients that I wouldn’t necessarily consume, it does contain coconut and palm kernel oils that are great for softening and adding shine to the hair.Although Cool Whip contains ingredients that I wouldn’t necessarily consume, it does contain coconut and palm kernel oils that are great for softening and adding shine to the hair. According to LiveStrong, both coconut & palm kernel oils contain lauric acid (a type of saturated fatty acid”>. There is a higher amount of lauric acid found in coconut oil, which aids in strengthening hair strands.
Keep in mind that these are in the hydrogenated form. Plus, there are many other ingredients involved, so you won’t necessarily get all of the amazing benefits that you would get from using these oils in their natural state. However, for the sake of an experiment I still wanted to see what the hype was all about.
What you will need
1 cup Cool Whip (generic store brand is ok, but I went with the original”>a towel
a disposable shower cap
How to apply to your hair
- Using your measuring cup, measure out 1 cup of Cool Whip (1/2 cup for shorter hair”>.
- Wrap a towel around your neck to avoid a mess on your clothing.
- Using your hands apply the Cool Whip on dry or wet hair from root to tip.
- Once your hair is saturated, place your disposable shower cap on and leave on for 15-20 minutes.
- Rinse well and then continue with your normal wash routine.
My experience
It was strange to apply cold, Cool Whip to my curls. However, I loved that the mask wasn’t messy and stayed in place. After 20 minutes under the disposable shower cap, I felt my hair and it was noticeably softer. It was very easy to rinse out, unlike some of the other DIY masks I’ve tried in the past. I didn’t feel the need to use a shampoo so I just co-washed with my conditioner.
My results
It gave me softer curls that were shiny but lacked moisture.Unfortunately, the cons outweigh the pros on this mask. My hair did feel noticeably softer but it didn’t provide a lot of moisture to my curls. It also lacked slip. It wasn’t easy to slide my fingers through my hair.
Also, applying cold Cool Whip on my hair did make the experience a little less enjoyable. The only real benefit I noticed from this was that my hair did look a bit shinier but that could have been due to the conditioner I added in my co-wash.
It wasn’t my favorite hair mask, but still fun to experiment with nonetheless. I’d be very interested to see if trying this on wet hair or using Creamy Cool Whip next time would make a difference. Perhaps, those with naturally straight or wavy textures will have better luck than me. I think I’ll stick to my all natural DIY hair masks in the future.
What is traction alopecia?
According to the American Hair Loss Council, traction alopecia is the loss of hair caused by physically stressing and putting tension on the hair. Certain hairstyling including hair weaving and cornrows that were done too tightly can cause this type of hair loss.
My story
Traction alopecia isn’t something I always dealt with but I think it’s important to understand how and why it happened to me. For a long period of time, I went through a phase where I didn’t love and accept my curls. It was no one’s fault but my own. My family and friends never made me feel like my hair should be straight. I was influenced by outside media outlets to conform to the straight hair standard. I’ve experimented with relaxers, the hot comb, blowouts, etc…You name it, I have tried it.
Fast forward to the years of adding color and bleach to that mix. My curls were non-existent and a lot of my hair eventually broke off. There was no big chop for me. I chose to transition by masking my hair in a sew-in weave. “What better way to grow out the damage?” I thought.
The majority of my hair would be braided and not touched by heat or any other outside elements. Here’s where I went wrong: My curls, to begin with, are fine in texture. Damage from relaxers, color, bleach and heat made the texture even worse. The weight of my hair extensions plus the amount of time I wore them for (7 years!!”> equaled my current struggle with traction alopecia.
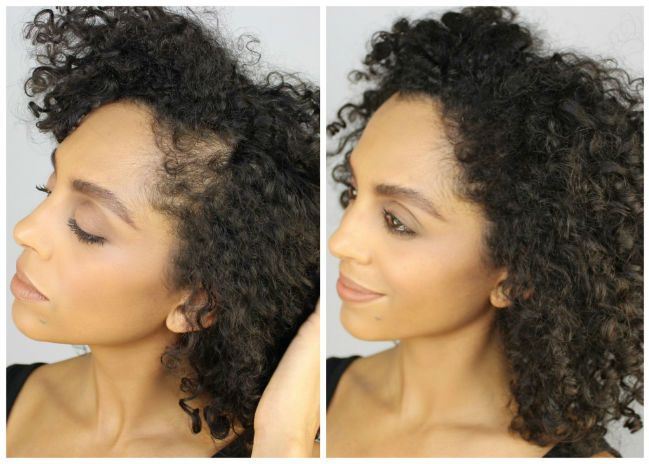
While I’m not completely free from this condition, I’ve found a couple ways to hide it.
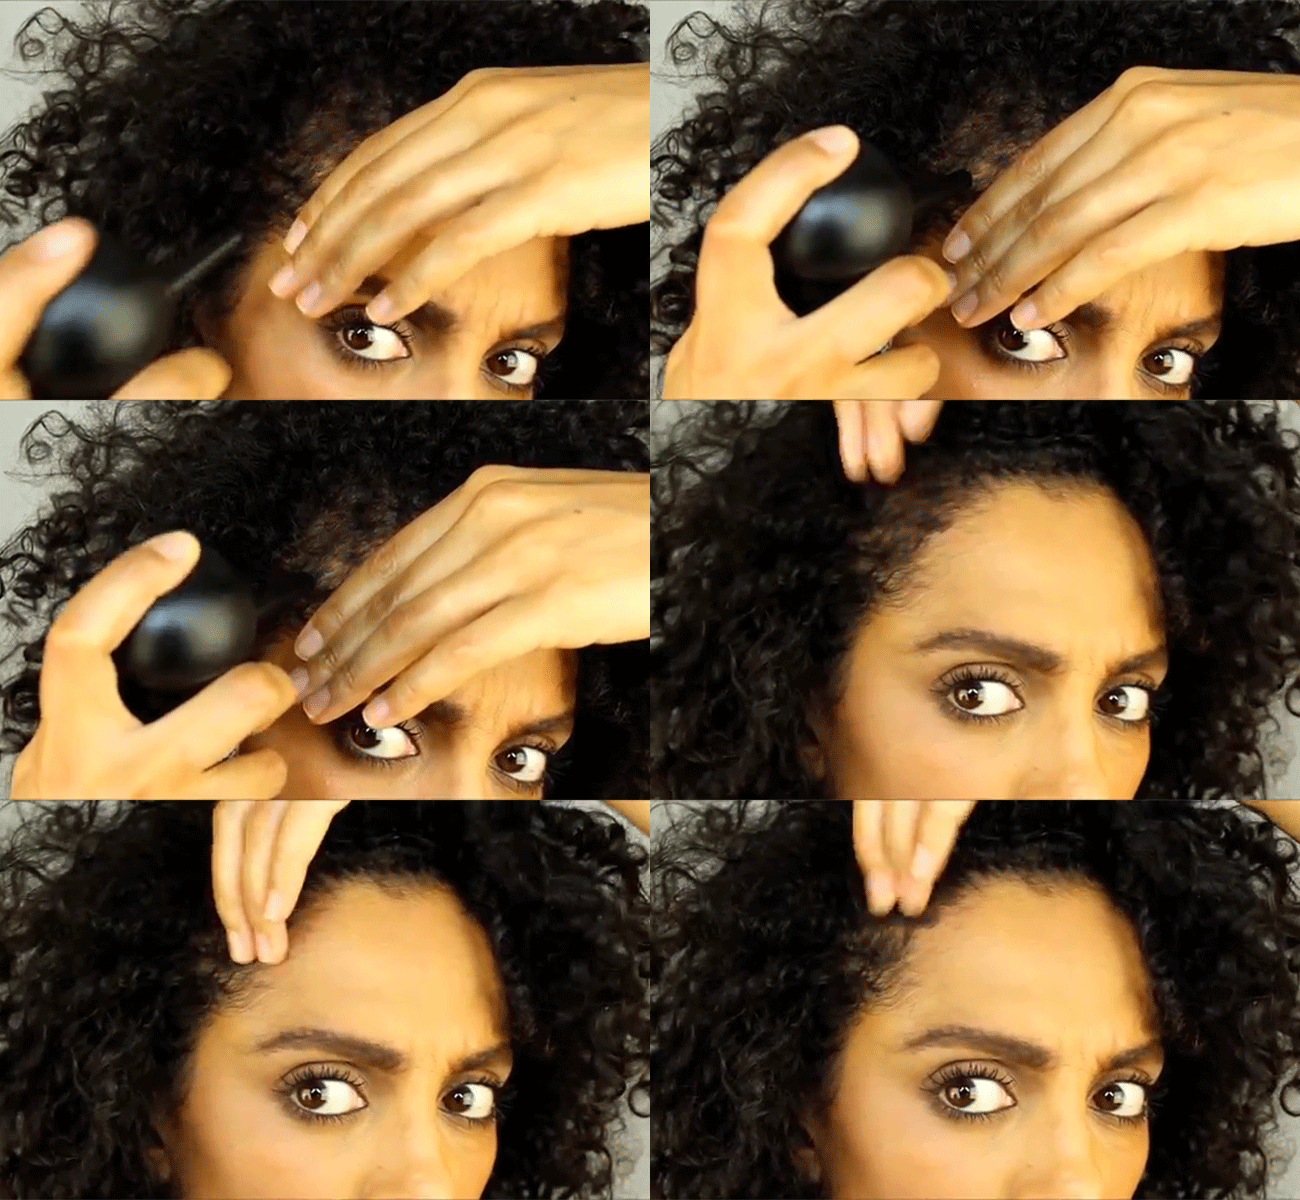
Toppik Hair Building Fibers
By far the easiest and my favorite method. Toppik is made of a colored keratin protein that will make your hair appear more full and thick. It’s great for bald spots, fine hair and alopecia. I purchased the Hair Building Fibers along with the Hair Perfecting Tool Kit. It’s so easy to use and provides long lasting results! Although, it’s not necessary to purchase the Perfecting Tool Kit, I find the spray applicator the most beneficial tool. It sprays the perfect amount in a targeted area.
Eyeshadow
A little more work but cost-effective. Using a dense crease brush along with an eyeshadow that matches your hair color, you can fill in your bald spots. By pressing and packing in the shadow, your bald spots will gradually disappear. Although this takes a bit longer, it is an affordable option that almost anyone can do. Bonus Tip: Use Ampro Protein Styling Gel to help darken the area on slicked back styles.
Do you have traction alopecia? Feel free to share your techniques on hiding it below in the comment section.
Follow Rochelle on Instagram @DiscoCurls & Subscribe to her YouTube channel, Disco Curls.
It never fails, at this time of year you can count on dry hair & skin. This weather makes me dig deep to find the best remedies to stay moisturized from head to toe. Sometimes the best solutions are found right in your kitchen. That’s why I wanted to share some of my favorite DIY winter hair & skin care masks.
Avocado Hair Mask
Avocado lovers rejoice! Your hair just gave you a high five…
Ingredients
- 1 ripe avocado (1/2 for shorter or fine hair”>
- 1 tbsp. honey
- 1 tbsp. olive oil
- A few drops of essential oil
You’ll also need
- a mixing bowl
- a fork and spoon
- a towel
- optional: a disposable shower cap
Directions
- Using a spoon, scoop out the avocado from its shell and place into mixing bowl.
- Add 1 tbsp. each of honey and olive oil to the mix.
- Add a few drops of your favorite essential oil. I love peppermint oil because of how it stimulates the scalp.
- Lastly, use your fork to break up the avocado and blend the oils together. Tip: Hate chunks? Try using a hand blender to smooth out the mask!
- Before applying be sure to start on damp, detangled hair. It’s perfectly fine to start with your co-wash first but keep in mind that you will need to rinse this out well. If you’re messy like me, I advise you to wear a towel around your neck.
- Apply the mix using your fingers from root to tip. You will quickly feel a difference in the softness of your hair!
- Leave the mask on for 20 minutes–add a disposable shower cap if you like–and continue with your wash routine.
Banana Coconut Hair Mask
Try this hydrating mask–it doubles as a tasty smoothie!
Ingredients
- 1 Banana
- 2 tbsp. coconut milk
- 2 tbsp. honey
You’ll also need
- a blender
- a strainer
- a disposable shower cap
- a mixing bowl
- optional: hair color applicator brush
Directions
- Begin by breaking up the banana and adding it to the blender. Then add 2 tbsp. each of coconut milk and honey. Blend the mix until smooth.
- Strain this mixture into a bowl. Unlike the avocado hair mask, I find this mask more difficult to remove, so don’t skip this step.
- Use a hair color applicator brush to apply as well as my hands, since this mask is also more liquid based.
- Wrap your hair up and apply a disposable shower cap. Leave the mask on for 20-30 minutes.Optional: Apply a heating cap over your cap to penetrate the mask deeper into your hair.
- Rinse the mask very well in shower and continue with your normal wash routine.
Banana Oatmeal Mask
Why should your hair have all the fun? Try this wonderful skin care mask that hydrates, gently exfoliates and soothes my dry skin.
Ingredients
- 1/2 banana
- 1/4 oats
- 1 tbsp. honey
- 2 tbsp. water
You’ll also need
- a mixing bowl
- a fork
Directions
- Using your fork, mash the banana until it has a creamy consistency.
- Add the oats, honey and water.
- Blend this mixture well until the oats are well absorbed.
- Apply the mask to your face, using the oats as a gentle exfoliator.
- Leave it on for 15 minutes.
- Using a wash cloth, gently remove the mask and rinse well.
- Follow up with your favorite moisturizer.
Subscribe to my channel, DiscoCurls, so you never miss another video!


