Search Results: Rochelle Masella
Do you ever feel like you need to transform your hairstyle but don’t know where to start? Well, it doesn’t always have to be a drastic cut or color to make a difference.
If you’re having a dull moment with your curls, don’t even sweat it–something as simple as moving the part in your hair can be a refreshing way to change up your appearance. Why not try these three ways to change your part for a different look?
The Center Part
It’s simple, effortless with a bohemian vibe. This look shows off more of the face by keeping a balanced section of hair on both sides. Think of an imaginary line starting from the center of your chin, through the center of your nose, between your brows and up into the hairline. That is essentially where you want your part to line up. However, with curly hair using a comb for precision can sometimes mess up a perfectly defined curl. Don’t be afraid to use your fingers to create the part and let them zig-zag naturally down the center to make it more modern and less precise.- Bonus Tip: Center parts don’t have to be boring, add a headwrap or Mia’s Part Art to dress it up.
The Off-Center/Side Part
It’s an easy way to give your curls a small boost of volume especially if they appear flat. A good rule of thumb is to keep the part in between the start of your brow and the arch. After the hair is washed and styling products have been applied, take individual curls and move them over to your preferred side. Letting them dry in this position will ensure that your part stays in place. A side part can also be a temporary fix to hide an area that is experiencing hair loss. If this is your normal part, try switching sides to make a subtle difference.
- Bonus Tip: To make your part more interesting, try glitter roots by mixing colorful chunky glitter to your hair gel and applying it with a hair color brush to the area.
The Extreme Side Part
It is a flirty, sexy way to wear your curls. If the hair falls slightly onto your face, it can even add a bit of mystery to your look. The extreme side part starts anywhere from the arch of your brow, to as far as your ear. It gives the crown major height and transforms your everyday curls into something more glamorous.- Bonus Tip: Enhance the look by smoothing edge control along one side of your hairline and adding embellished hairpins, a hair comb or flower.
No matter what hair part you try, it will make enough of a difference to keep you happy.
The beauty of it all is that unlike a haircut or hair color, it costs nothing to make these small changes and stumps others on what’s different about you.
What is your favorite way to part your hair? Which ones have been successful? Do you part your hair in a completely different way? We’d love to know about your experiences down in the comments.
Follow me @DiscoCurls on Instagram for more curly hair inspiration.
This has been one of my number 1 hair tools because it’s multi-purpose; I can reshape, detangle, deep condition, stretch and add volume to my curls.
Having naturally curly hair can have it’s ups and downs.
On the upside, it is beautiful and carefree. We even have the option to wear it straight and trick our friends. On the downside, we experience frizz, dryness, tangles and require a routine for our curls to look their best. Speaking as a fellow curly girl, I have cabinets that overflow with curl products and hair tools. However, if it came down to keeping only a few of these items, my Q-Redew would be near the top of my list.
What is the Q-Redew?
The Q-Redew is a handheld steamer that provides moisture back into the hair. In essence, it mimics the similarities that I get from humid temperatures except with more control. This has been one of my number one hair tools because it’s multi-purpose. I can reshape, detangle, deep condition, stretch and add volume to my curls.
How It Works
According to their website, “The Q-Redew disperses gentle warm steam to the hair which temporarily opens the cuticle of the hair allowing moisture to penetrate the hair strand. It is while the hair is warm and soft that you can safely manipulate the hair without damage. When used on dry hair the hair remains dry to the touch eliminating the hours needed to air dry.”
The set up is simple–after filling up the reservoir with distilled water, plug in the device and wait for it to heat up. Then, press the trigger to release the steam.
My 3 Favorite Ways to Use The Q-Redew
1. Enhance & Reshape
A few days post wash, my roots begin to stretch out making them appear straight while the rest of my hair is curly. This is because of my nighttime routine which consists of placing my curls into a pineapple while I sleep. The bends in my hair and any stretched areas are easily fixed by holding my Q-Redew near the root area. It shoots steam into the stretched areas causing it to shrink up and coil again. It took me a few tries to get it right but when I did, there was a nice boost of volume to the affected areas.2. Detangle & Stretch
By far my favorite way to use the Q-Redew because it cuts down on my shower time. On wash days, I normally spend up to fifteen minutes in the shower because I’m trying to gently detangle my curls. By detangling prior to my shower, I’m out in well under 10 minutes. The steam from the Q-Redew magically helps the prongs glide through my dreadful tangles. This same process can stretch the hair to provide the look of a blowout and prepare the hair for twist-outs, braid-outs, and more.By far my favorite way to use the Q-Redew because it cuts down on my shower time.
3. Deep Condition
Because the Q-Redew effectively opens up the hair cuticle, it can help deep conditioners penetrate even better. To deep condition, section the hair off and wave the steam over each section. Then, immediately smooth your favorite deep conditioner into the hair. Repeat on all sections and apply a shower cap for 20-30 min. Rinse and continue with your regular styling routine.Watch My Full Q-Redew Review
Here, I show a demo of my favorite ways to use the Q-Redew.
Do you use a steamer in your natural hair regimen?
This year for the first time ever, Pantone announced two shades as Color of the Year. Rose Quartz & Serenity.
” src=”https://diana-cdn.naturallycurly.com/Articles/tV_pjimage-16.jpg”>
Pantone Colors of the Year, Rose Quartz & Serenity, are calm pastels seen all over runways, home decor items, and in the beauty industry. In addition to their Colors of the Year, the introduction of 10 new Fashion Fall Colors, led by the blue family, represent tranquility, strength, and optimism. They range from earth tones like Potter’s Clay to vibrant colors such as Aurora Red. As the summer approaches, here are 10 ways to incorporate these future trends into your hair routine.
1. Protective Style
Don’t worry if you missed out on the Granny Grey hair that was so popular last year. This year, Sharkskin keeps the trend going. While I would never suggest destroying your curls with the coloring process, perhaps a safer route is incorporating the color with crochet braids. Check out this grey hair protective style by YouTube creator Jessica Pettway.2. Curly Haired Clip-In Extensions
Channel your inner fiery goddess with vibrant red hair extensions. Aurora Red is a bold red shade that can be achieved without the damage by using clip-ins. You can either try a two-toned burgundy red ombre weft or color the extensions yourself with a vivid color like Pravana’s ChromaSilk Vivids in Red.3. Demi Permanent Hair Color
One of Allure’s Best of Beauty winners for 2015 was eSalon.com, a website designed to create a custom hair color by asking a series of questions regarding your natural hair color and texture. For first-time clients, it’s only $10 to get a professional grade hair color custom-blended and delivered to your home. As a test, I signed up to see if they could come up with a color that would most represent Potter’s Clay, a rusty orange hue. After entering all of the details, I came up with the perfect version for my curls.
4. Hair Chalk
How could I not include a deep sea blue to represent the beauty of the ocean? Riverside is a cool but vibrant color that will definitely turn heads. One of the quickest ways to get such a color is by using Splat Temporary Hair Chalk in the shade Midnight Blue.5. Temporary Coloring
I recommend using this eyeshadow: Pomegranate Punk by Maybelline easily mimic Pantone’s Dusty Cedar, a faint rose-toned shade. Try a balayage effect by applying the shade to fingertips. Then press your thumb and index finger along small sections of curls and glide down. Watch as YouTuber Charmsie shows us exactly how to use it. For a color that will last a little longer than an eyeshadow, and won’t transfer onto your clothes, try a temporary color like Clairol Professional’s Jazzing Collection.
6. Glitter Roots
For a subtle party girl look, add glitter to your part. Bodacious is Pantone’s bright and playful purple for 2016, with hints of pink that will add the right amount of pop. Mix your favorite super hold gel with large purple glitter and apply to your part with an eyeliner brush.7. Glitter Pomade
The Spicy Mustard shade can be created by mixing a variety of gold and mustard yellow glitter with pomade and smoothing it onto a sleek style. Depending on the size of the glitter, it can be a flashy or subtle look that’s fun for hot summer girls’ night’ out.8. Colored Hair Sprays
A wonderful way to include several of the fall shades is to with colored hair sprays. Spray each section of the braid with a different color and let dry. Then braid the sections to reveal a beautiful rainbow effect. Achieve the essence of Pantone’s Airy Blue, Bodacious and Lush Meadow by trying Kryolan Color Spray shades in Light Blue & Purple and Green.9. Highlights
To include Pantone’s Warm Taupe, consult with your colorist to decide on the right base shade that complements warm taupe highlights. This will create beautiful multi-dimensional hair color.10. Wig
With a wig, the hair color possibilities are endless and you can change your look more often. Start on a virgin human hair wig and add your own color. A synthetic curly hair wig will save you the time and money and doesn’t require the long term commitment.Which one of Pantone’s Fall 2016 Fashion Colors are you dying to try this year?
[prodmod]My mother and I are similar in so many ways but also very different; she has a 4c curl pattern while mine is 3c. Needless to say, doing my hair was challenging–not for her, but for my tender head.
I am the daughter of parents from two different racial backgrounds; my father provided for us while my mother was the homemaker.
Thinking back to those days, I don’t know how she did it with five kids, three being in diapers at the same time. She cooked, cleaned, took us to school and sports practice, and made many of our clothes. She is the ultimate multi-tasker and meanwhile, I struggle to keep my plants alive.
As Mother’s Day approaches, I like to reflect on the lessons my mother has taught me. Some of them have been life lessons on things like how to be an independent woman, while others have been as simple as how to style my hair. At times, I’m sure she struggled to understand her children’s hair, but that didn’t stop her from passing down what she learned along the way.
Lesson 1: Detangling
My mother and I are similar in so many ways but also very different, one being our hair textures. She has a 4c pattern while I have 3c. Needless to say, it was challenging–not for her, but for my tender head as she ripped through my tangles and told me to “shut it!”
My sister and I feared the comb. What’s a wide-toothed comb? That didn’t exist in our home. If we were attending a birthday party or had to take a school photo, we were in for it. Luckily for my brothers, they kept their hair short–except for that brief Kid N’ Play moment a lot of us had in the ’90s.
Lesson 2: Protective Styling & Moisturizing
During this time, there was no such thing as lightweight curl creams or gel. All I needed to know was hair oil. “Grease ya’ scalp, gyal!”, she would tell me in her thick, Jamaican accent. The coconut oil of that time was not the organic virgin, unrefined coconut oil I use today. It was full of petroleum and mineral oil but it was readily available. Throughout this period, my mom gave my sister and I protective styles. Her traditional style included 4 sections of two-strand twists or braids. The look wasn’t complete unless we had bubble elastic hair ties and plastic barrettes on our ends. Our hairstyles were so tight, they gave us mini-facelifts.
Lesson 3: Product Junky-ism
As I got older, the styles changed and so did my mother’s hair. Her short Afro transformed into a shiny, Jheri Curl. The hair oil didn’t disappear, but new curl products had appeared in our house. The selection started expanding and made their way right into her bathroom. Care Free Curl Snapback Curl Activator gave all of our curls that desired shine but caused major shrinkage. Let’s Jam Shining & Conditioning Gel plastered our edges down and Luster’s Pink Lotion moisturized our hair. My mom was the ultimate product junky and that was a trait that she had proudly passed down to me.
Now in 2016, a regular comb isn’t used to detangle my fine curls.
Those extra-tight protective styles would destroy my edges today and most of the harsh ingredients from her old-school hair products aren’t found in my cabinet. Although I’ve had to modify the techniques and products she used, what I’ve learned remains the same. I may use a wide-tooth comb and massage my scalp with natural oils but those lessons are still valued. Even my refusal to stick to one product as my cabinet overflows with half-used curl creams. All in all, she did the best with what she had and just like my mother I plan to pass these lessons on.
Many of us have experienced an uh-oh moment with our hair color–especially when we try to do it at home.
The question then becomes, “How can I fix this?”
Chances are that if you did it at home, you may want to consult a professional to correct your mistakes. I spoke with Certified Redken Colorist Jenna Lynn Edmunds for her professional advice on this topic.
Color correcting curly hair
The oval shape as well as the curving of a follicle is what creates curly hair. However, the blessing of having curly hair comes with the curse of dryness. Edmunds says, “Curly hair tends to be a bit drier than straight hair due to the shape. Natural oils have a harder time making their way down the shaft. With that in mind, whenever we color curly hair we want to add as much hydration and shine as possible.”
Corrective Recommendations
Because curly hair requires more nourishment, choosing the right formula to color is essential to the health of your curls. “I always recommend glazes–demi permanent colors–versus a permanent color. We are able to deposit the desired tones, eliminate unwanted tones all while improving the condition of the hair. For example, if the hair is too warm–yellow or orange tones–we would apply a cool tone glaze–violet or blue.”When asked about at-home fixes, Edmunds adds, “You can also use a color depositing shampoo at home to achieve this effect but the result will be very subtle compared to a professional glaze.” She also recommends highlighting as another corrective service for color that looks flat and lacks dimension.
“With highlighting we are able to fix several issues in the hair. We can brighten, breakup banding and achieve the dimension that curly hair needs to appear healthy and shiny. Stripping all the hair is very damaging and often too harsh for delicate curls. By gently highlighting the hair, we can achieve our desired look and keep the integrity of the hair in tact.”
When the salon isn’t an option
Although seeing a professional is recommended, some may not make it to the salon to fix the problem. The reasons differ but include factors such as the price, not being able to get an appointment or just not having the time. If the mistake is minor or just requires weekly maintenance, beauty supplies offer at-home glosses and shampoos to refresh and tone down brassy or flat color.
-
John Frieda Colour Refreshing Gloss, $12.99 (available at Ulta“>
-
Joico Color Endure Violet Shampoo, $33.99 (available at Ulta“>
Both of our channels focus on care for finer, low density curls. It was an interesting way to see how different styling products worked in our hair and to learn any new tips and techniques.
In an effort to try new things, YouTube creator Rocio Mora (@RisasRizos“> and myself (Rochelle Masella, @DiscoCurls“> swapped curly hair routines as an experiment. Both of our channels focus on care for finer, low density curls. It was an interesting way to see how different styling products worked in our hair and to learn any new tips and techniques. More than anything, we wanted to try our holy grail products on each other since they were so different.
Our wash routines were fairly similar. To cleanse, Rocio’s used the DevaCurl No Poo Decadence Zero Lather Ultra Moisturizing Milk Cleanser to gently clean her scalp and curls. I used Carol’s Daughter Sacred Tiare Sulfate-Free Shampoo. Next, we both followed up with One Condition Decadence Ultra Moisturizing Milk Conditioner to nourish and soften our thirsty strands.
My Styling Routine on Rocio
Many of my subscribers know I’m a big fan of volume so I really wanted to add that element to Rocio’s look. After Rocio’s hair was cleansed, I began by spraying in a lightweight leave-in conditioner. OGX Moroccan Argan Creme Sheer Hydration Leave-In Mist moisturizes without weighing down my curls.
Next, I blended equal parts of my holy grail product, Samy Fat Hair Thickening Creme with the DevaCurl Styling Cream into my hands and raked it through Rocio’s curls. If certain sections of her curls required more of this mixture, I added more. My secret is to saturate the curls with product so when I begin to scrunch, they make a ‘squishing’ noise.
After lots of scrunching, I parted Rocio’s hair in the direction I wanted it dried. Then I began diffusing. Normally, I air dry my curls but for the sake of time and more volume we used the Deva Dryer with the DevaFuser attachment. What’s unique about the DevaFuser is that the shape is similar to a hand cradling so it manages to keep the definition while providing lots of volume at the root. I diffused her hair 60-70% and then let it air dry.
When Rocio’s hair was about 90% dry, I had her flip her head over and started scrunching her curls. Then, she flipped her head back and shook out the root with my fingers. She had major volume and I was one proud mama. As a finishing touch, I added a little bit of my Toppik Hair Building Fibers around her hairline to give her the appearance of even fuller hair.
Rocio’s Styling Routine on me
Since Rocio loves definition, she brought her holy grail products to the table and I was thrilled to experience something different (and not do my own hair”>. Like myself, she likes to start on soaking wet hair before applying her products. She used the Kinky-Curly Knot Today Leave-In Conditioner to coat the top half of my hair and then raked the rest through my ends. Then she had me flip my head to both sides as she scrunched it.
Next, Rocio raked a large amount of the SheaMoisture Curl Enhancing Smoothie–enough to scare me–from the middle of my head down to my ends. Her technique is to use the majority of it on the bottom half and any remaining to the top half to not weigh down the root. By using a larger amount of the cream, she is able to rock her defined curls for a longer period of time.
Then, Rocio proceeds to have me flip my head over and scrunch. One of the major differences in our techniques is that she didn’t create a part–she simply had me flip my head back and wherever my hair landed was how it would dry. Using an old t-shirt, she gently dried my ends to absorb some of the moisture.
To speed up the drying process, Rocio used a blow dryer with her travel diffuser. She first applied Tresemme Thermal Creations Heat Tamer to protect my hair and diffused on the lowest heat setting. When my hair was about 90% dry she released the cast by scrunching my curls. She also gently massaged my scalp to provide some lift.
Lastly, she sprayed in her SheaMoisture Yucca & Plantain Anti-Breakage Root Lifting Styler at my root and massaged it in. Can I just say, it smells amazing! My final results were gorgeous. My curls were beautifully defined, soft and springy!
Show our channels some love!
Subscribe now so that you never miss another video!
Rocio Mora | RisasRizos: YouTube ♥ http://youtube.com/RisasRizos
Rochelle Masella | DiscoCurlsTV: YouTube ♥ http://youtube.com/DiscoCurlsTV
[prodmod]Even with naturally curly hair, we can get the itch to change up our style. Sometimes those styles require more than an overnight wet-set or wash and go. Using heat styling tools can be beneficial to speed up drying, straighten, curl and smooth hair into glamorous waves and sleek styles. However, everyday and even occasional use can cause wear and tear on these hot tools. Learn these simple hacks to preserve the life of your heat styling tools.
Clean your blow dryer’s grate
Some of you may be thinking, “Why would I need to clean my blow dryer?” but continued use of a blow dryer can cause build-up in the grate over time. The grate (normally located at the back”> can collect dust, debris, and hair. This causes it to become clogged, and when that happens, it can cause your blow dryer to overheat (and possibly break”>. Proper cleaning of the grate can increase the longevity of your blow dryer.
How to clean the grate
First, be sure to that your blow dryer is unplugged. Remove the grate off of your blow dryer, along with any hair and debris. Do this using either tweezers, a cotton swab, or a microfiber towel. Rinse with hot water and let it dry 100% before reattaching. If you have a stubborn grate that can’t be removed, try using a vacuum nozzle attachment (while the blow dryer is unplugged”> to suction up any build-up.
How often to clean your blow dryer
This will all depend on how often you use your blow dryer. Professional hair stylists will clean more often than someone who diffuses their curls once a week. Some dryer brands urge you to clean after every use however, most people probably won’t do that. Professionals using it several times per day might consider cleaning their dryers once a week, while the day to day user once per month. If you rarely use your dryer, you can probably get away with cleaning it every few months.
Remove the sticky residue from your flat iron
You may notice that your flat iron or curling iron has a smudged, sticky, or cloudy appearance after a few uses. Using heat protectants, hairsprays and other styling products with hot tools can cause product build-up and gunk on their surface. Build-up can create a rough surface that makes the tool harder to glide down the hair resulting in possible hair breakage. It can also transfer the buildup back onto the hair.
How to clean your flat iron & curling iron
Hot tools like flat irons and curling irons can be cleaned easily by wiping down their surface with a clean, damp cloth and a little isopropyl alcohol. If the buildup is more stubborn, you can scrub it off with a used toothbrush. White vinegar is another alternative to alcohol and can be found in your kitchen cabinet. Be sure to let your tools dry completely before plugging them in again.
The best time to clean these tools is when they are still warm. Unplug your irons and let them cool down until they are safe enough to touch. This will help the build-up come off easy. If you use your hot tools everyday, weekly cleanings will help remove debris. For weekly or biweekly use, once every month or two will do the job.
Be honest!
How many times have you cleaned the grate of your blow dryer? Let us know down below in the comments.
The struggle to grow back my edges has been a battle; for the last couple of years, I’ve paid special attention to them.
The first question I had to ask myself was, “How did they get so thin in the first place?” I didn’t need a dermatologist or trichologist to tell me the answer because it was simple. I have Traction Alopecia.
As a young adult, I experimented with color, relaxers, braids, tight ponytails and bleach. In turn, it made my fine, curly hair weak and damaged. It started breaking off, and rather than doing a big chop, I wore a sew-in weave to transition. I left out my hairline area and a horseshoe part in the front of my head (for blending purposes”>.
However, my weave was a blessing and a curse. It was a blessing because every time I would get a ‘touch up’ I saw massive growth. My hairstylist was great about giving me frequent trims, removing build-up, and deep conditioning my hair before installing a fresh one. The curse came for not giving my hair a break. I was persistent on wearing a weave until all of my dead ends were gone–big mistake. The tension and weight of my extensions slowly destroyed my edges leaving me with long hair and a disappearing hairline.
3 Edge Growth Remedies I’ve Tried
Although the health of my hair has dramatically improved, I’m still on the hunt for the perfect edge growth remedy. Here’s what I’ve tried so far…
Organic Root Stimulator Fertilizing Serum (ORS”>
To this day, I haven’t found anything to be as effective as this formula. This lightweight serum stimulates the scalp, promotes growth and exfoliates clogged follicles. One of the biggest benefits was that I could apply it twice a day without weighing down my curls. The other was that, it works! I saw edge growth quickly and the effects lasted months after I stopped using it.
The ORS Fertilizing Serum contains powerful extracts from garlic, horsetail, nettle, aloe vera and stimulating paprika extract. Buyer beware: Wash your hands after applying it! It does sting if you get it near your eye area (first-hand experience”>.
Essential Oils
Sometime last year, I watched a YouTube video from SunKissAlba about hair growth. In the video, she mentions adding certain essential oils to her hair products. It sounded like a genius idea, so I started doing it too. Some of my favorite essential oils to include in my shampoos, conditioners and leave-in conditioners, are:
- rosemary
- peppermint
- tea tree oil
These essential oils are effective at stimulating the hair follicles and increasing blood flow to the scalp.
Scalp Massages
Every night before bed, I treat myself to a 3-5 minute scalp massage. It increases blood flow to the scalp; normally I include an additional form of treatment while I do them. For a few months, I massaged the SheaMoisture Jamaican Black Castor Oil Strengthen Grow & Restore Hair Serum on my scalp. But because I consider myself an at-home chemist, I’ll add some drops of rosemary and peppermint for extra stimulation. I’m currently also trying Tropic Isle Living Strong Roots Red Pimento Hair Growth Oil as another alternative.
Watch: Edge Growth Update | Tropic Isle Living Red Pimento Hair Growth Oil
What are your favorite remedies for edge growth? Share with us down below in the comments.
Warmer weather= getting my hair out of my face (in the most stylish way, of course”>.
Plus, it’s always nice to switch up my look with something edgy or something whimsical. Half-up, half-down hairstyles are perfect on naturally curly hair because with little effort they can become very elegant. I’ve created 2 simple styles that work great on stretched curls and can be created within minutes.
1. Half-Up Bun
The first is a half-up bun hairstyle that is a chic and popular look. It can be altered to your specific tastes by changing the size of the bun or by the way you part your hair.
Step 1: Start on stretched hair. (I like this look on 3rd or 4th day hair.”> Using a comb, create a horseshoe section at the top of your hair.
Step 2: Apply your favorite edge control or pomade to the sectioned area. CURLS Blueberry Bliss Curl Control Paste is an excellent choice for smooth edges with a hint of shine. Using a small amount of the control paste, smooth it along your hairline then use a brush with boar/nylon bristles to polish the style.
Step 3: Secure the section with a hair elastic to create a half ponytail. My favorites are Goody Ouchless Elastics because they don’t pull or snag my hair. Next, twist the ponytail and wrap it loosely into a bun. Use bobby pins to secure the bun.
Step 4: (Optional”> Loosen up the bun by pulling with your fingers to create a more exaggerated style.
2. Twisted Half-Updo
This style is a twisted half-updo that is soft and ethereal. By adding just a few 2-strand twists you will have a bohemian look that can be considered casual yet elegant.
Step 1: Section stretched hair horizontally from one ear to the other. Clip the back half of your hair so it doesn’t interfere with the front section.
Step 2: Create 5 vertical sections on the top half of your head. For a little added shine you can add a small amount of jojoba oil or the Curls Blueberry Bliss Curl Control Paste for texture. For each section, begin a standard two-strand twist. Repeat until all sections are finished.
Step 3: Loosen up each twist by using one hand to hold the ends and the other to pull 1 strand of the twist upward gently. This will help create a softer looking twist.
Step 4: Take down the back section of your hair and begin gathering all of the twists over the crown. Secure the twists with bobby pins or use an embellished barrette to dress up the look.
Step 5: To create a more whimsical style, use your fingers to pull apart and loosen up the twists.
Which of these half-up, half-down hairstyles is your favorite?
Let us know down below in the comments.
[prodmod]
Follow me on Instagram @DiscoCurls
Heatless stretching is a damage-free way to add length or volume to your curls.There are certain methods in my hairstyling that will make my curls to appear more stretched and elongated. Sometimes, it’s due to the styling products and tools I use; other times it’s just my everyday routine. I have found that my fine 3C curls stretch very easily so I’m especially particular with my techniques. They change from mild to moderate because on wash day, I like to keep my curls tight and let them loosen up as the days pass. My day 1 stretching technique will be totally different than day 4. So as my curls stretch, so do my techniques.
1. Clipping Technique
On day 1, I’m focused on keeping my curls defined without a ton of shrinkage. Duckbill or double prong clips can be used to provide a very mild form of stretching. It’s an easy way to keep the curls you want stretched while letting the others shrink.
After washing my hair, I like to use my Jane Carter Curl Defining Cream to style. This moisturizing cream keeps my curls defined and helps fight shrinkage. Made with shea butter, avocado and jojoba oil it leaves my curls soft and not crunchy. I start by raking this throughout my hair and scrunching my curls. Then, I like to add double prong clips randomly along my ends to maintain the length while it drys. The finished look is elongated curls that are shiny and defined without frizz.
2. Pineapple Technique
The pineapple technique is by far the easiest form of stretching for me because it is a normal part of my bedtime routine. At the end of day 1–and for the remaining days of the week–I do this to preserve my style. I start by placing all of my curls in a loose ponytail at the front of my head and secure them with a smooth elastic or scrunchie. Even though it is mild tension, the ponytail stretches out the roots and provides length.
3. Braiding Technique
Braiding is an effective method of stretching, especially if I’m looking to loosen up my curl pattern. It’s also a great prep for any other heatless styles like flexi-rod or perm-rod sets.
After day 3 or 4 when my hair has naturally stretched, I part my hair into 4-5 sections and begin braiding. To intensify the stretch, I like to pin my braids against my scalp using bobby pins. Normally, I don’t add any product to my braids but I love adding CURLS Blueberry Bliss Curl Control Paste along my hairline for smooth edges in the morning.
To protect against friction and keep my braids in place, I wear a satin scarf to bed. In the morning when I take down my braids, I’ll use a tiny amount of jojoba oil to separate. Lastly, I gently shake out the style to reveal my beachy waves.
[prodmod]
Watch my video
Follow me on Instagram @DiscoCurls
If you didn’t know by now, NaturallyCurly has a Q&A section that many readers can leave questions to their unsolved curl mysteries. For most textured hair people, having multiple curl patterns can be confusing–especially when it comes to how to style and which products work best.
Question
“Help! My hair is several different types and I don’t know how to style.
I have some hair that is wavy, some small loose curls, and some that have tight curls. I don’t know how to style it because it is poofy and it lacks any type of shape. My roots are very straight and smooth. I’ve perfected straightening and curling it and I love it like that but I’m tired of frying it and it takes so much time to do. I want to embrace my curls but I don’t know how!! I try “plopping” and using t-shirts to dry my hair which helps but obviously not enough. HELP.” -user Kelly.Chris
Answer
According to Shai Amiel, a Los Angeles based curly hairstylist, “The best way to bring out the bounce of the natural curl is by eliminating some of the dead ends that weigh the hair down. I’d definitely recommend cutting some of the dead ends. The shorter you go the more body and bounce you will get.”
When asked about his favorite products and styling techniques he said, “I’d use a light hold gel to give the hair some tightness in order for you to maximize the curl pattern. For best results, diffuse curls upside down. It’s best to trust a curly hair specialist to cut it properly and treat it to bring back some elasticity that has been compromised by excessive straightening and color.”
Question
“Wavy or Curly or Both?
My hair is a combination of S shape waves and also a variety of curls that coil around sidewalk chalk, a sharpie, and a straw. Should I look for products for wavy hair or curly hair?” -user azpoochAnswer
Not all products labeled for wavy or curly hair are made the same. The key is to look at the ingredients listed. Because your hair has different textures some areas may require more moisture than others. However, certain products made for curly hair may contain heavier oils and butters that can weigh your hair down even more. Using products that contain more lightweight ingredients will be your best bet. Gentle sulfate-free shampoos will cleanse without stripping the hair. Follow up with a moisturizing conditioner and style with lightweight gels and creams.
Briogeo Be Gentle, Be Kind Green Tea Shampoo
- Sulfate-free cleanser that is suitable for all hair types
- Enriched with Green Tea antioxidants, B5 & E vitamins
- Paraben and silicone free
DevaCurl One Condition
- A rich and creamy daily conditioner that delivers maximum hydration
- Key ingredients include rosemary, lemongrass, olive oil and hops
- Free of sulfates, parabens, silicones, paraffin, mineral oil, phthalates and DEA/MEA/TEA
DevaCurl Light Defining Gel
- A light-hold moisturizing gel that provides definition while preventing frizz
- Key ingredients include chamomile, wheat and soy proteins
- Free of sulfates, parabens, silicones, paraffin, mineral oil, phthalates, alcohol, DEA/MEA/TEA
Do you have a question for myself or the NaturallyCurly community? Post it in the ASK section now.
Photos courtesy of franckreporter (Getty Images”>
Primarily thought of as a male disease, hair loss affects more women than one would imagine. According to the American Hair Loss Association, women actually make up forty percent of American hair loss sufferers. Any form of major hair loss is considered alopecia. The most common form of hair loss is androgenetic alopecia; this form of pattern baldness is found in both men and women.
It was first believed that the hormone testosterone was the leading factor in hair loss, but within the last few decades scientists have discovered that it’s the androgen hormone DHT that is the biggest contributor to hair loss.
Within the last few decades scientists have discovered that it’s the androgen hormone DHT that is the biggest contributor to hair loss.
What is DHT?
The American Hair Loss Association describes Dihydrotestosterone, DHT, as a derivative of the male hormone testosterone. Testosterone with the help of the enzyme Type II 5-alpha-reductase converts to DHT.
When the levels of DHT increase, it shrinks and damages hair follicles making it difficult for healthy hair to survive and grow. Even with the lower levels of testosterone that women carry, DHT can still affect hair growth.
Can your shampoo save the day?
The FDA has only approved one over the counter medication that is considered effective in fighting women’s hair loss. Minoxidil, also known as Rogaine, is a topical or foaming solution that when applied to the scalp is used to stimulate hair growth in both adult men and women.
Many brands make shampoos now that claim to include key ingredients to help with hair loss by reducing and blocking DHT.
The benefits of some of these shampoos are that they may contain DHT blockers, increase blood circulation to the scalp, increase hair growth, remove scalp fungus and clear dead skin cells from the scalp.
The commonality in the majority of these shampoos include the use of saw palmetto nettle extract, pumpkin seed oil, azelaic acid and B-Complex vitamins like biotin and vitamin B5 (Pantothenic Acid”>. Each ingredient contains its own unique benefit to the health of the hair.
Pura D’or Organic Argan Oil Anti Hair Loss Shampoo
$24.99 on Amazon
- gentle, color safe, and organic formula that contains 12 advanced DHT blockers to stop premature hair loss and stimulate follicles.
-
reduces excessive shedding and beneficial on thinning hair and receding hairlines.
-
free of SLS, Parabens and other harsh chemicals.
- contains a B vitamin complex, biotin, nettle extract, saw palmetto, he shou wu (Fo-Ti”> and other natural ingredients to help strengthen hair strands.
Regenepure DR Doctor Recommended Hair Loss Shampoo for Hair Growth and Scalp Treatment
$25.00 Amazon
-
sulfate-free shampoo, free of harmful chemicals parabens and SLS
-
contains 1% ketoconazole, a powerful anti-fungal that is often used for dandruff treatment and help hair regrow.
-
packed with other beneficial elements, including saw palmetto extract, vitamin B6 and zinc oxide. Niacin, caffeine and linoleic acid, which stimulate the scalp, while emu and jojoba oils keep the skin supple and rejuvenated and help in nourishing the scalp by turning dry and damaged hair into fuller and thicker hair.
What shampoos have you found effective in reducing DHT?
photos courtesy of hellos8 (Getty Images”> and Pura D’orI have always wanted to see what my hair would look like at this length. I love that I can switch from longer to shorter overnight.
Have you ever wanted to see what your hair would look like at a shorter length? Curious to see what you’ll look like with the big chop?
Here is a temporary solution that can be done overnight and without heat. I personally have always wanted to see what my hair would look like at this length and I love that I can switch from a longer to shorter style. This style will more than likely work best on medium hair lengths with layers. However, I found that using perm rods and flexi rods in different sizes gave me a fabulous tapered Afro.
What You’ll Need:
- Salon Care Curved Perm Rods Mini Red ⅛ Inch 3mm
- Salon Care Curved Perm Rods Long Yellow 5/16 Inch 5mm
- Hot Tools Pro Curls Spongy Rod Rollers 5/8 Diameter, 7 3/4 Long
- Styling comb
- Sectioning comb
- Sectioning clips
- Bobby Pins
- CURLS Blueberry Curl Control Paste
- CURLS Goddess Curls Botanical Gelle
- Silk scarf (for overnight sets”>
Prep (the night before”>
1. Start on either freshly washed or dry hair (I started on dry hair to make sure it dried faster”>.
2. Begin at the nape of your neck, making a small horizontal section.
3. Add a dollop of the botanical gelle and rake through the section making sure to clear any tangles.
4. Split each section into 3 or more ½ inch sections.
5. Wrap and secure each section using the smallest perm rods. Repeat this process for the first 3 bottom rows.
6. Increase the size of the perm rod as you get higher. When you get to the crown, switch to flexi rods or large perm rods (to create looser curls”>. After all rods are installed, wrap your head in a scarf and sleep in them overnight or until 100% air dried.
Takedown + styling (the next morning”>
7. The next morning, take down your scarf and begin to unravel each perm rod. You will find that the curls in the perm rods will be extra tight and close to the scalp. The curls left in the flexi rods will be looser and together this will create a tapered look.
8. Using your fingers, begin separating each curl with a small amount of the control paste. Be sure to separate each curl 2 to 3 times to ensure lots of volume.
9. Use a lifting comb to add more volume at the root. To create the look of a tapered afro, pick lightly on the bottom half so that the curls stay tighter to the scalp.
10. Pin any loose, longer curls that are out of place. Lastly, use a larger pick at the crown to create the illusion of a tapered haircut. Depending on the length and type of haircut you have, bobby pins will probably be necessary.
Watch the full tutorial here
Subscribe to my YouTube channel DiscoCurlsTV (and thumbs up if you liked the video”>!
[prodmod]Try this and let us know how it turns out in the comments below.
You don’t have to limit your fun flirty looks to Valentine’s Day
Try out this heatless flexi-rod set on your curls! My fine 3c curls had no problem taking on this style–it was so easy to do. Best of all, it doesn’t call for using damaging heat tools. The end result will leave you with soft, fluffy curls that will demand all the attention in a room.
[prodmod]
What You’ll Need:
- 1 to 2 packages of flexi rods (I used Hot Tools Pro Curls Spongy Rod Rollers 5/8 Diameter, 7 3/4 Long”>
- an elastic band
- a comb
- a pick
- a spray bottle of water
- your favorite edge control (I used Curls Blueberry Bliss Curl Control Paste“>
Directions
This works best on curly hair that is finer in texture.
1. It’s important to know that less is more for this style to be successful–washing and styling factor into this. After washing my hair, I make sure to use lightweight products in my styling process. In the days leading up to this style, I used:
- leave-in conditioner: Curls Quenched Curls-Curl Moisturizer
- styling products: Samy Fat Hair Thickening Cream and Curls Creme Brule Styling Cream.
2. I let my hair air dry and add absolutely no products to my hair for the next couple of days.
3. By the 3rd or 4th day, I gently detangle any knots until I serve up Diana Ross realness! I find that when my hair dries, my stretched look is flat and the final look doesn’t come out the same. That’s why I can’t stress it enough, less is more!
4. Using my comb, I section off the top half of my hair and secure it with my elastic. Next, I make 1 inch sections and spray it with water. I also run my comb through again to make sure that it’s not tangled.
5. Using a flexi-rod, I wrap each section from the ends up to my roots and bend them to secure. Repeat this process on the entire head. Lastly, wrap a silk scarf over the flexi-rods and leave on overnight.
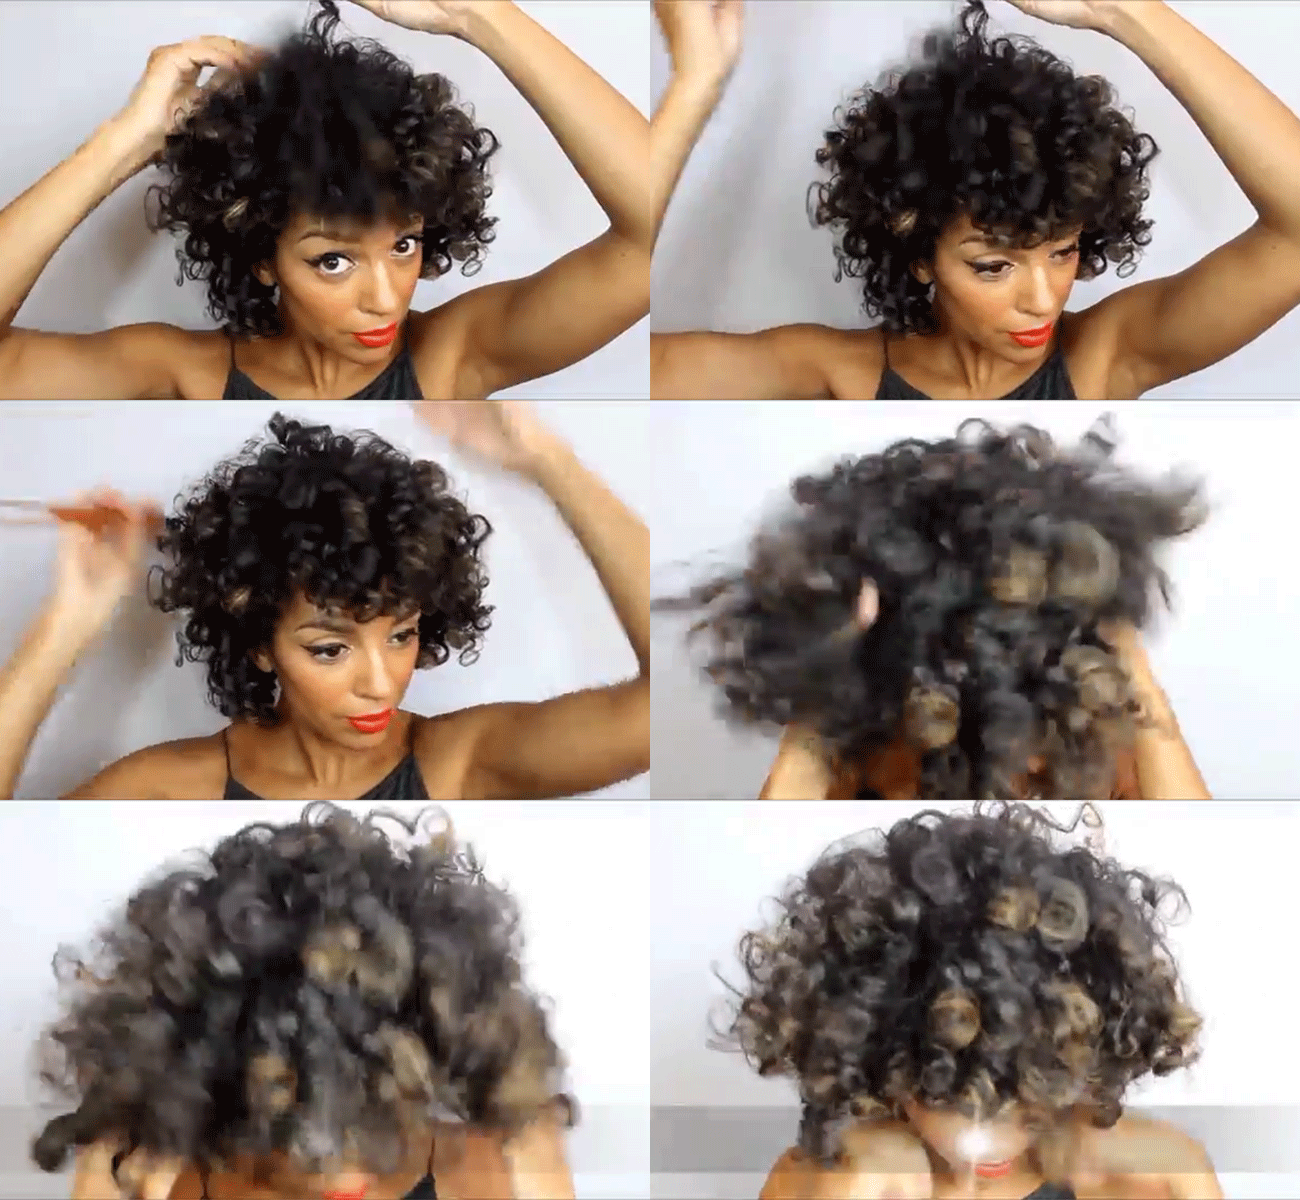
6. In the morning, I remove my scarf and unravel each flexi-rod. Using my Blueberry Bliss Curl Control Paste, I add the tiniest amount to help separate my curls and give it a more piecey look. Don’t be afraid to separate each curl a few times to make it more natural.
7. I use a pick at the roots to fluff and add extra volume. 8. Lastly, I use my hands to gently shake out the roots. This makes my hair softer and loosens up the curl pattern. You can also spritz your curls with a flexible hairspray but I didn’t feel the need to.The final result
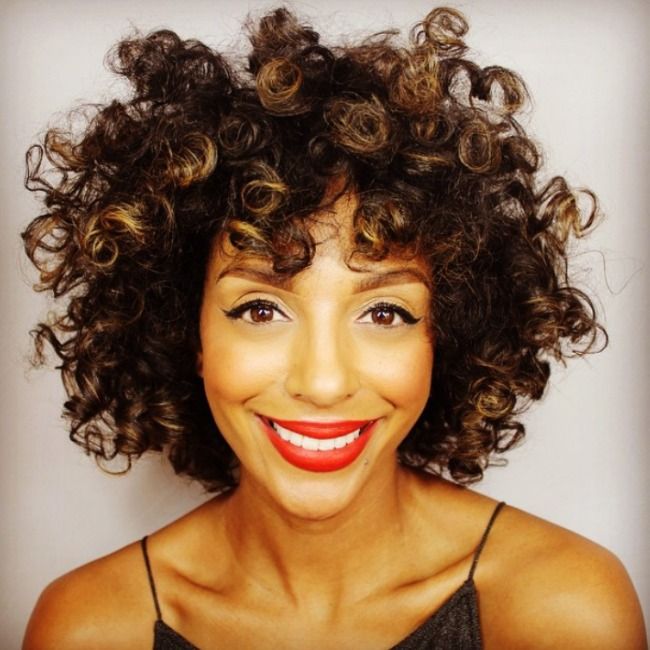
I have a head full of soft, beautiful curls that will make your date do a double take! Complete the look with a classic cat eye and a bold red lip that will be sure to have all the attention on you.
Watch my video
Subscribe to my YouTube channel, DiscoCurls | Follow me on Instagram: @discocurls
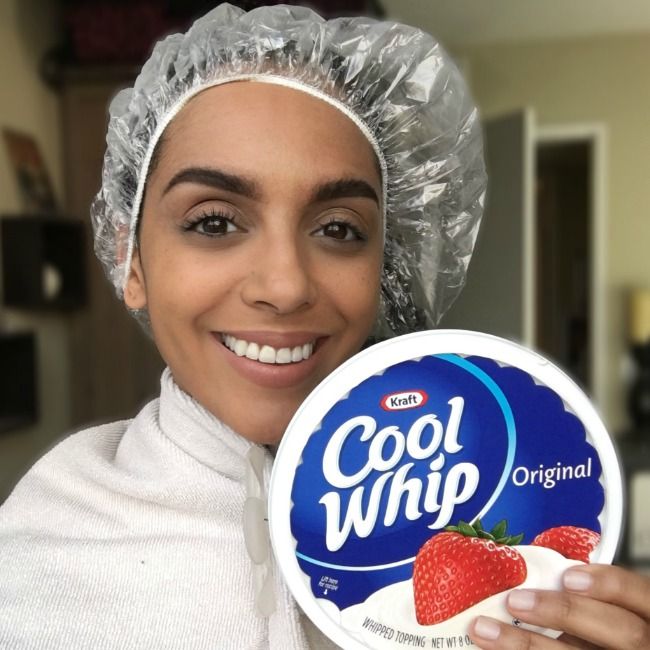
[prodmod]On my quest to discover new and interesting beauty products, I’ve been introduced to something I never imagined I would put in my hair. I’m a big fan of multi-purpose products so when I heard that you can use Cool Whip as a deep conditioner, I jumped on the experimental train. I’ll try anything once and this sounded fun and easy.
I didn’t necessarily mix anything together to make it a true DIY–the simple fact that I’m using something from the kitchen made it enough for me. I’ll try anything once, and this sounded fun and easy.
Although Cool Whip contains ingredients that I wouldn’t necessarily consume, it does contain coconut and palm kernel oils that are great for softening and adding shine to the hair.Although Cool Whip contains ingredients that I wouldn’t necessarily consume, it does contain coconut and palm kernel oils that are great for softening and adding shine to the hair. According to LiveStrong, both coconut & palm kernel oils contain lauric acid (a type of saturated fatty acid”>. There is a higher amount of lauric acid found in coconut oil, which aids in strengthening hair strands.
Keep in mind that these are in the hydrogenated form. Plus, there are many other ingredients involved, so you won’t necessarily get all of the amazing benefits that you would get from using these oils in their natural state. However, for the sake of an experiment I still wanted to see what the hype was all about.
What you will need
1 cup Cool Whip (generic store brand is ok, but I went with the original”>a towel
a disposable shower cap
How to apply to your hair
- Using your measuring cup, measure out 1 cup of Cool Whip (1/2 cup for shorter hair”>.
- Wrap a towel around your neck to avoid a mess on your clothing.
- Using your hands apply the Cool Whip on dry or wet hair from root to tip.
- Once your hair is saturated, place your disposable shower cap on and leave on for 15-20 minutes.
- Rinse well and then continue with your normal wash routine.
My experience
It was strange to apply cold, Cool Whip to my curls. However, I loved that the mask wasn’t messy and stayed in place. After 20 minutes under the disposable shower cap, I felt my hair and it was noticeably softer. It was very easy to rinse out, unlike some of the other DIY masks I’ve tried in the past. I didn’t feel the need to use a shampoo so I just co-washed with my conditioner.
My results
It gave me softer curls that were shiny but lacked moisture.Unfortunately, the cons outweigh the pros on this mask. My hair did feel noticeably softer but it didn’t provide a lot of moisture to my curls. It also lacked slip. It wasn’t easy to slide my fingers through my hair.
Also, applying cold Cool Whip on my hair did make the experience a little less enjoyable. The only real benefit I noticed from this was that my hair did look a bit shinier but that could have been due to the conditioner I added in my co-wash.
It wasn’t my favorite hair mask, but still fun to experiment with nonetheless. I’d be very interested to see if trying this on wet hair or using Creamy Cool Whip next time would make a difference. Perhaps, those with naturally straight or wavy textures will have better luck than me. I think I’ll stick to my all natural DIY hair masks in the future.
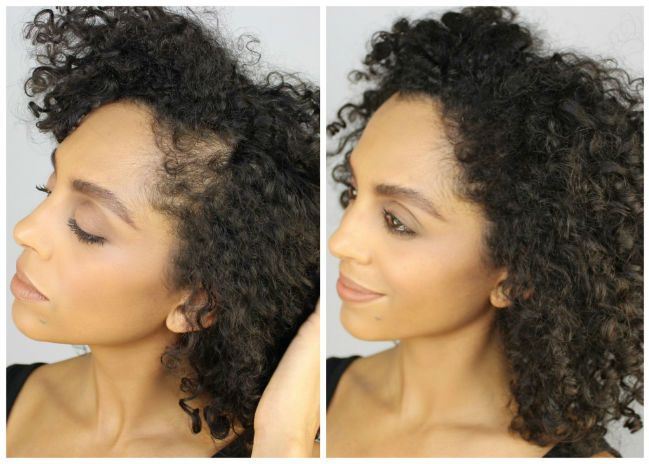
What is traction alopecia?
According to the American Hair Loss Council, traction alopecia is the loss of hair caused by physically stressing and putting tension on the hair. Certain hairstyling including hair weaving and cornrows that were done too tightly can cause this type of hair loss.
My story
Traction alopecia isn’t something I always dealt with but I think it’s important to understand how and why it happened to me. For a long period of time, I went through a phase where I didn’t love and accept my curls. It was no one’s fault but my own. My family and friends never made me feel like my hair should be straight. I was influenced by outside media outlets to conform to the straight hair standard. I’ve experimented with relaxers, the hot comb, blowouts, etc…You name it, I have tried it.
Fast forward to the years of adding color and bleach to that mix. My curls were non-existent and a lot of my hair eventually broke off. There was no big chop for me. I chose to transition by masking my hair in a sew-in weave. “What better way to grow out the damage?” I thought.
The majority of my hair would be braided and not touched by heat or any other outside elements. Here’s where I went wrong: My curls, to begin with, are fine in texture. Damage from relaxers, color, bleach and heat made the texture even worse. The weight of my hair extensions plus the amount of time I wore them for (7 years!!”> equaled my current struggle with traction alopecia.
While I’m not completely free from this condition, I’ve found a couple ways to hide it.
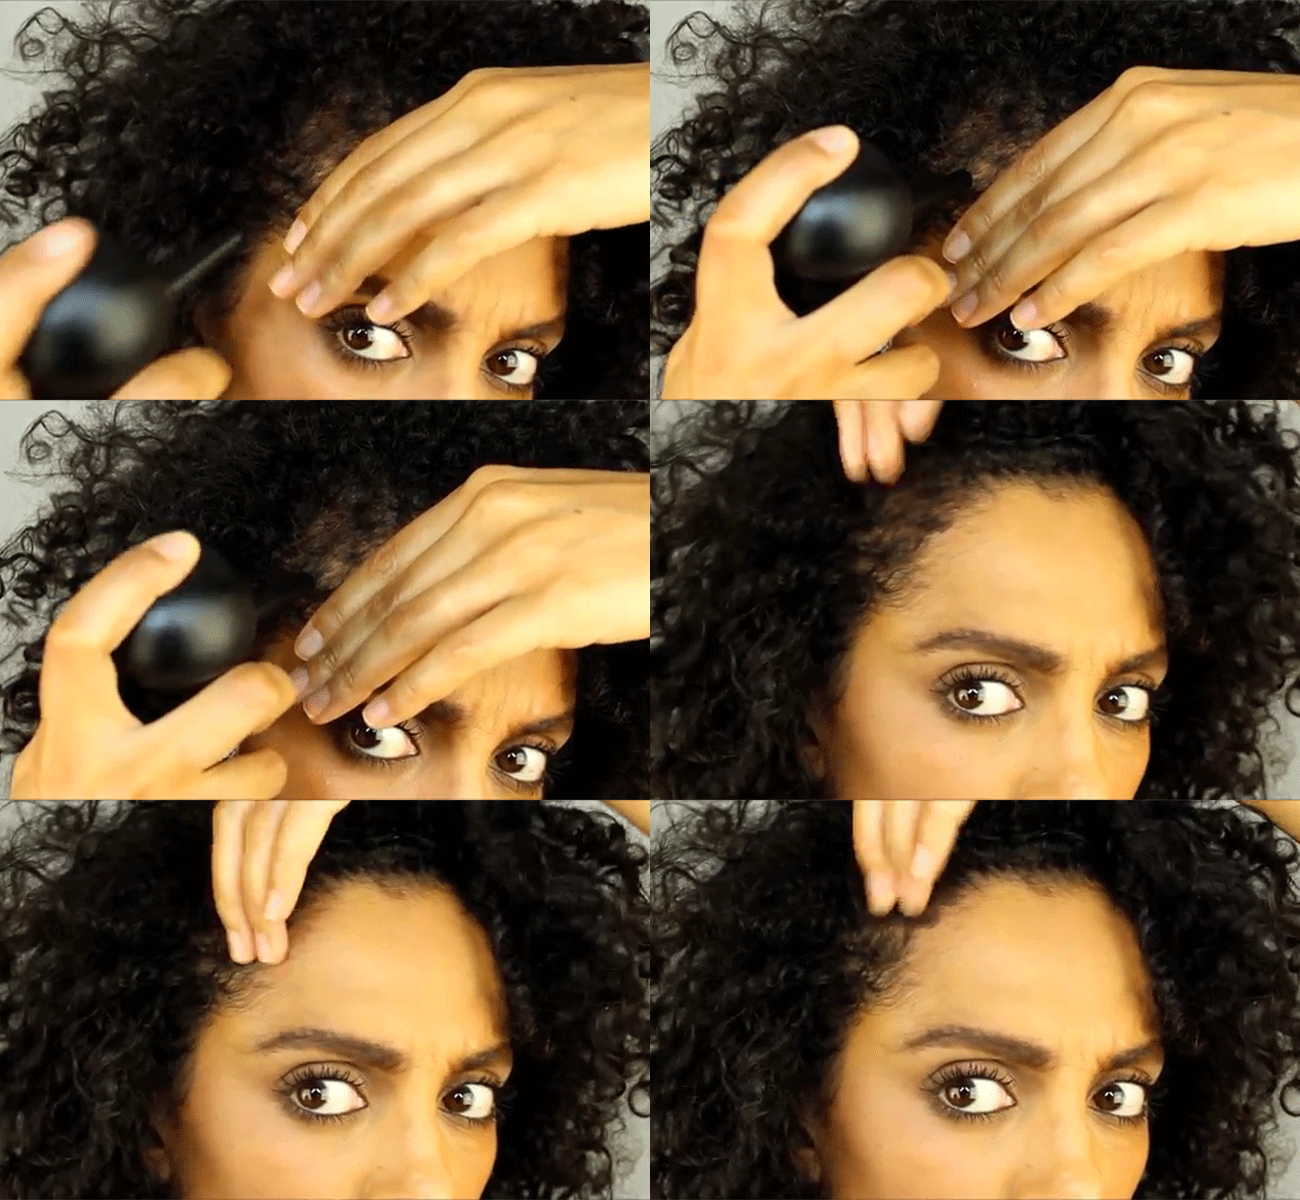
Toppik Hair Building Fibers
By far the easiest and my favorite method. Toppik is made of a colored keratin protein that will make your hair appear more full and thick. It’s great for bald spots, fine hair and alopecia. I purchased the Hair Building Fibers along with the Hair Perfecting Tool Kit. It’s so easy to use and provides long lasting results! Although, it’s not necessary to purchase the Perfecting Tool Kit, I find the spray applicator the most beneficial tool. It sprays the perfect amount in a targeted area.
Eyeshadow
A little more work but cost-effective. Using a dense crease brush along with an eyeshadow that matches your hair color, you can fill in your bald spots. By pressing and packing in the shadow, your bald spots will gradually disappear. Although this takes a bit longer, it is an affordable option that almost anyone can do. Bonus Tip: Use Ampro Protein Styling Gel to help darken the area on slicked back styles.
Do you have traction alopecia? Feel free to share your techniques on hiding it below in the comment section.
Follow Rochelle on Instagram @DiscoCurls & Subscribe to her YouTube channel, Disco Curls.
It never fails, at this time of year you can count on dry hair & skin. This weather makes me dig deep to find the best remedies to stay moisturized from head to toe. Sometimes the best solutions are found right in your kitchen. That’s why I wanted to share some of my favorite DIY winter hair & skin care masks.
Avocado Hair Mask
Avocado lovers rejoice! Your hair just gave you a high five…
Ingredients
- 1 ripe avocado (1/2 for shorter or fine hair”>
- 1 tbsp. honey
- 1 tbsp. olive oil
- A few drops of essential oil
You’ll also need
- a mixing bowl
- a fork and spoon
- a towel
- optional: a disposable shower cap
Directions
- Using a spoon, scoop out the avocado from its shell and place into mixing bowl.
- Add 1 tbsp. each of honey and olive oil to the mix.
- Add a few drops of your favorite essential oil. I love peppermint oil because of how it stimulates the scalp.
- Lastly, use your fork to break up the avocado and blend the oils together. Tip: Hate chunks? Try using a hand blender to smooth out the mask!
- Before applying be sure to start on damp, detangled hair. It’s perfectly fine to start with your co-wash first but keep in mind that you will need to rinse this out well. If you’re messy like me, I advise you to wear a towel around your neck.
- Apply the mix using your fingers from root to tip. You will quickly feel a difference in the softness of your hair!
- Leave the mask on for 20 minutes–add a disposable shower cap if you like–and continue with your wash routine.
Banana Coconut Hair Mask
Try this hydrating mask–it doubles as a tasty smoothie!
Ingredients
- 1 Banana
- 2 tbsp. coconut milk
- 2 tbsp. honey
You’ll also need
- a blender
- a strainer
- a disposable shower cap
- a mixing bowl
- optional: hair color applicator brush
Directions
- Begin by breaking up the banana and adding it to the blender. Then add 2 tbsp. each of coconut milk and honey. Blend the mix until smooth.
- Strain this mixture into a bowl. Unlike the avocado hair mask, I find this mask more difficult to remove, so don’t skip this step.
- Use a hair color applicator brush to apply as well as my hands, since this mask is also more liquid based.
- Wrap your hair up and apply a disposable shower cap. Leave the mask on for 20-30 minutes.Optional: Apply a heating cap over your cap to penetrate the mask deeper into your hair.
- Rinse the mask very well in shower and continue with your normal wash routine.
Banana Oatmeal Mask
Why should your hair have all the fun? Try this wonderful skin care mask that hydrates, gently exfoliates and soothes my dry skin.
Ingredients
- 1/2 banana
- 1/4 oats
- 1 tbsp. honey
- 2 tbsp. water
You’ll also need
- a mixing bowl
- a fork
Directions
- Using your fork, mash the banana until it has a creamy consistency.
- Add the oats, honey and water.
- Blend this mixture well until the oats are well absorbed.
- Apply the mask to your face, using the oats as a gentle exfoliator.
- Leave it on for 15 minutes.
- Using a wash cloth, gently remove the mask and rinse well.
- Follow up with your favorite moisturizer.
Subscribe to my channel, DiscoCurls, so you never miss another video!