Search Results: Nikki Walton


 Tied up, tied down, burned with a hot iron, pulled, and pushed–I feel totally neglected. Why can’t I just be left alone? Why can’t I just be massaged with special care, set free and treated with respect and kindness? I may just breakand leave this place. Better yet, I could totally drop out of sight where no one can find me. Sound like a victim of domestic abuse? Not exactly, this may be your hair crying out for rescue.
Alopecia (hair loss”> is frustrating, demoralizing and downright scary.Society puts a great deal of pressure on us to achieve and maintain a glorious mane. Unfortunately, circumstances sometimes arise which causes one to lose hair.
There are two basic categories of hair loss: Scarring and Non-scarring Alopecia
Within each category, there are multiple causes. It is possible to achieve hair regrowth in many cases of non-scarring alopecia. Scarring alopecia portends a more permanent and emotionally devastating situation, as it means that the hair follicles have been sufficiently destroyed so that regrowth is not likely. Non-scarring alopecia is more common than scarring form; therefore, my discussion will be limited to this type of hair loss. Scarring forms can be the result of extensive and prolonged destructive hair care practices, or a medical condition (i.e. lupus”>. The skin on the scarred area of the scalp will usually be shiny in appearance and thin in texture. A dermatologist should be consulted for diagnosis and treatment.
The most common causes of Non-scarring alopecia are:
Traction alopecia
Hair loss due to traumatic hair care practices such as braiding, twisting the hair too tight or wearing binding hairstyles frequently. This common type of hair loss is usually most prominent around the hairline. Hair is more fragile and subject to breakage in these areas. Solution: Loosen up that hair! You’d probably fall out too if you were bound down too tight. Braiding/Twisting should be done loosely. If small bumps and or pain may appear in newly styled and affected areas, the braid/twist should be immediately removed. If you’ve already been a victim of traction alopecia and are looking for regrowth, treat affected areas with gentle hair care practices. Avoid the use of drying gels and products which may irritate/ dry out the hair and scalp skin. A dermatologist may be able to assist in providing medical treatments which can encourage a better environment for hair regrowth.Telogen Effluvium
Hair loss due to major hormonal shifts related to pregnancy, stress and major illness. This type of hair loss is frustrating because the hair tends to thin diffusely throughout the scalp. It is normal to lose up to 100 hairs per day, but this condition results in an enhanced rate of shedding causing much more hair to fall out on a daily basis. Characteristic “club hairs” can be detected among the shed hair. They have a smallwhite bulb at the end. Fortunately, this condition resolves on its own without medical treatment. Unfortunately, it can take several months after the hormones have become regulated that adequate regrowth is noted. Solution: Be gentle with your hair and patient for resolution.Anagen Effluvium
Hair loss as a result of chemotherapy. This is another temporary hair loss state which usually occurs in response to medications used in cancer treatments. Hair will regrow in most cases, after offending medication is stopped.Androgenetic Alopecia (Genetics”>
Women can also lose hair in a specific pattern in the crown region of the scalp due to hereditary causes. Some hair follicles in this region are genetically predestined to become smaller and eventually inactive. The hair then falls out. In women with this type of hair loss, the front hairline is usually spared with balding most pronounced in the crown region. Solution: Rogaine (minoxidil”> has been used successfully in some cases to achieve a bit of regrowth. Seek the advice of a dermatologist for evaluation of and treatment for this type of alopecia.Alopecia Areata
Hair loss thought to be associated with immune factors. This type of hair loss can cause solitary bald patches on the scalp (in its mild form”> to complete loss of all body hair (most severe form”>. Solution: Most individuals with the mild form are successful at achieving hair regrowth with the assistance of cortisone injections and/or topical prescription agents. A visit to the dermatologist would be required for these treatments.Hair breakage
On average, hair grows a half an inch per month. The terminal length of hair (the maximum length”> is genetically determined. A major key to being able to fully appreciate increasing hair length is preventing breakage. Eliminating or minimizing traumatic hair care practices (i.e. direct heat styling”>, and moisturizing sufficiently are the best ways to retain length. Shampooing, Conditioning regularly and deep conditioning treatments with supple moisturizing agents help maintain hair moisture. Curly hair makes it more of a challenge for natural scalp oils to effectively move down the strand. The curlier the hair, the more difficult this process becomes. Therefore, adding moisture to the strands (especially the ends”>, sealing and protecting them with various styling techniques can really benefit your hair. Fortunately, there are many conditioning products available. Avoid petroleum and mineral oil containing products. These ingredients occlude pores and can lead to facial breakouts.Treat yourself to a scalp massage regularly to stimulate the hair follicles. This is very relaxing and can help improve circulation which is always a good thing for hair health! Take care of yourself, so you can care for others. Do your best to be your best. The better you are, the brighter the world gets.
Written By Dr. Perry for CurlyNikki
Disclaimer: This information does not serve as a substitute for individual medical care by a physician. This article is an informative guide to point you in the right direction. All product recommendations and advice are suggestions which may or may not work for your individual needs. Specific medical issues and concerns should be addressed by your health care provider. Patricia Perry, M.D. is a dermatologist in private practice in Southern California who can be reached for consultation at 2625 W. Alameda Ave., Suite 504, Burbank, CA 91505. Phone: (818″>559- SKIN (7546″>.

Do you dread shampooing your hair? Do you detest the state of your hair after you shampoo? Love going to the salon, being primped and preened and laying back with a head full of suds, while some fashionable hairstylist scratches the mess out of your scalp? Welp, you SHOULDN’T! If you answered “yes” to any of these questions, this post is for you!
Oils produced by the scalp are not always able to travel down a curly, spiral hair follicle. This is the exact reason why curly hair tends to be drier than straight hair often leaving us unclear about how and how often to shampoo.
Shampoo is derived from the Hindi word champo , meaning “head massage.” Shampoo is a product used to remove oil, dirt, skin particles and any environmental build up in your hair. It’s important to note that moisturizing is not one of it’s functions but there are some steps you can take to ensure that your hair is properly clean and conditioned.
Pre-Oiling
Diluting Shampoo
I like to dilute my shampoo with water and add a bit of conditioner to the mix. I fill 1/3 of a squeeze bottle with shampoo, 1/3 with water and 1/3 with one of my more cheap conditioners. The results have been less dry, less tangled, moisturized hair. It also saves me a ton of money on shampoo. And remember, water is a curls best friend!
Sulfate
Technique
The way in which you shampoo is important. Simply rubbing shampoo onto wet hair and scratching the scalp is not enough. Separate and shampoo your hair in sections. This ensures that you are cleansing and tending to every strand while also helping with the de-tangling process.
It is also important that you do NOT scratch your scalp with your fingernails but instead massage it with your fingertips. Scratching is too harsh a technique and can actually further irritate your scalp, weaken your hair follicles and cause scalp tenderness. Massaging the scalp is a much healthier approach and stimulates hair growth by promoting the circulation of blood in scalp.
Infuse these methods into your shampoo regimen and see what happens. I anticipate that you will be happy with the results. Good luck!
MORE: For My Prepoo Recipe Click Here
This post was written by Antoinette of AroundtheWayCurls for CurlyNikki.
 I love bananas for a variety of reasons. One of the main reasons is banana pudding. Yum. But whenever I find myself wondering what to do with the leftover overly ripe bananas that grace my kitchen counters I always try to remind myself, if I don’t eat it, I can always use it on my natural hair!
Banana is tricky though. Do not blend it well enough and you are going to have a big mess on your hands, so be sure to blend it down into the consistency of a thick baby food or else you’re going to hate rinsing small banana bits out of your hair. You want all of the banana to be blended well–no pieces left behind in the bowl.
Less the scary banana aside, you can make this sweet banana creme pre-poo in a jiffy and have your hair feeling so soft that you’ll want to tell everyone you know to try this recipe!
What You’ll Need
Combine the following in a blender:
- 1 medium to large size banana (overripe is fine… banana baby food is fine too”>
- 3 tbs plain yogurt (full fat is best”>
- 4 tbs honey
- 3 tbs condensed/evaporated milk
- 2 tbs wheat germ oil
Directions
Blend all of the ingredients well and apply to you hair from root to tip. Cover your hair in a plastic cap and wrap your hair in a heated towel or sit under a hooded dryer for 15-20 mins. Rinse well and proceed to wash and style your hair as normal.
This is a fun pre-poo I like to do on days when I’m doing my nails. I don’t know why, but I think it’s the smell of the banana or something that makes this feel very spa-like and special. I’ll wrap my hair up in a towel while the pre-poo works and then work on my pedicure and watch reruns on snapped on oxygen. Random I know, but it’s fun!
What say you? Have you ever used banana on your natural hair as a pre-poo treatment? Do you like how it makes your hair feel?
This post was written by KurlyBella for CurlyNikki.

Growing longer hair should be pretty simple for every woman- right? I mean, the hair just grows out of our heads. It’s not like we have to look at our scalps on a daily basis and say “Yo follicle! Handle your business!” So why is it that some of us can never seem to grow our hair to the length that we desire? Many women are surprised to discover that the answer to that question isn’t found in taking hair pills or hunting for a new hair product.
Growing longer hair is simply about allowing our hair to grow more than we are damaging it.
It’s actually that simple.
So if you’re having trouble gaining length, you may want to look a little closer at your hair care regimen. Maybe there are specific things that you are doing to cause damage and counteract your hair’s growth. Here are 4 reasons you may not be gaining length:
1. You’re over-manipulating and under protective styling
I constantly get questions about whether women can get away with not protective styling and still achieve length. The fact is that curlier hair is more delicate (and finer”> than straight hair. Because of this, you need to protect it from frequent manipulation. Sure, you can try your luck with infrequent protective styling- but more manipulation equals more hair damage, which equals more breakage. And more breakage will always counteract attempts to gain length.
2. You’re not moisturizing and sealing
Curly, kinky and coily hair CRAVES moisture. Moisture it what’s need for our hair to preserve elasticity. And when hair is deprived of moisture, the result is that not so pleasant “B” word again—Breakage! To gain length (and prevent breakage”> you must help your hair maintain its elasticity by making moisturizing and sealing part of your daily hair routine. Hair that does not gain length is simply hair that is breaking faster than it is growing. In the case of curly hair (especially curly, porous hair”>, you always want to counteract dryness and breakage by moisturizing and sealing.
3. You’re using heat
With the exception of using mild, wet heat to deep condition, dry heat (i.e. from flat irons or blow dryers”> should be avoided. Dry heat literally boils moisture out of hair- leading to dryness and ultimately breakage. I know there are women that like to flat-iron or blow dry their hair for the occasional sleek look, but those are two of the fastest ways to damaging your already-prone-to-dryness curly hair. I know it may be hard for some to accept, but to gain length you’re going to have to step away from the heat.
4. You’re not trimming damaged or spit ends
Hair doesn’t need to be put on a frequent trimming schedule. But if you are damaging your hair so much that splits ends and breakage become a common occurrence, then you need to trim your hair regularly to counteract this damage. If you don’t take care of these damaged ends on the spot, or ignore them, you’ll just have damage that will literally start to extend from the tip of your hair and up the hair shaft. In those cases you’ll end up having to do a bigger chop than when there was less damage. And this bigger chop will, once again, make it harder for you to achieve the length you want.
5. Keep Things Low Maintenance
Keep things simple with low maintenance and protective styling. All hair goes through normal wear and tear. But the less stress you put on hair by manipulating it with things like combing and heat styling, the less likely it will incur damage that will cause things like split ends and breakage.
Have you ever had a problem with growing your hair to the length you wanted? What changes did you make in hair regimen to help solve this problem?
This post was written by Dr. Phoenyx Austin for Curly Nikki.

I confess that anytime you see me with this bun, I was just being plain lazy… but it still looks like I did a lot, so, hehehe!
The maintenance is so easy, too. All I do is dab the hair with my LOC mix, smooth and go.
I can rock this for weeks if you let me! The best part is that it doesn’t stress my hair at all… very easy on the edges.
What You’ll Need
It’s so quick and easy to do and all you’ll need is–
- Medium length natural hair
- Two elastic hair bands
- 5 mins

You can make it as big or as small as you want to depending on the placement of the end band. It’s a cool protective style because it keeps your ends hidden away. If you want it to be very huge, do it on blowdried hair or hair stretched out with twists, braids or bands.
Tip:
Keep your edges smooth by using a gel and tying on a silk scarf. You can also pin down the edges of the bun using bobby pins to hide the elastic band.
For more variations of ‘The Bun’ , peep them on Instagram @nappilynigeriangirl
What’s your go to #CasualCurly style?
This post was originally published on CurlyNikki.

Hello! My name is Elaine and I’m 20 years of age. I’m Ghanaian-African and I reside in South Jersey. I’m in college and I major in Computer Info Systems. I’m a very down to earth person, I love to have fun and I’m very outgoing. My hair is a very big part of me.
How long have you been natural?
I’ve been natural for 2 yrs and 6 months.
Were you a big chopper or transitioner?
I big chopped. I used to have half of my head shaved, I got bored of it and decided to shave all of my hair, that’s when the magic happened.

How would you describe your hair?
I would describe my hair as kinky, colorful,vibrant, fun and wild.
What do you love most about your hair?
I love that I can be very versatile with my hair and it’s never boring.
What has been the most memorable part of the journey?
My most memorable part of my hair journey has to be me inspiring others to go natural and also learning about my natural hair gradually.

What is your favorite hairstyle?
I love to rock my fro out and my other favorite style has to be the fro-hawk.
Any memorable reactions from friends or family?
Every one in my house is natural so I haven’t gotten any crazy reactions from my family. I’ve gotten a lot of good and amazing reactions and compliments from outsiders, too. They love my hair which I’m very thankful for. I’ve also gotten a lot of crazy reactions and questions which boggles my mind. Questions like, if my hair was a hat, if my hair was real or if it was a wig.

What is your hair regimen?
I’m not a big product junkie but I use Cantu Hair Products and olive oil. I wash my hair every two weeks, condition and use leave in conditioner for my hair every week to keep it moisturized. I also use olive oil too keep my hair shiny. I try to stay away from the flat iron.
Who are your favorite vloggers?
My favorite natural hair youtuber is ElektrikTv. She has all the cool hair colors I would love to have.

Anything else you would like to add?
The natural hair journey may not be the easiest but it’s very worth it. It’s really beautiful when we embrace our kinks no matter what texture it is. Rock your fros! its exotic!
Where can we find you for more information?
You can find me on IG, Twitter and Facebook @ElaineAfrika
Follow me on Instagram!!! @aubz1291

My name is Olivia and I’m from Grand Cayman, Cayman Islands (in the Caribbean”>. I’m an Accountant by profession, but my true calling is really to exist in the Fashion World. I have a penchant for all things creative- art, music, fashion and if you consider food and travel creative, then include those too :”>.
How would you describe your style?
I don’t believe that my style can be summed up in a specific way simply because it’s all over the place. Sometimes classy, sometimes modest but sometimes risque. Sometimes girly or flirty. Sometimes chic, boho, retro, edgy, feminine, glam etc. I dress according to how I feel and not necessarily according to what’s in.
How do you decide what to wear in the morning?
Most of my thoughts come alive in the shower. I’m not sure why, but they do. At times, I’ll wake up completely clueless as to what I’m going to wear and as soon as I’m in the shower, voila! a complete outfit comes to mind. Very rarely do I mentally plan my outfits the day/ night before.
What are your favorite wardrobe pieces?
Well, that’s a tough one. I’m really not sure actually. Because I live on an island and it’s ALWAYS hot, I’d like to say that I tend to grab for anything hassle free, preferably iron/ wrinkle-free (I HATE ironing”> and most importantly, cool and comfortable.

Where do you typically shop for clothes and accessories?
ONLINE!! Living on a tiny island has some great perks, but also some major disadvantages when it comes to shopping for clothes, so I’ve mastered the art of online shopping.
Let’s talk hair. How long have you been natural? What is your normal regimen?
I’ve pretty much been natural all of my life. I’ve relaxed/ permed my hair, maybe twice. I’ve been loc’d for almost 10 years now though. As for a regimen, I don’t necessarily have one. I wash my hair whenever I feel like (no strict routine”> or when it really needs it and apply Argan oil to the locs and castor oil to the root. That’s about it really…oh, and I interlock maybe once per month.
Despite what the masses may say, locs are very versatile
Do you have a signature hairstyle?
Anything up and out of my face is my signature. My big bun is always quick and easy and it works with every single outfit.
How does your natural hair work with your style?
Despite what the masses may say, locs are very versatile and very much fit right into how creative I can be with my personal style. To me, it’s the perfect fit.
How can we stay connected with you?
I am literally on almost all social platforms
Instagram | Facebook | Website | Pinterest | Twitter | Chictopia | EmailThis article was written by GlobalCouture LLC for CurlyNikki.

 Ever heard of Coconut Nectar? Yea, me neither lol, until I received a newsletter from Hairfinity (see below”>. By quitting time that same day I’d already planned my route to beat traffic to get to Whole PayCheck Foods. I figured, I love deep conditioning with coconut oil and cooking with coconut milk, so nectar can’t be too bad. Right?
Raw coconut nectar is an excellent way to infuse your hair with moisture to combat dryness. Coconut nectar is made from coconut tree sap. This sap contains loads of healthy vitamins, amino acids, and vitamins that help to neutralize the pH balance levels in your hair. When coconut nectar is added to your deep conditioning treatments it helps to flatten out the hair cuticles allowing them to lye straight and smooth so, that your hair will become softer, less frizzy and easier to manage.
To use coconut nectar in your deep conditioner simply pour as much as you feel necessary directly into your product and stir it in completely. Depending on your hair length and density will better determine exactly how much you will need. Adding in other natural ingredients like olive oil, coconut oil, or whole leaf aloe vera gel will help to further bring forth plenty of moisture and hair manageability.
Divide your hair into 4-8 sections, then distribute your deep conditioning mixture from the top of your roots to the very ends of the strands of your hair. Allow the mixture to sit on your hair from 30-60 minutes with heat or without heat. Using heat will help to maximize the strength of your treatment and yield the best results. Raw coconut nectar can be found in most grocery stores or online.
And so the experimentation began. I chose to mix with Camille Rose Algae Deep Conditioner, which I know works well by itself. I applied the mixture to 3 sections of my hair. I used the 4th section as my control with plain conditioner, no nectar. I left the mixture on overnight (as usual”>.
When rinsing, I noticed a subtle difference in softness, curl pattern and how the hair hung, weirdly enough. Once the conditioner was completely rinsed from my hair the untreated side felt a bit more rough, as if the cuticles weren’t laying the same.
As I blow dried I noticed my scalp on the untreated portion had a bit of conditioner residue left over. This leads me to believe the coconut nectar assists the conditioner in the rinsing process. There was no difference in the length of time my hair took to blow dry but there was a slight sheen and smoother strands on the the treated portion of my hair.
Overall, this nectar seems to behave similarly to honey, as they both appear to be humectants. Considering those plastic bear-shaped containers may not actually be honey anymore[+], this is an affordable alternative to purchasing expensive raw/real honey[+].
CurlyNikki Says:
I recently copped a bottle of Coconut’s Secret Coconut Aminos… not for my hair, tho. It was a total impulse buy, as it was by the register and I had never heard of it before. #SpendinThemSpends #ButItWasCheapTho I bought it as a replacement for Bragg’s Aminos and soy sauce for rice dishes and the like. It’s less salty than its counterparts and is gluten and soy free! I’ll definitely check out the nectar the next time I hit up Whole Paycheck!
This post was written by ConfessionsOfABlogVixen for CurlyNikki.

The bun went so very hard this weekend. It hung out at Eatonville, re-upped at Trader Joe’s, had wine at Bobby Vans, spent them spends at Tarjay, smashed all the chicken fried oysters at Marvin’s, met some CN readers… and engaged in a little date night turn-up on U street. I even loitered a little.
I thought I’d respond to questions about my bun situation here.
What do you do to your hair after you Curlformer it?
Once it’s fully dry, I remove the Curlformers and part it down the middle to create two flat-twists to stretch out the Shirley Temple-esque curls while still giving that joint some texture. The more stretched the hair, the bigger the bun. The more texture the hair has, the bigger the bun.
How do you create your bun?
The next morning, I undo the twists and using my fingers only, gather all of my hair at the crown and secure using two satin scrunchies (from Sallys”>. The satin scrunchies are not only easy on my fine hair, but also add bulk and volume to the resulting bun. I then spread the hair in the ponytail out, in all directions around the scrunchies to hide them, and loosely wrap and pin until the bun is roundish and to my liking. It’s essentially a sock bun.

What about your edges?
What do you do at night?
If I’m on my game, I take the bun down, put the hair into two flat twists (no combs, just fingers”> and pin them so that the one on the left is stretched and pinned on the right and vice versa. This keeps my hair textured (the twists”> and stretched (the pinning”>. I then put on my satin cap. If I don’t have time to re-twist, I simply put on my satin cap and the bun lives on another day. I never really have to re-moisturize (thanks to the pre-poo/deep treatment and super moisturizing leave-in on day one”>, but I do keep the ends lubricated with my coconut/castor oil mix.
from this…

to this

How do you create your jumbo buns?
This post was originally published on CurlyNikki.

Changes in weather require modifications to your hair care regimen in order to keep you hair looking and feeling at its best. But how do you know what you should use and when? This article will serve as the foundation for what you need to understand in order to choose the correct products for your hair in any season. This requires a good understanding of humectants: how they work, their purpose and how they are relevant to hair.
What are humectants?
Humectants are used in hair and skin care products to promote moisture retention. They have the ability to attract water from the atmosphere. Many different molecules have the ability to be effectivehumectants. How well they do this depends on how many water-loving sites they contain for hydrogen bonding with water molecules. The strength of this bonding between the humectants and water improves moisture retention by minimizing water loss due to evaporation. Because of their water-binding abilities humectants are ideal for dry, thirsty hair. Because the weather impacts the health and state of our hair, it’s important to understand how they should be used in various climates and how your hair care regimen should be modified from one climate extreme to the next.
In Tonya McKays’ article the Effects of Relative Humidity on Hair and Humectants, she points out that the laws of thermodynamics have a daily influence on our hair. Thermodynamics is the study of energy. Energy exits in many forms such as heat, light, chemical energy and electrical energy. Everything in nature is always striving to reach a state of equilibrium or point of balance. Molecules that are highly concentrated in one area will typically move to an area where they are less concentrated until the concentration is equal for both areas. This is called diffusion. Diffusion occurs in substances that are solids, liquids or gases. You can demonstrate diffusion easily yourself. Fill a glass with water and add a few drops of ink or dye to the water carefully. The colour will sink to the bottom initially because it’s denser than the water. However over time, if left undisturbed, the ink at the bottom of the glass will spread upwards from where it’s more concentrated (at the bottom”> to where it’s less concentrated (at the top”>. Eventually all of the water in the glass will be the same shade. This is the point where there are no more differences in the concentration of molecules. Why is this important? Because when it comes to hair, this same law of molecules trying to reach a state of equilibrium applies. And the molecules we’re most concerned with are water molecules.
Humidity
Humidity is the amount of water vapor in the air. Dry hair (contains minimal water”> exposed to a very humid environment will eventually become saturated with water molecules as water moves from an area of higher concentration (the humid air”>, to an area of lower concentration (the hair”>. Textured hair is more susceptible to this because it is more porous than straight hair. Once hair is exposed to high humidity environments the cortex can swell causing cuticle scales on the hair shaft to lift contributing to frizz.
Humectants can be a curly girl’s best friend or worst enemy. In some natural hair circles there is still some confusion about these molecules. Some are concerned that they make their hair hard; others are concerned about stickiness. Still others are not quite sure what to make of them and avoid them at all costs. So what is the real scoop? Well the answer is, “it depends”. On what exactly? Well a number of things of which the most important may be the climate.
While the topic can be quite complicated it’s important to note that for the sake of hair care and the use of humectants, there are two main weather conditions:
- Low humidity
- High humidity
Low Humidity
Low humidity conditions are those such as cold, dry winter air. In this case, if you use products that contain a lot of humectants, there is not a lot of water in the air for the humectants to attract to the surface of your hair. What can occur is that the humectants in your products may prevent the evaporation of water from the hair into the air. However don’t look for ultra-moisturized hair fromhumectant use in this type of climate because it’s just not going to happen. In fact there is a chance thathumectants may remove moisture from the cortex of the hair into the air. Remember diffusion? Moisture will move from areas of high concentration (in this case the hair”> to areas of lower concentration – the air! This can result in dry, icky feeling hair. Not cool!
High Humidity
With high humidity conditions such as warm or hot summer air, there can often be A LOT of moisture in the air. Some moisture is good; a lot of moisture – not so much. If your textured hair is dry, damaged and overly porous it can absorb a lot of water from the air. This can lead to swelling of the hair shaft, lifting of the cuticle, tangling and frizz. Combine this situation with a product that is high in humectants (especially glycerin”> and you have a situation where a lot of water is attracted to the surface of the hair. This can lead to hair that always feels wet, takes forever to dry and is a sticky, tangled mess. In other words, cotton candy hair. Not hot at all!
Complicating things MORE…
Figuring out the humidity: Dew points
So how can you assess the humidity in the air? This is a complicated topic that’s difficult to wrap your head around if you’re not a meteorologist or physicist. However, you don’t have to be either one to get a basic understanding of how to determine how your hair will behave on a particular day. Something we can use is called the dew point. The science-y definition of dew point is the temperature below which the water vapor in a volume of humid air at a constant barometric pressure will condense into liquid water. Huh???
What you need to know is that the dew point is associated with relative humidity.
The higher the dew point, the more moisture there is in the air.The lower the dew point, the less moisture in the air. To gauge how dew point makes you feel in general, dew points above 65 F (about 18 C”> make it feel sticky and humid outside while dew points less than 65 F are more comfortable. The higher the dew point above 65 the stickier it will feel outside.
With respect to hair, knowing the dew point can really help you in managing your hair and style and determine whether or not you’ll use humectants, and if so, how much. You can check the dew point of your location on various weather channels and online.
Complicating things EVEN MORE…
Types of humectants
There are several different types of humectants found in skin and hair care products. For a pretty comprehensive list please refer to this article by our Curl Chemist Tonya McKay.
A few examples include:
- Glycerin
- Propylene glycol
- Honey
- Agave nectar
- Sorbitol
- Sodium PCA
- Panthenol
- Hydrolyzed silk protein
- Fructose
What’s interesting about humectants is that each one has a different ability to bind to water. I’ve searched for a credible comprehensive chart on the ability of humectants to bind water and I’ve found the one below from the Handbook of Cosmetic Science and Technology, Third Edition:
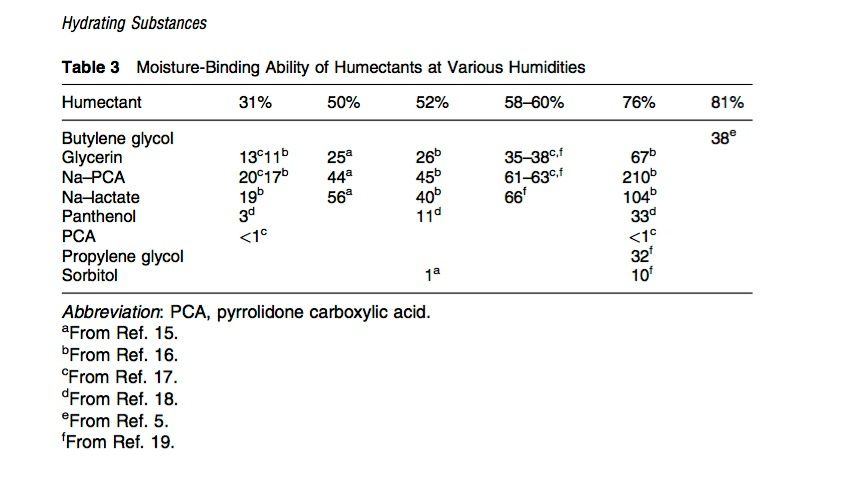
What this chart shows is that glycerin, sodium PCA, sodium lactate and propylene glycol are humectantsthat have really strong water-binding capabilities while the other humectants have less. While not a complete list of humectants it shows the major ones available in hair and skin care products.
With this understanding, how do we choose products and build a regimen for various climates? Next week’s post will address this in detail.
This article was written by Susan Walker for CurlyNikki.

We discussed the topic of Texture Typing and discrimination in our Live panel with Miss Jessie’s Original co-founder Miko Branch, Karen Tappin of Karen’s Body Beautiful, & Imani Dawson, founder of the blog tribe called curl (if you missed it, watch here“>. YouTuber Jouelzy continued the discussion on her channel with her video on the topic. And CurlyNikki published this piece by Susan Walker of DrWalkerWellness, to which the feedback has been thought-provoking. We look forward to reading how the NaturallyCurly community feels, comment below!
Dr Susan Walker writes:
So this is going to be a bit controversial. No, a lot controversial. I don’t really want to go to where I’m taking this to be honest. However, in the upcoming weeks I’m going to be discussing a topic that can be compared to nails on a chalkboard in terms of the effect it has on some women. So I want to pave the way for it by examining where some of this outrage – from a practice that is really meant to be rather benign – is coming from.
And that topic is hair typing.
I’ll be going into hair typing because, quick frankly, like SKIN typing, it is extremely valuable for DESCRIBING your hair and helping you DETERMINE the types of products that would be ideal for you, the hair care practices you should use to bring out the best in your hair, styling techniques to enhance your texture, and expectations you can realistically have for your hair. So why the push back? Why is there such an issue with using a system to *classify* the hair based on it’s appearance and other objective parameters? It’s obvious but I’ll state it anyway. African textured hair is extremely different from Caucasian hair. And let’s throw Asian hair in there to. Because when studies and comparisons are being performed between hair textures it’s these ones that are evaluated. I need to make this statement because when it comes to hair care, there is a high probability that you won’t be able to use the products made specifically for hair that is not textured or curly. I say a high probability instead of a definitive “NOT” because with curly hair there is a huge spectrum of textures, curl patterns and hair types. So you MIGHT be able to get away with using products that are specifically formulated for straight hair. But most women won’t. So what is the issue? Where do I begin. An article in Ebony.com in May made me shake my head. Literally. The title was“The Sad Truth About Natural Hair Discrimination”. The viewpoint of the article was that There’s a New Way for Mainstream Media to Divide Us Via Our Hair… and
…We’ve found ourselves sponsors of a beauty industry that is overwhelmingly praising a certain type of natural hair, and clearly ignoring another.
Women with kinky textured hair, commonly known as type 4, are experiencing something of a “texture discrimination” as a consequence of this new natural new beauty standard. Curly and wavy girls dominate the branding in products mass marketed to natural hair…now there is a new pressure for natural women to yearn for a specific type of natural hair.
and lastly
Women with kinky textured hair are experiencing texture discrimination as a consequence of a new beauty standard now being set amongst naturals.
It concludes with a mention of hair typing with some women finding it “frivolous” and “divisive”. On some forums some women are even being ridiculed for having a hair texture that is less desirable or manageable than other textures. I don’t even know where to begin. On the one hand I would be foolish to say that certain textures are not desired over others with some women who are natural. Not all, but some. I’m guilty as charged. At one point in my life I found myself wishing, hoping and praying for the “more manageable” and “desirable” hair texture. And since I always talk about truly embracing your natural hair if you’re going to go natural, I have to examine where this is truly coming from. It’s going to get a little deep and perhaps uncomfortable. But let’s lift up the rug a little to reveal some dirt shall we?
Where It Comes From
We are 400 + years post slavery. However even though the physical shackles are gone the after effects and mental strongholds resulting from that era are as just as suppressive. One author calls these after effects Post Traumatic Slave Syndrome (PTSS”>.
PTSS describes a set of behaviors, beliefs and actions associated with or, related to multi-generational trauma experienced by African Americans that may be inclusive of but not limited to undiagnosed and untreated Post Traumatic Stress Disorder (PTSD”> in enslaved Africans.
Post Traumatic Slave Syndrome: America’s Legacy of Enduring Injury and Healing, Joy Degruy Leary. Uptone Press (2005″>
PTSS is an explanatory theory which posits that centuries of slavery in the United States, followed by systemic and structural racism and oppression, have resulted in multigenerational maladaptive behaviors, which originated as survival strategies. The syndrome continues because children whose parents suffer from PTSS will often be indoctrinated into the same behaviors, long after the behaviors have lost their contextual effectiveness. The author states that PTSS is not a “disorder” that can simply be treated and remedied clinically but rather must necessarily require a profound social and structural change in Americans and American institutions that continue to promote inequalities and injustice.
So what are some key BEHAVIOUR patterns that are reflective of Post Traumatic Slave Syndrome? According to author Dr. Joy Degruy, there are a few:
Vacant Esteem
Insufficient development of what the author refers to as primary esteem, along with feelings of hopelessness, depression and a general self destructive outlook.
Marked Propensity for Anger and Violence
Extreme feelings of suspicion perceived negative motivations of others. Violence against self, property and others, including the members of one’s own group, i.e. friends, relatives, or acquaintances.
Racist Socialization and (internalized racism”>
Learned Helplessness, literacy deprivation, distorted self-concept, antipathy or aversion for the following:
- The members of ones own identified cultural/ethnic group,
- The mores and customs associated ones own identified cultural/ethnic heritage,
- The physical characteristics of ones own identified cultural/ethnic group.
What I want to focus a bit on is the …distorted self-concept, antipathy or aversion for the physical characteristics of ones own identified cultural/ethnic group. Colorism is one aspect of this. And now hair texture discrimination seems to be a concern as well. It’s something Solange Knowles refers to as “curlism’. However this concept is not new. It didn’t originate with the current natural hair movement. In the U.S. The roots of discrimination based on hair texture (along with skin color I might add”> are. both are deeply rooted in European colonialism and plantation system of enslaved African Americans. Anyone that was white or closely resembled or emulated “whiteness” culturally, idealogically, economically and aesthetically was rewarded. So the lighter you were and the “better” your hair was, the more favourable. In the 20th century an assessment called the “brown paper bag test” was a ritual once practiced by certain African-American sororities, fraternities and organizations who would not let anyone into the group whose skin tone was darker than a paper bag. Another test was the comb test. If a comb might snag in the hair, sorry, that’s a fail. My point in going through all of this is that our perceptions of what is desirable and beautiful are deeply rooted in slavery.
“…the capture of the mind and body both is a slavery far more lasting, far more severe thanconquest of bodies alone…” Ayi Kwei Armah, Two Thousand Seasons (p.33″>
Tight, coily and kinky haired naturals are underrepresented and not given the same accolades and props that their shiny, silkier, looser curl counterparts are given.This reality is seen on social media as videos and images of these looser curls textures get more shares, likes and favourable comments than kinkier textures. It’s also argued that these women have more media and sponsorship opportunities as well. Bloggers and vloggers are speaking up as well pointing some of the blame at natural hair care companies who perpetuate the stereotypes of good hair. Essentially it’s hair that is long, loosely curled and shiny with a lot of movement. Oh, here we go again. This desirable hair texture is the one closest to….you got it! And so this is where the division comes in. The sad reality is that we are doing this to ourselves. We (as a collective”> have the issue. I’ve heard from so many professional women who have embraced their natural hair texture that it’s the other black women in their office who seem to have a problem with natural hair and not their white coworkers. It’s us who tell our children whether they have “good hair” or not. We do it. And a lot of times we don’t even realize we do it because it’s deeply ingrained in our psyche.
Oh yes, PTSS rearing its ugly head.
So where does that leave us? When can hair JUST be hair? Why are we now divided yet again? I would like to say that it really isn’t that deep but the truth is that it IS that deep for some.
Back to Hair Typing
This issue is something we’ve been wrestling with for hundreds of years. It’s a problem that is pervasive and I have no answers or solutions. And that’s not what this post is about. The reason for it was to try to uncover some of the reasons why we think the way we do; to bring it to your awareness and figure out what you can do to effect some type of change in your own life. I have two daughters. Both beautiful little girls. Both with COMPLETELY different hair textures. Both soft hair but one has silkier hair than the other. She’d be on overnight sensation if I put her on Youtube. Trust me.
But what I have to consciously make sure that I don’t swoon over how cute she is when her hair is styled a certain way. I have to fight against implying how much more manageable HER hair is but commenting on how difficult my OTHER daughter’s hair is to comb. You get the picture. This is what I can do to build up self esteem in more daughter so that she appreciates and loves her natural hair.
In my discussion of hair typing, my approach is going to be objective and descriptive. It will imply nothing about “good” and “bad” hair. Just what is. It will guide you with your product choice and give you a reality check on what you can expect a product to do. If your hair is not inherently shiny, no amount of product “X” is going to give you that shine like you see of the girl in the picture! So please, save your money!
Don’t shy away from understanding your texture. Learn everything you can about your hair’s strengths and weaknesses so you can get to a point where you truly love your hair!
This post was originally published on CurlyNikki.

So how do you deep condition? And how do you know if your deep conditioner is good or not? Do you rely on price? Not necessarily as an expensive product doesn’t mean the product is good, nor does a cheap product mean it doesn’t work. So what should you look for? The answer to this question is to become ingredient savvy. Having an understanding of ingredients will help you determine, at least at first glance, if a deep conditioner is going to be effective for you or not.
Ingredients that attach to the hair
Remember we discussed the fact that conditioning agents ADSORB to the hair? ADSORBING means that the ingredients attach to the surface of the hair. This phenomenon is responsible for helping to soften the hair, temporarily repair the hair, smooth the cuticle and reduce flyaways. The main types of ingredients you’re looking for are cationic surfactants, cationic polymers, emollients, oils and silicones. Surfactants are molecules that have water-loving and water-repelling segments. There are many uses for surfactants and they are mainly used for their cleansing ability. Surfactants can carry a positive charge, negative charge or no charge. However, when it comes to conditioning, cationic surfactants – or those with a positive charge – are extremely important. Since hair carries a relative negative charge, if you use a cationic or positively charged surfactant it will be attracted to the negatively charged section of the hair and bind to the surface of the hair. The surfactants will also form a film that smoothes the cuticle resulting in reducing static, tangling and improving softness. What are some main cationic surfactants? Behentrimonium methosulfate, behentrimonium chloride and cetrimonium chloride. Other ingredients that adsorb are conditioning polymers like the polyquaterniums and cationic guar gum. Lastly emollients such as cetyl and cetearyl alcohol, some oils and silicones also have the ability to attach to the hair and convey benefits.
Ingredients that penetrate the hair
Some ingredients can penetrate into natural hair at a temperature of about 35 degrees celcius. This corresponds to the temperature that would be reached if you applied conditioner to your hair and covered it with a shower cap. These ingredients include hydrolyzed wheat protein, hydrolyzed silk protein, coconut oil, cetrimonium bromide, panthenol, some silicones. Many can penetrate in between the layers of the cuticle and into the cortex of the hair. Each ingredient has its own time for penetration ranging from minutes to hours. This time can also depend on the condition of the hair often with damaged hair resulting in faster penetration than hair that is not damaged. So what about the DIY mayonnaise, avocado and egg masks so many women use? Well the truth is that a lot of those ingredients aren’t penetrating INTO the hair. Especially not the egg. In order for protein to penetrate into the hair is has to be hydrolyzed into amino acids. Egg protein is just too large to have any affect inside the hair. The most you’re hoping for with these DIY masks is for the ingredients to sit ON TOP of the hair and make your hair feel good temporarily.
Best steps to deep condition curly hair
- Shampoo with a product containing negative surfactants or cleansers. Rinse the shampoo from the hair and then apply the conditioner with positive surfactants. This is the best method for getting the most amount of conditioner to adsorb onto the hair, while allowing the maximum penetration of key ingredients into the hair. The reason you want to shampoo the hair first is that high carries slight negative charge which is enhanced with the use of shampoo with a negative charge. Opposites attract so when hair with a negative charge encounters the positive charge of the deep conditioner there will be more adsorption onto the hair and better penetration of active ingredients. It’s important to rinse out the shampoo because if not, the negative charge of the shampoo could interfere with the ability of the conditioner to adhere to the surface of the hair.
- Apply enough conditioner on the hair to completely cover and saturate the hair. Put a plastic cap over your hair and then apply heat for up to 30 minutes. The time the conditioner is left on the hair combined with the application of heat increases the penetration of some ingredients into the cortex. If you don’t have a heating cap you could theoretically use a hair dryer or blow dryer or, steam or boil some towels in hot water, carefully remove them from the water with gloves, remove excess water and wrap your head (covered in the plastic cap”> with the towels for the required time. The point is that the warmer your hair is, the deeper the penetration into the hair and the more effective the conditioning treatment. This can be a crucial step for naturals with low porosity hair. Many women have informed me using heat makes a huge difference in their hair’s ability to retain moisture for a long period of time.
- Rinse with cool water. Cool water may help to seal the cuticle.
After you have effectively deep conditioned your hair it should feel softer, moisturized, shiny and more manageable. If your conditioning treatment results in this, then you’ve definitely found a product to keep. If it doesn’t then get rid of it, read the ingredient list and invest in a product that is really going to do something for your hair.
Beware of overconditioning!
Some women love to leave a deep conditioner on their hair for hours at a time for various reasons. While conditioning is good for the hair, too much of a good thing is not necessarily better. Conditioning for hours at a time can result in softer hair and this likely occurs because of a change in the keratin forming a different configuration than normal. Hair that is softer will be weaker and more prone to breaking if manipulated. This change in keratin is temporary and your hair will return to its strongest state, but you’ll need to be careful how you handle it until it does.
How do you deep condition your hair and what ingredients make a huge difference in the way your hair looks and feels after deep conditioning?
This post was originally published on CurlyNikki.

Finger detangling is a delicate and intricate procedure. If done properly, it is entirely possible to go without combs and have an exclusive finger combing routine. This is especially beneficial for women who have hair that easily breaks during the detangling process. It is also possible to incorporate finger combing as a first part to your detangling routine prior to combing in order to reduce breakage.
Here are two very good videos that demonstrate the process of finger detangling on dry hair and wet or damp hair:
1. Dry finger detangling
This is one of the slowest and most painstaking processes. The huge benefit of it is that if you adhere to the rule of patience, it is possible to significantly and positively impact length retention. This is because there is much less breakage as hair is stronger when dry than when wet and there is no shrinkage involved to complicate detangling.
However, the emphasis is on proper handling as dry hair is less flexible and therefore does not tend to stretch as much. Provided that you take your time and handle your hair in manageable sections this is the preferred method for maximum length retention. If you reach a point where the hair is not able to be detangled (matting or knotting”> do not be afraid to reach for a an oil or conditioner to help create more slip.
Adjustments that you can make:
In this video, Chery goes on to comb her hair , this is entirely optional, if you wish to do the same, you can but the finger combing on its own is good enough to keep your hair detangled (see the previous how to on keeping hair in sections while washing as that will help to stop hair tangling after washing”>.
2. Wet/damp or conditioner finger detangling
This is an easier and faster detangling process that suits most naturals especially those who are new to patient detangling and those with a loose curl. It definitely will help with retention of hair length but you must be careful not to overstretch hair as wet or conditioner soaked hair is highly flexible. If you have high shrinkage, it may be a little more difficult to conditioner finger detangle but it is still much easier than dry detangling if you are pressed for time.
The key principle of this method is to use the slip that the conditioner provides to reduce breakage and allow hair strands to slide past each other. It is therefore imperative to choose a conditioner which has a lot of slip (usually very light in consistency more often in a bottle than a jar, low in heavy conditioning agents like behentrimonium chloride, high in ingredients that give slip like oils and silicones – many naturals preferring water soluble silicones”>.
Adjustments that you can make:
You can opt to not comb your hair as Vanisha does in this video but you should aim to be very thorough with finger detangling instead (i.e handle smaller sections than shown in the video”>. Most conditioners also usually work much better when given a short time to adsorb (yes with a D -meaning stick to the surface”> to hair. You can opt to apply the detangling conditioner to each section, twist or braid it up, wait for 5-10 minutes and then proceed with detangling. You can also opt to use a water and oil mix instead of conditioner but I do not recommend just plain water or a plain water/glycerin mix as that does not give hair any slip at all and can lead to breakage. Always involve either conditioner or oil.
Additional Videos for different hair textures:
Via HeyFranHey
Via Cherry818
This post was written by GlobalCouture for CurlyNikki.

Keeping those edges or the hairline under control is an issue for many ladies whether natural, relaxed or somewhere in the middle. That particular area of our hair is super delicate, so we need to definitely Handle With Care!
Here are three things you can do to help those edges stay put!
(1″> Avoid excessive brushing.
I know you want to be a member of #teamlaidedges but too much manipulation too often and you’re talkin’ possible traction alopecia on deck! For styles that require a slick and sleek look (usually an updo of some sort”>, after gathering all of your hair into the desired position, try using just your hands to smooth the very edges of your hair with your gel or edge taming product of choice. If you still feel a brush is necessary, use just a few soft strokes, follow up with your hands and tie your hair down with a silk/satin scarf for about 15 minutes or overnight to allow the style to set. Afterwards, your edges should be laaaaiiiiid! *snap*
(2″> Take care when installing protective styles.
A beautiful, neat set of braids or twists can be achieved without catching every single strand of baby hair. That baby hair don’t wanna be braided! It’s up to YOU to (nicely”> communicate to the stylist that you’d still like to have hair on your head once those braids come out. Don’t be shy! Contrary to popular belief, you’re NOT supposed to have a headache when you walk out of that braid shop. Many of us have come to accept that as a normal part of getting braids and such but it’s quite UNacceptable and unnecessary. The hair follicle can only take but so much tension so please be careful and be mindful, too, of how MUCH hair you’re adding as this can weigh the hair down and cause loss.
In a related story… if you rock wigs or weaves from time to time, your cornrowed “base” should still allow you to breathe! I elaborate on that in this throwback post. Many regular wig and weave wearers will leave out their hairline and the nape area so as to protect them from potential damage. Oh! Glue on your edges? Not a great idea. Also, how bout just taking a break from your weave or wig every so often?
(3″> Ponytails, Puffs & Buns… be easy.
They’re cute and all but this is a good example of “too much of a good thing…”. I know we love our puffs and buns but try switching it up and alternating your pulled-back hair days with your hair-out or down days so you don’t put too much stress on your edges.
If you find yourself already suffering from hair loss around your hairline…
Try massaging the area with some Jamaican Black Castor Oil. The act of massaging alone improves blood circulation so just about any oil will do. The thing with JBCO, though, is that it has been known to increase blood flow to the scalp, sending nutrients to hair follicles which, in turn, boosts hair growth. Infusing it with an essential oil that stimulates circulation to encourage growth (rosemary, peppermint…”> is even better!
Keep your diet balanced. Eat right, take your daily vitamins and drink lots of water. Remember, healthy hair begins on the inside.
This post was written by LuvToBNatural for CurlyNikki. CurlyNikki Says: Shea Butter or pure aloe vera gel or juice are also excellent edge setters. Just slick some on and tie on a scarf. Voila. Magic.

MYTH 1: Sulfur in hair care products cause dandruff
Actually sulfur is part of anti-dandruff ingredients! It helps get rid of it, not cause it!
MYTH 2: Weather causes dandruff
Low humidity can trigger dry skin which leads to flaking but weather alone does NOT cause dandruff.
MYTH 3: You can catch dandruff from someone
Dandruff isn’t an infection, which means it can’t be caught from contact with people with dandruff. You have to have an individual sensitivity or predisposition to it.
MYTH 4: Dandruff is caused by poor hygiene
While washing your hair helps, this is a common misconception. It’s actually our intrinsic susceptibility to irritation, sebum (a substance found on our scalps”> and a micro-organism that lives on our scalp that really causes dandruff. Of course, while dandruff isn’t simply a result of poor hygiene, washing your hair regularly with dandruff can certainly make a big difference.
MYTH 5: Styling products cause dandruff
No, but some styling products leave a flakey residue that looks like dandruff. (From the resins that hold your hair in place”>.
MYTH 6: Dandruff is caused by dry scalp
This is a little redundant at this point but actually dandruff has nothing to do with dryness – rather it’s caused by too much oil.
MYTH 7: If a shampoo says it removes flakes then it’s a dandruff shampoo
Some clever marketers imply their products are dandruff shampoos by talking about removing visible flakes (which ANY shampoo will do”>. Burts Bees “Feeling Flakey” is an example.
MYTH 8: Copper brushes cure dandruff
Copper does have anti fungal properties and although some people swear by this, we can’t find any evidence that it’s true.
The Beauty Brains bottom line
It’s important to understand whether you truly have dandruff or just dry scalp. Then you can decide how to best take care of your scalp. A ZPT-based shampoo is generally accepted as the best but there are several different active ingredients you can choose from if your scalp is particularly flakey. And now you know that sulfur in shampoos and the weather do NOT cause dandruff!
This post was originally published on CurlyNikki.com

I don’t often write posts dedicated to the partners of naturalistas but I thought it would be a good idea to share some tips on dating women with natural hair. Because no matter how you look at it; we naturalistas certainly have our own ways. Therefore I put together a list with the top 9 things you need to know when dating women with natural hair:
YOU and Only you can touch her hair
Her hair is a part of her body. You, as a loving and devoted partner, are allowed to touch it just like the rest of her body. That being said, she probably won’t like it when strangers (your nosy friends, parents or others”> touch it without asking permission. Especially not when adding: “Wow. I didn’t expect it to be this soft.”
Handful of grease
If you do feel the need to touch her hair, you’re doing this at your own risk. What risk you ask? The fact that your hand will be covered in oil or leave in conditioner. So, don’t tell me I didn’t warn you.
Sunday=Washday
You’ll have to learn to accept that you won’t be able to share your Sundays together as they’re dedicated to washing her hair. This means that the whole day will be dedicated to cleaning and conditioning her hair. Try to understand this and don’t rush her into anything. If you push her into hurrying up, so she can still do something with the rest of her day (yes, I’ve been told this before”>, she will try to speed up the process. But this just means that her hair will break even more as she will treat it with less patience. Give her the time she needs.
Yes, she does need all those hair products
Yes, sweet Lord yes. She does need all of the products she has laying around the bathroom. You asked for a woman with a full set of hair and therefore you’ll have to accept that her hair products will take up 70% of the bathroom cabinet. And some of the shelves. And maybe your side of the bed.
Don’t ever call her a Snoop Dogg look-a-like
Even if she has mad rapping skills, no woman with braids wants to hear this. She braids her hair every night in order to preserve moisture and prevent it from tangling. This is a must for women with natural hair. It might take a while but it pays off. You can support her by offering a short neck massage. Saying she looks like Snoop Doggy Dog (now Snoop Lion”> is somewhat less supportive.
Don’t throw anything away without asking
Don’t ever, and I mean EVER, throw her hair products away without running it past her. Always ask if you can throw it out even if there’s a thick layer of dust on it. For all you know it’s her once-every-three-months-amazing-secret-cream-formula. Just because we don’t use our products on a regular base, does not mean that we don’t need it anymore.
Ignore the nightcap
Every night we go to bed, we put on our satin nightcap. The best thing to do is act like you don’t see it. A big no-no is saying that she is wearing a funny cooking hat. We most definitely know that the cap is not a sexy addition to our life, but it’s a must have to moisture natural hair and prevent it from tangling.
Curls everywhere in the house
If you live with a naturalista your house will probably be covered in little curly hairs. You might not like this or find it unhygienic, but the solution to the problem is: a hoover. Don’t ever mention that the curls look like pubic hair! If you make this mistake you might end up in a huge fight in which scenario you’ll be cleaning up the hairs by yourself.
She often changes her hairdo
Bron foto: Keturah Ariel
Natural hair is very versatile. One day she’ll be rocking an afro, while the next day she could have it tied back real tight. The week after she might have braids and the week after she might have taken them out to rock a ‘braid out’. That’s the amazing part of having natural hair!
ISN’T IT GREAT HAVING A RELATIONSHIP WITH AN WOMAN WITH NATURAL HAIR??
This article was written by ThisGirlsBlackBook for CurlyNikki.
Natural Hair Struggles

I love my natural hair, but sometimes it can do the most. So I’ve created a list of 14 struggles that only natural girls will understand

1″>. You shock everyone when you straighten your hair.

2″>. Protective styling and missing your hair. I last two weeks, tops!

3″>. Can we say, product junkie?

4″>. Using a TON of products, even though the directions state otherwise…

5″>. Your twists didn’t fully dry before you unravelled them…

6″>. Having to introduce the satin bonnet to your significant other…

7″>. Humidity = frizz

8″>. Not retwisting your hair and waking up looking like…

9″>. The ‘first day hair’ struggle #Shrinkage

10″>. People always want to touch your hair…

11″>. Styling your hair before bed takes forever!

12″>. Trying out a new style that you saw online and it turning out horrible.

13″>. Pretty self explanatory…

14″>. Bad hair days.

But when the going gets tough… just remember that your natural hair is awesome!
This post was written by Beautiffulcurls for CurlyNikki
I’m inspired to share these books after a recent encounter with a mom; she told me her four-year-old little girl, who has gorgeous, kinky-curly golden coils, was starting to notice and questioning the difference between her hair and other little girls. It was at that moment I remembered all of my insecurities while growing up in a Hispanic neighborhood, where best friend had silky, bone-straight hair which easily grazed her tailbone. The difference for little girls now is the plethora of positive reinforcers to encourage them to be just who they are — beautifully kinky-curly.
5 Story Books

Big Hair Don’t Care ($8″>

I Love My Hair! ($7″>

Penny & the Magic Puffballs ($13″>

My Hair is So Happy ($10″>

I’m a Pretty Little Black Girl ($12″>
Written by Confessions of a Blog Vixen for CurlyNikki

