Search Results: NaturallyCurly

Understanding how and why hair breakage occurs will help us better understand just how to repair our hair and make it healthier. “Hair is a fiber, much like wool,” says Dr. P. Mirmirani, a staff dermatologist at the Permanente Medical Group in Vallejo CA, “it’s bundled together tightly in the middle and protected on the outside by the cuticle.”
The main causes of hair damage come from, of course, the chemicals we apply.
Things like bleaching and color, highlights, perms, chemical straightening and relaxing. These processes make for a weaker cuticle and break down the strength of the hair. They also reduce the amount of sheen and natural oils that help give our hair that healthy looking vibrance.
Styling is also a part of why our hair suffers from breakage. Too many braids, ponytails, brushing, the pulling and tugging on your hair frequently, can all make for permanent damage. Extensions and weaves will also cause damage.
So how do we save our hair?
For most women, cutting out all of these above processes is impossible. However, we can manage our way back to better, healthier hair by cutting down on the amount of styling. And when you do find it necessary to use heat on your hair, always apply a product to your hair to protect it. If you use extensions, be sure they are not too tight, you do not want to damage your roots.
If you find that your hair is truly damaged, you may have to start over by getting a good, healthy cut and simple hair care routine. Dr Kiran Lohia, MD, says to shampoo at most 2-3 days per week with a sulfate free shampoo–depending on your activity and hair type. Always follow with conditioner, and apply extra to your ends. If you can, air dry, otherwise, use a product to protect your hair from damage. If you use a diffuser, try to dry hair just 20-30% and allow the rest to air dry. Make sure you use a healthy, deep conditioning treatment on your hair and scalp, like coconut or olive oil, at least 2x per week for your locks.
We interviewed RISE co-founders, Rochelle Graham, CEO of Alikay Naturals, and Angela Walker, Founder of The Natural Hair Nstitute, to ask about their experience in the beauty industry. They share their experiences and words of advice as trailblazing women in leadership roles.
Don’t let your insecurities cause negative competitive behavior
Rochelle: Narrow down what is working for you and explore the resources that are available to you rather than compare what you don’t have to others is one way to overcome feelings of “not being good enough.” Honing in on using your positive attributes and the resources that you have access to will not only better benefit you on the rise, but serve as an inspiration to another woman.
Angela: Women have to realize that talking to other businesswomen in your industry can only help your business. Everyone’s battle is different, everyone’s insight is different, and we all have something to learn from one another. You should enter these relationships with an open mind and an open heart, not necessarily spilling out your trade secrets but think of it as talking to a colleague who you both share the same passion for something. How could you not have a great conversation talking to someone who shares one of your most pressing passions.
Ways that women can help each other
Rochelle: Support and honesty are instrumental in women helping each other. Don’t be afraid to reach out and warn someone headed in a negative direction. Wanting to extend a helping hand to other women is what inspired me to launch the Alikay Naturals Brand Ambassador program. After receiving inquiries from women looking for advice as they embarked on their own goals and dreams, I wanted to create a program that served as an influential force in facilitating the individuality that builds confidence while empowering other women.
Angela: It’s important to reach back and encourage other women to make steps towards their dreams. It is inspiring to hear a woman you admire and/or respect tell her story and realize she started out just like you.
Top challenges for female entrepreneurs
Rochelle: The most challenging part about being a female entrepreneur, especially being a young female entrepreneur, is getting over the hurdle of expectations set by others. Traditionally, women have been expected to play a certain role in business and female millennials are challenging those stereotypes. As a female CEO, I find myself constantly having to prove myself as the most powerful decision maker within the company. Whether it is pushing for my voice to be heard in a board room surrounded by men or walking into a room with my spouse and male colleagues shaking my husband’s hand first after assuming that he is the sole decision maker. As a mother of a 3 year old, I have to always be aware that my ability to balance my work with my home life could be under scrutiny when taking on new partners. I want to be judged based on the quality of my work and my business, not my responsibilities in my personal life.
Angela: The most challenging part of being a female entrepreneur for me is being taken seriously. To be taken serious you need to look the part and I’m still working on that. I grew up in a home where makeup was never worn and fancy clothes were not a priority. The focus was on books and sports. So to now be in a realm where brains matter, but looks are almost just as important I find myself often feeling like I need to work on that side a bit more.
Turning your passion for hair care into a career
Rochelle: Whether you are an entrepreneur or an intrapreneur, it is important to invest your time wisely in research, be passionate about your career and be willing to go the extra mile for your business. While funding is a resource often associated with entrepreneurship, industry knowledge and a vision are the main resources for both.
For entrepreneurs, having your own business is so different from working for someone else. There is no one to tell you when to start your day or end your day. You have to be self-disciplined, be able to set your own boundaries and have the ability to forecast what your business needs for growth. As an entrepreneur, loving what you do is an important part of the dedication to your business, because you are going to work harder, wear many hats, and be required to make sacrifices.
Angela: Volunteer your time into getting to know the industry. And by getting to know the industry I don’t mean watching YouTube for hours, though entertaining, that’s not an education on the industry. There are many roles that make up this amazing industry we all love and you need to educate yourself to find out which avenue you want your career to go.
The RISE Women Empowerment Tour’s first stop is this Saturday, March 7th in Houston, TX. Join Michelle, NaturallyCurly.com Co-founder for her inspirational talk on female entrepreneurship. We hope to see you there!
If you have ever treated yourself to a “shot” of wheatgrass at your local health food shop, you’ll recognize the taste, and the color — both are extremely green — for lack of a better term. Why? That tiny little cup of thick green juice goes down fast and starts nourishing your body immediately.
Holistic health experts say that wheatgrass contains 98 of the 102 earth elements, and the benefits for humans are a lengthy list. Wheatgrass allows the body to perform and function at it’s best and highest levels, when taken regularly. It also does amazing things for our skin and hair.
It’s a great option for those who are highly active and allows you to clean your hair thoroughly, without removing much needed protective oils.
Wheatgrass used topically is known to help reduce the appearance of gray hair, treat dandruff and scalp problems and add and seal in moisture, naturally. It’s a great option for those who are highly active and allows you to clean your hair thoroughly, without removing much needed protective oils. These 3 wheatgrass shampoos may be worth a try.
Peter Lamas Wheatgrass Shampoo, $20
This product is known to be an effective detox for chlorine and excessive mineral deposit build-up. This shampoo also helps to protect color and guards against color fading. This product is 100% vegan, certified organic and is cruelty and paraben free.
MORE: Top 10 Vegan Hair Brands
Supernatural Wheatgrass Protective Shampoo, $29
This sulfate-free shampoo has UV protection to keep color from oxidizing or fading. The antioxidants (wheatgrass”> and aloe work together to soothe a sensitive scalp. It also contains non-irritant essential oil of orange, clary and tangerine leaf fruit extracts to preserve color and hydrate dry hair.
Qhemet Biologics Egyptian Wheatgrass Cleansing Tea, $13
If you have multi-textured hair in need of a good clarifying treatment session, this sulfate-free, pure kosher shampoo is for you. The shampoo includes organic wheatgrass extracts, barley, alfalfa, and aloe. It has vegetable glycerin to add shine and promote health, naturally. It reduces the chances of excessive shedding and the soothing lavender scent is perfect for using before bed at night.
Any of these 3 shampoos can be used on all hair types, and, for those who are more active, due to their concentration of organic content, these shampoos can be used more regularly if needed. It’s recommended that you lather the shampoo in, let it sit in your hair for 3-5 minutes then rinse and condition as usual.
Have you ever used wheatgrass for your hair or health?
Each year the NaturallyCurly Editors set out to find and test the best products and tools on the market for curly, coily and wavy hair. Our twelve editors – ranging in hair types from 2A to 4C – have tested hundreds of products from the tried-and-true Holy Grails to the up-and-coming new kids on the block. Here are a few (but not all”> of the criteria we used to make our decision:
- Does the product work for your hair type?
- Would the product replace your Holy Grail product in that category?
- Ingredients
- Does the product do what the packaging claims it will do?
- Does the product have added benefits not listed? What are they?
- Ease of use and product distribution
- Packaging and product functionality
- Innovation
- Scent
After months of deliberations and a few heated debates we are thrilled to announce the final winners of Editors’ Choice 2015.
Shampoo
- TYPE 2 – Elucence Moisture Benefits Shampoo
Clarifying Shampoo
Shampoo Bar
- TYPE 2 – None
- TYPE 3c – Jakeala Marshmallow Root Shampoo Bar
- TYPE 4 – Jakeala Marshmallow Root Shampoo Bar
Dry Shampoo
- TYPE 2 – Amika Perk Up Dry Shampoo
- TYPE 3 – DevaCurl No-Poo Quick Cleanser
- TYPE 3c – DevaCurl No-Poo Quick Cleanser
- TYPE 4 – None
Cleansing Conditioner
- TYPE 2 – NYC Curls The Curl Cleanser
- TYPE 3 – Unwash Bio-Cleansing Conditioner
Daily Conditioner
- TYPE 2 – U R Curly Quinoa Conditioner
- TYPE 3 – Curls Coconut Sublime Conditioner
Leave-In Conditioner
- TYPE 2 – Kinky-Curly Knot Today
Deep Conditioner
- TYPE 2 – Amika Nourishing Mask
Treatment
- TYPE 2 – MopTop Clarifying Rescue Treatment
Moisturizer
- TYPE 3c – Oyin Handmade Hair Dew

Styling Cream
- TYPE 3 – ISO Bouncy Créme
Styling Gel
- TYPE 3 – Oribe Curl Gloss
- TYPE 3c – As I Am Coil Defining Jelly
- TYPE 4 – Kinky-Curly Curling Custard
Cream Gel
- TYPE 2 – Redken Curvaceous Full Swirl
- TYPE 3 – Paul Mitchell Fast Form
- TYPE 3c – Ecoco Eco Curl ‘N Styling Cocktail
Frizz Fighter
- TYPE 3c – None
- TYPE 4 – None
Product to Cocktail
- TYPE 4 – Darshana Natural Indian Hair Oil
Smoothing or Straightening
Refresher
Finisher
- TYPE 2 – Amika Un.Done Texture Spray
- TYPE 3 – Ouidad Clear Control Pomade
- TYPE 4 – Darshana Natural Indian Hair Oil
Hairspray
- TYPE 2 – DevaCurl Flexible-Hold Hair Spray
- TYPE 3c – None
- TYPE 4 – None
Hair Oil
- TYPE 3c – Sunny Isle Jamaican Black Castor Oil
- TYPE 4 – Darshana Natural Indian Hair Oil
Styling Tool or Necessity
- TYPE 2 – DevaCurl Dryer and DevaFuser
- TYPE 3 – DevaCurl DevaTowel
- TYPE 3c – Curly Tee Towel Original Curly Tee Towel
Retexturizing Tool
- TYPE 2 – Amika Switch Kit Starter Set
- TYPE 3 – Amika Tourmaline Clip-Free Curler
- TYPE 3c – Curlformers Short & Wide Styling Kit
Hair Growth Product
- TYPE 3c – Jane Carter Solution Grow Great Hair
- TYPE 4 – Sunny Isle Jamaican Black Castor Oil
Mousse or Foam Product
- TYPE 2 – Pantene Pro-V No Crunch Curls Whip
- TYPE 4 – None
Shine Spray
- TYPE 2 – Sebastian Trilliant
-
What It’s Like Living In Germany With Curly Hair… As A Guy
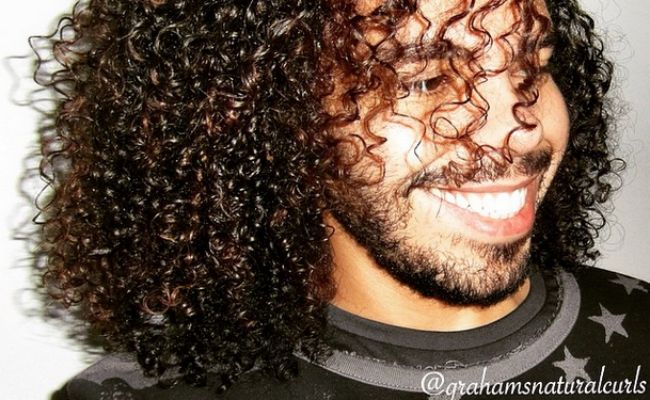
Hi my name is Graham, I live in Germany and I would like to talk about my personal experience of the natural Hair Community in my Country.
First of all let me give you some Informations about my ethnicity, my mom is German and my Dad is Puerto Rican African American. I remember growing up in germany as a mixed curly Boy wasn’t very easy. I lived near an army base so I also had some African American or multiracial friends but I went to a German school where there were not many kids like me. I got teased a lot for my skin color and curly hair even though I am very light skinned.
I was the only mixed boy in my Class which was very hard for me
I was the only mixed boy in my Class which was very hard for me, but it got a little bit better when I moved to another school. Over the years, a few things have changed but not a lot when it comes to acceptance, marketing and availability of curly hair products.
I live in a small city–it is not super small but also not very big. I know a few mixed ladies and gents and I’ve also introduced them to my Youtube channel to show them that they can rock their curly hair no matter what other people say. Some ladies really stopped relaxing their hair, too!
I notice some people staring at me whenever I am walking through the shopping mall… but I guess it’s only because they’re not used to see someone rocking big, fluffy hair outside the Internet. I can see that it get’s better but curly hair is still not fully accepted where i’m from, it is not ignored because there are some curly guys and ladies but it needs a bigger change.
Another BIG problem is finding curly hair products.
It is impossible for me to find what I need in my city. Regular beauty supply stores doesn’t carry curly hair products. I can’t just go into a store a buy something from Lottabody, Carol’s Daughter, or Creme Of Nature. The nearest big city that carries some of my favorite products is about an hour away, but they also do not carry everything I like–so most of the time I have to buy online.
I can see a difference when it comes to marketing on billboards, magazine advertisements and television commercials. However, every now and then I see African-American male and female models on billboards in stores like H&M and Zara and the same with magazines and TV Commercials. It’s great to see that because little girls and boys who walk into a store and see that or watch a commercial might feel accepted because the model looks like them.
I do know a few Cities with a bigger amount of Mixed and Puerto-Rican or African-American People and i believe it would be great to do some meet-ups over there because that’s something I really miss. I always hear about the curly meetups and events but it seems they are all in the US and England, even France. But what about Germany? I’m sure a lot of curlies like myself would join a curly event in a German City like Mannheim or Frankfurt, those are cities with a lot of curly guys and ladies. Who knows, maybe I can host it!
There should be a huge change soon because I can see that the natural community grows each day more and more and i think that’s something that should have happened already many years ago– but, better late than never.Until next time, stay curly! Follow me on my YouTube channel and Instagram.
Question
Can hair bonding glue (for weaves, wigs, and extensions”> cause damage to your natural hair?
Answer
Unfortunately, yes. The glue can do damage to your scalp, which can be permanent.
According to The Hair Trauma Center founder and beauty expert Jacqueline Tarrant, hair weave glue does not allow for any “breathing” of the hair, in that it blocks the pores in your scalp, damaging hair follicles and drying out the hair. If you wear longer or heavier extensions, the glue and the extensions will eventually pull on your scalp and may begin to thin your hair too. Some people report that they get headaches and bald areas on their scalp from the glue and extensions.
Hair glue contains large amounts of a soluble latex which may cause a reaction to those who are allergic.
Hair glue contains large amounts of a soluble latex which may cause a reaction to those who are allergic. Due to the high volume of products made with latex, more people are finding that they are experiencing reactions. Those who are allergic or have reactions can experience dermatitis, even asthma and anaphylactic shock.
For those who suffer from latex reactions from hair glue, simple procedures like scalp treatments can help heal the affected areas. Sometimes, hair must be cut a particular way afterwards, so as to avoid more swelling or lesions. For those who suffer from dermatitis, a mild soap in lukewarm water can help relieve the itching.
If you have had extensions or used hair glue with a wig, thoroughly check your scalp and neck areas for bumps, swelling or irritation. If you notice anything, remove the source of the issue immediately. Stop your use of hair glue and go see your primary care doctor. There are newer, healthier options on the market which are fragrance free and non-allergenic for sensitive skin. Ask your stylist or the cashier at your local beauty supply store what options they offer for bonding extensions to your natural hair.
If you are in the market for shopping a detangling brush, here are a few videos you may want to watch before you shop. Not sure if a detangling brush is for you? These are all specifically designed with textured hair in mind, and they’re created by 3 of our favorite Youtubers.
Long, Thick 3C Curls: Denman Brush
Using a very basic technique, Curls&Beauty&Life shows her fellow tailbone length 3B/3C curly hair viewers how to use the Denman brush on wet hair with a quarter sized amount of leave-in curl creme. Using just short simple strokes of the brush, wet, thick curls are tangle-free and frizz-free in just one short session.
This brush is available online at Shop.NaturallyCurly.com and in Sally Beauty stores.
Low Porosity, Fine 3B Curls: Tangle Teezer
The video shows those of us with 3A-3B fine curly hair how to use a wide tooth comb, a Boots brush (vented with wide plastic “Bristles” “> a large roll brush with bristles and the Tangle Teezer. Thesparkleicious promotes the Tangle Teezer stating that “it’s an amazing brush” and is available in varied sizes and colors. The Tangle Teezer is great for thick curls–long or short, and it is great for managing difficult knots and tangles.
This brush is available online at Amazon and in Target stores.
Color-treated, 2A Waves: The Wet Brush
A very candid video review–yes, there’s “language” in it–about The Wet Brush. Rachel Whitehurst has thick, red, color-treated wavy hair (which she bleached on the ends”> and states that it’s usually tangled mess. According to Whitehurst, this brush has definitely changed her life and she lets you know in full detail. The brush is used in the shower, on wet hair, and glides through thick curls in just seconds – according to the video. The Wet Brush allows for zero tangles or frizz, and easy to style hair.
This brush is available online at Folica and in Ulta stores.
[prodmod]
What do you use to detangle?
It may sound fun to receive boxes upon boxes of free curly hair products every year and then be asked to choose your favorites… until you have your hair parted in 4 sections with a completely different shampoo, conditioner, leave-in, butter, and oil on each section, as you enter the results of this latest round of tests into a spreadsheet. Yes we have spreadsheets. Then, and only then, will you truly know what it’s like to live through Editor’s Choice season. Sure, a few months ago your eyes were wide with glee thinking only of all the products you will get to try. All the new stuff. The scents. The packaging. Hundreds of them. You. Couldn’t. Wait. But like that frozen yogurt you ordered with all of the toppings you suddenly find yourself overindulged and totally overwhelmed. Ok who are we kidding, it is still really fun.
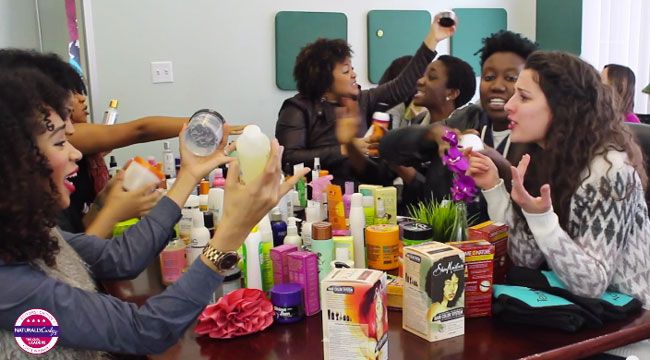
For months the NaturallyCurly editors have been in deliberations over their picks for the 2015 Editors’ Choice awards. First we split off into four different groups determined by our curl pattern. The Type 2s, Type 3s, Type 3cs, and Type 4s. Then we proceeded to test shampoos, oils, masks, refreshers and more, all the while comparing the new crop against our tried and true Holy Grails. As you can imagine, this lead to spirited discussion and passionate debates around the office, a few of which we decided to capture on camera.
This is a recreation of the events that transpired, but it’s pretty spot on if we may say so ourselves. Yes Michelle really does use that much product on the daily, Cristina really did jedi mind trick her peers, and Amanda literally thinks she can speak for both Type 3cs and Type 4s, and no they’re not happy about it.
We’re so excited to share this year’s winners with you! We’ll be announcing Editors’ Choice 2015 next week, but in the meantime enjoy this sneak peek behind the scenes at the NaturallyCurly office.
Watch the Video
Subscribe to our YouTube channel for more videos like this!
We personally think gray is beautiful, but we get questions from our community about how to slow down the growth all the time. Of course a good diet, genes and a lifestyle are major contributing factors, but if you are tired of covering them up with commercial color that is laden with chemicals, it may be time to try a more natural home remedy. For hundreds of years women have been taking their gray hair care into their own hands right in their kitchens, and these are a few of the ways they have found success.
The following ingredients for these recipes can be found at your local fresh or whole foods markets or health stores.
Curry leaves
Boil a handful of fresh curry leaves in a tablespoon of coconut oil and strain. Massage the mixture into your hair and rinse after 30-40 minutes. Use this treatment 1-2 times per week.Indian gooseberry
It is rich in vitamin C and has lots of anti-aging benefits. Boil a few pieces of gooseberry with some coconut oil and allow them to cool. Apply the oil to your scalp and leave on for 1-2 hours then rinse.Coconut Oil and Lemon Juice
Mix 3 teaspoons of lemon with some coconut oil, enough for the length of your hair and apply it to your scalp and massage it in. Leave it on for at least an hour then rinse and shampoo as usual.Henna
Works wonders for darkening hair and strengthens while leaving shine. Using henna powder, or grinding henna leaves into a powder, form a paste and add 3 tpsns of Indian gooseberry powder, one teaspoon of coffee powder and a touch of plan yogurt then spread on your hair. When it’s dry, rinse it out and shampoo as usual. Repeat every 2-4 weeks.Onion juice
Apply juice directly to scalp and leave on for 30 mins then rinse. Repeat daily for 2-3 weeks.Black tea
Helps darken hair and leaves shine. Boil 2 teaspoons of black tea in a cup of water and add 1 teaspoon of salt. After cooling, rinse your hair with the mixture 2-3 times and let the last rinse sit on your hair for 20 mins. Wash your hair with cold water but do not use shampoo to follow.Rosemary & Sage
Boil 1/2 cup of each in 2 cups of water and let sit for 2-3 hours, then strain. Use it to rinse hair after your shampoo and let it sit for 15-20 mins then rinse with water.Amaranth
Combats hair loss and helps retain the color of you natural hair. Shampoo your hair then use the juice squeezed from the amaranth leaves to your scalp and rinse.Have you found a gray hair remedy that worked for you?
What is a forehead/hairline lift?
A forehead or hairline lift minimizes the creases that have developed over time across the forehead. The same procedure also helps to decrease the lines across the bridge of the nose, frown lines and repositions sagging eyebrows. The overall appearance after a forehead lift is usually that of a more rested face.
For those considering a forehead lift, finding the right doctor is first and foremost. Doctors will be certain to ensure that the procedure you’re requesting is realistic for your appearance.
…the method involves one continuous incision starting at ear level and then moving around the hairline. A well-done procedure will ensure no visible scarrin
For the most part, the method in which the lift is done involves one continuous incision starting at ear level and then moving around the hairline. A well-done procedure will ensure no visible scarring will appear at the hairline after the operation and healing process.
Other types of procedures can also be done. Your doctor can make more than one incision using an endoscope so the surgeon can view the procedure on a large screen as she works. Similar procedures to the hairline lift are a browpexy or a direct brow lift, which adjusts the brow position. Some of these procedures, can, at times, be combined with a facelift or other similar cosmetic procedures.
Are they safe?
As with any surgery, there is always some risk involved. Some of the side effects and possible complications that can occur are: prolonged swelling, small amount of hair loss around the incision, bleeding underneath the forehead (skin”>, injury to the nerve that raises the eyebrow and temporary numbness or itching of the forehead and hair.
Recovery from the forehead lift procedure takes time. Doctors stress the importance of patience through the healing process. Most surgeons recommend 2-3 days of cold compresses and elevating your head with a lot of rest. Sutures are typically removed about one week post-surgery and most clients have fully recovered after two weeks.
Considering getting a forehead/hairline lift?
If you are considering a forehead lift, do your research and educate yourself about well qualified board surgeons of cosmetology. When meeting with your doctor, be sure to have a list of questions and concerns as well.
You know when your curls are in a rut? Your old faithful products aren’t doing the trick and the curls just are not popping like they used to? In times like this, you might want to consider a protein treatment.
If you color treat your hair or use heat styling tools then all the more reason to work a protein treatment into your regimen.
Depending on your hair needs, there are different types of protein treatments that perform different functions. If your hair is fairly healthy then you can treat your curls to a light treatment or protein pack once a month. For moderately damaged hair, choose a deep penetrating treatment twice a month. And if your hair needs some serious TLC then opt for a reconstructor, like the ApHogee Two-Step Protein Treatment.
How can you tell if you need a reconstructor?
Your hair could use a reconstructor if it:
- Is over-bleached.
- Will not hold color. (use PRIOR to color application”>
- Breaks when combed or brushed.
- Is mushy when wet and brittle after drying.
Directions
Shake well before use! Keep out of eyes. If product gets into the eyes, rinse thoroughly with clean water. (The pH of ApHogee Two-Step Protein Treatment is about that of lemon juice and it will cause similar eye irritation”>.
- Gently cleanse hair with ApHogee Shampoo for Damaged Hair. Rinse thoroughly and towel blot dry.
- Apply enough ApHogee Two-Step Protein Treatment to thoroughly saturate hair and comb blend for even distribution.
- Leave hair uncovered, DO NOT use a plastic cap. Either sit under medium heat hooded dryer. (Alternatively, a hand dryer may be used, but hair should not be agitated while drying.”>
- Re-wet and gently rinse thoroughly with warm water. Repeat
- Apply ApHogee Balancing Moisturizer to hair and scalp. Leave in for 2 mins., then rinse thoroughly. Style as usual.
Watch the Video
Have you tried this protein treatment? What did you think?
[prodmod]This post is sponsored by Aphogee.
You’ve been seeing Jamaican Black Castor Oil praised everywhere so you ran out and bought yourself a bottle of the thick, dark magic potion. Now what? What exactly can you do with this oil and why is it so much darker than any other oil you’ve ever tried? In this infographic we show you how to use JBCO to thicken your eyebrows, fade your scars, restore your edges, minimize acne redness, revitalize your scalp, minimize crows feet, decrease joint inflammation and soften your hair. Talk about multi-purpose!
And this is only a handful of the ways you can use JBCO, if your favorite way to use it didn’t make the list, let us know in the comments.
Cold weather can make for itchy skin and a dry scalp. Curls can suffer too– from lack of moisture and dried tresses. Knowing how your skin and hair adapt naturally to the cold is helpful. Once you see and feel the changes of the season, begin to make some changes to your hair care routine too.
So, why doesn’t your hair like the cold? Perhaps one of these common reasons.
1. It’s dry out there!
Stay extra hydrated this winter. Curly hair tends to be dry by default, so it needs some extra love once the weather starts cooling down. Start drinking more water. Carry a small spray bottle with you on your commute filled with water and a leave-in conditioner.
2. Goodbye, shine…
Sadly, our hair suffers more when the temps drop and dull hair sets in. Do not wash your hair every day–this will disturb the natural oils in your hair that help promote growth and add natural sheen to your curls. Avoid dyes and fragrances in your product if you notice your hair feeling thinner.
Use a moisturizing cleansing conditioner (co-wash”>. Choose one based on your hair type, porosity, and thickness. For a list of conditioners with reviews from curly members, check the Product Database.
3. Split ends and brittleness
Dryer hair leads to split ends, ultimately leading to breakage. Set aside 30-45 minutes for a weekly deep conditioning treatment. Cover your hair with a plastic cap and sit under a hooded dryer. Rinse out product thoroughly with a sulfate-free shampoo or cleansing conditioner.
Look for products containing humectants for your curls during the winter. Puddings, creams and butters are great options. Experiment and find out just how much of the product your tresses can handle without being weighed down, but still moisturized. These types of products are usually heavier in consistency than other stylers.
If you haven’t tried a curl refresher before, you may also want to during this season as well. They are especially helpful for revitalizing second-day hair and beyond without cleansing or conditioning.
4. Dress up without flattening down
Hats are a cute way to protect your curls from the elements of the climate. A lot of curlies like cowl neck sweaters and jackets which add like oversized hoods. The trick is to wear your nighttime satin/silk bonnet underneath to keep the fabric from tugging your hair or adding frizz if you choose to take it off during the day. Or, tuck your hair under the hat by bunning it.High school is a roller coaster, which at times, seems to have more downs than ups, and other times more ups than downs. I found myself starting my junior year in a completely new setting with few friends. For those of you who have never been ‘the new kid’ take this piece of advice: confidence is key.
I walked in on my first day in a new high school with a smile on my face and curls in my hair. The amount of compliments that I got about my hair from strangers was astonishing.
“Oh my gosh is this your natural hair?” When I answer yes I usually get a ‘lucky’ or ‘I’m so jealous’.
When I was in middle school I woke up an hour earlier than I should’ve every day so I could hide something that I’ve come to love. I straightened my hair because that was what all the other girls did. I didn’t realize that having curly hair was a characteristic that set me apart from the teenage girl crowd. It wasn’t until my freshman year of high school that I started wearing my hair naturally. I felt different, like I had finally found the answer to the most important question to me. Who am I? I’m Hayley; yes the one with the curly hair.
Every girl feels that they should look their best going in to their first day of school, and I did that with curly hair. I wasn’t afraid of what people would think of my curls because I love them. I do stand out, but that doesn’t matter because I’ve accepted the fact that I’m different.
After every shower I have a short process to make my curls shiny and not frizzy. First off I comb through it and get all of the tangles out, then I run through it with an oil of my choice (Argon, Moroccan, Monoi, Keratin, or Macadamia”>, and lastly I scrunch sections of my hair with mousse or styling cream. I then let it air dry to get pretty curls.
It took me a while to find hairstyles that I could use at school, but I eventually found a few I wear often. I try to keep it simple because less is more. I usually wear my hair with a headband, pinned back by a few bobby pins, or half up half down. I like using a headband because I can coordinate it with my outfit or add a pop of color if I’m only wearing neutrals. It also keeps the hair out of my face and is easy to do with my hair in a pony tail or down. I usually pin my hair back when I have a test that day. This hairstyle keeps the hair out of my eyes and you can get creative with it, such as braiding, twisting, etc. Lastly, and my favorite, half up, half down. Its simplicity makes me confident that my curls look the best they can.
High School is a time in your life to figure out who you are. Don’t hide your curls because everyone has straight hair or you’re afraid of what others would think. Be your natural self, a curly girl.
This article was written by Hayley Sureck.
The United Kingdom is a diverse country and with that brings an exciting and beautiful multitude of waves, curls, spirals, and coils.
The British curly hair market has recently boomed in response to the increasing number of people embracing their natural textures, and it has lead to a wide range of products designed for wavies, curlies and coilies’ specific needs!
CurlMart ships internationally so you can always order your favorite curly products, but if you’d like to walk into your local store and pick up shampoo or conditioner, then this list is for you.
Illustration by NikisGroove
Hair color–lightening, bleaching–is always a matter of chemistry. Many women use hair color to give them a newer, fresher look, while others are simply covering some greys and roots. It’s estimated that over 1/3 of women over the age of 18 color or lighten their hair frequently. There is a growing trend of men as well, who are also using more hair color more now than ever.
Quick history lesson
The first commercial hair color was invented in 1909 by French chemist, Eugene Schueller. Since then, dozens of chemists have reformulated colors and lighteners to enhance natural colors and help rid of unwanted greys.
Today’s chemical processes may still not be considered safe, and coloring and lightening hair will always take a toll on hair’s natural shine and body. But using a deep conditioning system and maintaining a healthy hair routine aids in making color last and keeping hair looking it’s best.
So, how does it work?
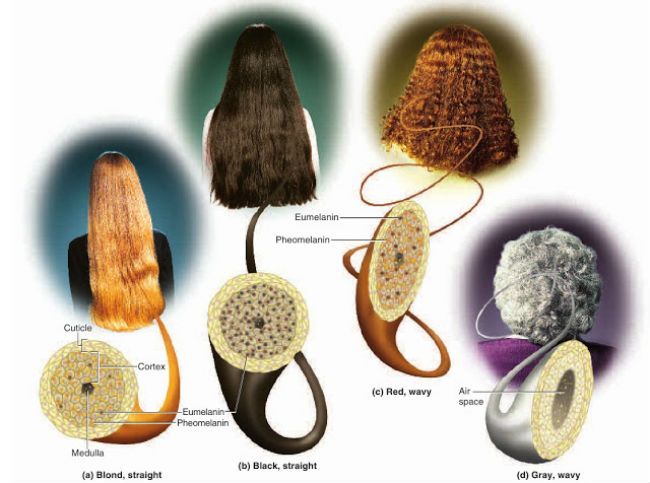
Normally, bleach is used to lighten hair. It reacts with the melanin (the part responsible for the color tones in your natural hair”> in the hair, and removes the color in an irreversible chemical reaction. The bleach oxidizes the melanin molecule. Although the melanin is still present, the oxidized molecule is colorless.
Hair bleach tends to leave a yellowish tint on the hair at first. The yellow color is the natural color of keratin, the structural protein in hair. Bleach also reacts more readily with the dark eumelanin pigment than with the pheomelanin (longer polymers”>, so some gold or red residual color may remain after lightening.
Hydrogen peroxide is one of the most common lightening agents found in hair color. The peroxide is used in an alkaline solution, which opens the hair shaft to allow the peroxide to react with the melanin. Hydrogen peroxide reacts with melanin, breaking their double bonds and eliminating their ability to absorb light. Because pheomelanin is more stable than eumelanin, hair that is in the process of being bleached often begins taking on an orange-red hue.
In addition to hydrogen peroxide, commercial bleaching products will usually have persulfate salts to help speed up the process, and stabilizers to help prevent the breakdown of hydrogen peroxide. Hydrogen peroxide also weakens the cell membrane complex by oxidizing bonds between cuticle cells, disulfide bonds in the cortical matrix, and other areas rich in amino acids. This makes the hair brittle and weak. Hydrogen peroxide also can damage a lipid on the surface of the hair called 18-MEA. As a result, bleached hair will also frequently feel dry.
It is most important to keep bleached (lightened”> hair extremely moisturized after a color/bleach treatment. Deep conditioning with natural products like coconut and jojoba oils will keep hair healthy and looking it’s best.
[prodmod]Try one of these products specially formulated to work with color-treated hair:
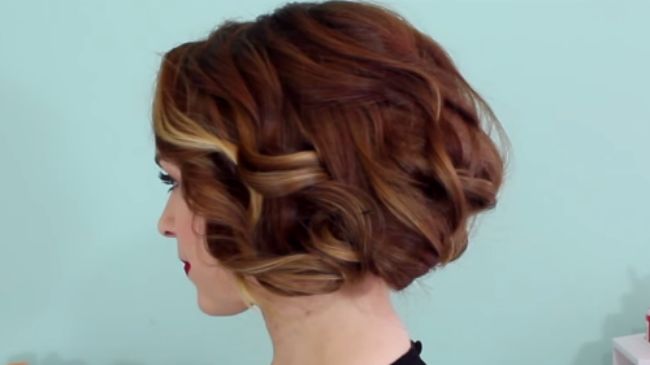
Faux bobs are a great look for special events, or just a way to change up your day to day look on longer hair–without a long term commitment. Following these simple steps with Kayley Melissa’s video tutorial, you can create your glam faux bob.
-
Make a base with the back part of your hair.
-
Tie up the back section of your hair –and twist loosely into small bun. This will help add some volume and shape to the overall faux bob once it’s done.
-
Let the rest of your hair down and twist it into looser curls or waves. Spray lightly with a holding mist.
-
Separate your remaining hair into 5 sections. (3 in back and 2 at top”>
-
Gather the middle/back section of your hair and wrap it around 2-3 fingers, like a donut shape, loosely. Pin that section underneath (where you have the small bun from step 1″> and do the same with the sections on the side.
-
Pin your sections underneath.
-
Use a curling wand for the front section of your hair. Curl hair away from your face.
-
Loosen the curl with your fingers.
-
Take one section, wrap around 2-3 fingers, in a donut shape again, and roll up and pin underneath. Do the same for the other top section.
At night, add a sparkly hair clip. If any pieces come undone, be sure to have a few extra hair pins with you to fix them.
Watch the tutorial
 The oregano herb has been used for thousands of years not only to cook with, but as an all-natural medicinal healer. It has been found to work wonders for those with GI and urinary tract disorders, and its anti-inflammatory properties is effective in helping those suffering from osteoporosis, common cold, bloating, muscle pain, allergies and common ear and toothaches.
Oregano’s antibacterial properties also help in ridding of fungus from the scalp and nail bed areas. It works wonders on dandruff and nail fungus.
Nail fungus remover
- Mix 1/2 cup of Epsom salt and 1/4 cup of borax in a basin with tepid water.
- Soak hands or feet for 20-30 minutes. Dry off with towel.
- Rub oregano oil into the infected nail and onto every cuticle.
The oil should be applied three times per day until you notice the fungus going away. Keep your feet dry and allow them to breathe by wearing sandals or open toed shoes.
If you instead, suffer from skin infections or irritated gums, dry skin, you can mix olive oil or coconut oil with 1-2 drops of oregano oil and apply to your infected/itchy area.
Dandruff & dry scalp treatment
- Mix 2-3 drops of oregano oil with any other hair oil of your choice and rub into your scalp, delicately.
- Add a few drops of almond, coconut or olive oil.
- Leave on your scalp for 45 minutes and use a clarifying shampoo to completely rinse it out.
You may also add 2-3 drops of oregano oil to your shampoo and apply it to your hair in the shower. Let it stay on your hair for 3-4 minutes then rinse. Repeat one more time then condition if desired.
Knot detangler
- Mix 1-2 tablespoons of dried oregano with one tablespoon vanilla extract and one cup of water.
- Warm the mixture for 45 seconds on low heat or microwave for 30 seconds then allow to cool.
- Pour the mixtures into a container or spray bottle and keep it in the fridge.
- Use the mixture on your hair after your shower and comb it through evenly.
The mixture can be stored for up to one week.


