Search Results: Jemima Price


Back in the ‘80s, many curlies sported a crispy, crunchy-looking halo of rock-hard shiny curls achieved from their gel or mousse. Fear of this crunchy perm look is why many people have been scared off wearing their curls naturally since! However, this ‘cast’, as it’s been termed, is what can help to create smooth, glossy curl clumps, once you have removed it. This step in a curly girl’s repertoire is often the break-through moment – you know, that moment when you realize you’ve been doing it wrong all along!
So, how do you remove this crunchy cast? Well, that’s where the process of ‘scrunching out the crunch’ or SOTC comes in.
How to Achieve a Cast

Pictured: @actuallyalicia.curls
A solid cast is achieved through curly hair styling with your favorite products on wet or damp hair. Different products can create different strength casts, but strong-hold gels and mousses are usually the best way to create a cast.
Allowing the hair to dry fully (either through diffusing or air drying) without touching it too much (tempting I know!) allows the product to form a hard, crystalline surface around the hair.
Image Source: @chloe.chapdelaine
This encourages the cuticle to lie flat which in turn creates that smooth coveted shine. However, you don’t want to walk round with rock-hard curls looking like you’ve just jumped straight out of an ‘80s Bon Jovi MTV video! This is where the term ‘scrunch out the crunch’ comes in or you could think of it as the “soft curls technique.”
How to Scrunch out the Crunch
Step 1: Ensure hair is completely dry
Test this by holding a clump between two fingers and squeezing gently, feeling for any dampness.
Step 2: Scrunch
Gently cup curl clumps in sections and scrunch your curls upwards. Some people do this quite vigorously to gain volume and lift the root, but you may wish to do this gently to begin with to see how much definition you can achieve.
Step 3: Crunch


Image Source: @allamerican_curly
Keep cupping and scrunching until all the ‘crunch’ has gone and your curls are soft and bouncy. Don’t forget the back; you want to reduce crunchy curls that could still be lingering! Some people flip their hair from side to side or upside down to ensure full coverage.
Different Ways to SOTC
You can simply do this with the cheapest option – your bare hands! However, some curlies like the added protection and luxury of scrunching with a silk scarf. Drape the scarf across your palms and scrunch in the same way as above.
Image Source: @brittminetti
Another option is to use hair oil. Rub a couple of drops between your palms before scrunching. The oil helps break up the cast and adds extra shine.
Image Source: @__kimberlydiaz
Some people prefer to mix up their method of removing the crunch; for example, you could try ‘smoothing out the crunch’ which is where you gently smooth the curl downwards between two fingers, thus smoothing out the cast. This helps to reduce the chances of getting frizz, which can happen with over-vigorous crunching! Or you could ‘clap out the crunch’ on more stubborn casts where you clap the lengths of your hair between flat palms.
What If I Don’t Achieve a Cast?

Don’t fret too much; you can still achieve beautifully smooth and glossy curls without one. Next time you wash, try applying different layers and combinations of products or try a strong-hold styler as your final layer. Once you get used to recognizing whether you have a cast forming or not, you can try the #smasters technique, which is where you apply another layer of gel/mousse when your hair is 80% dry. This can help a cast to form before you finish drying fully.
So, what are you waiting for? Let’s get scrunching!
This article has been updated.
OUR EDITORS INDEPENDENTLY SELECT ALL PRODUCTS FEATURED ON NATURALLYCURLY. HOWEVER, WE MAY EARN AN AFFILIATE COMMISSION WHEN YOU BUY SOMETHING THROUGH OUR RETAIL LINKS.
Wavy hair can be incredibly versatile, adding texture and hold to hairstyles that might fall flat on straighter hair. That’s why when you need a break between wash days, you’ve gotta pull from the arsenal of wavy hairstyles at your disposal. Whether you are aiming for a protective wavy hairstyle or keeping it chic with a stylish wavy updo, there are many ways to change your everyday look. If you’re looking for inspiration, we’ve rounded up 15 of the best hairstyles for wavy hair.
1. The Half-up Ponytail
Image Source: @aslinurakinci
We’ll kick off with a quick and easy one! The key to this hairstyle is volume which wavy hair can sometimes lack. Asli gives a good tip here: once you’ve scooped the top layer into a high ponytail at the back of your head, use a claw clip underneath the pony to lift it even further.
2. Loose High Spacebuns

Image Source: @amberbuzz
Super cute for a beach trip or festival. Divide hair in half and loosely bunch hair at the base of your head (make sure they are even). Secure in loose messy buns using spiral bands. Pull a few tendrils out around the face for a softer look.
3. Messy Loose Pony
Image Source: @kellanywilliams
Wavy hair is the best type of hair for a messy pony. Simply scoop hair to the crown of the head and secure it in place with a spiral band or scrunchie. Leave loose sections around the face. This looks especially good with a middle part, as shown above.
4. Waves with Clip
Image Source: @itsmikaylanicolee
Have a day when your waves just won’t refresh? Enhance natural waves with a fun accessory. You can gently twist your hair at the base of your head and then securely or loosely clamp it down with your favorite clip.
5. Temporary Color
Image Source: @linnygd
To really stand out, why not try upgrading your waves with a pop of color? There are so many temporary color masks to try now, like the Curlsmith Hair Makeup, which also provides some hold. This on-trend blue hue tone really enhances waves and curls.
6. Top Knot

Image Source: @keilanihair
Using a scrunchie for a looser look, pull the hair at the base of your head and create a sleek or messy top knot. This simple, easy, and great if you need to create a wavy hairstyle between wash days.
7. Twist Low Bun
Image Source: @hanzcurls
Calling all my wavies looking for protective styles for wavy hair that aren’t complicated, this is for you. We all know how to do a simple bun, and it’s just as easy to do twice for a simple look that feels special. Securing the low bun with a scrunchie allows for a sleek yet functional style that really plays up the natural texture of wavy hair.
8. High Bun
Image Source: @curlylilly
Similar to the previous style, this creates a sense of relaxed elegance. We love to see easy updos for wavy hair that work for weddings or special events. Make sure to keep a short middle part and leave out any tendrils in the front or side of your face. Pull hair back into a loose bun and secure the extra pieces with fun accessories.
9. Boho Hairstyle
Image Source: @wavycurlymichelle
Festival girlies will love this very easy and functional wavy hairstyle. Allow tendrils to fall down on both sides of your face that you plan to braid. The key to this whimsical look is to embrace some frizz to look like you’ve just been dancing in the woods!
10. Claw Clip Updo
The key to this look is lots of volume and a big claw clip at the base of your neck. It’s messy and loose and won’t create a lot of tension on your scalp, which makes it an easy updo for wavy hair.
11. Tight Bun

Image Source: @laialdarwich
This slick high bun is giving glam! We all know the bread and butter of any bun is a light hold gel to secure the style. You can add some romantic touches with a few tendrils framing your face or opt for no tendrils.
12. Stylish Updo
Image Source: @curlycaridad
A very pretty style and not as complicated as it sounds! Divide your hair as if you were going to do a ponytail and apply mousse (make sure you stretch the hair). Then, you’ll separate the ponytail into two sections that you’ll individually braid before twisting into one giant bun that intertwines both braids.
13. French Braids
Image Source: @ohlala.keriting
Wavy hair can make this cute trick extra special by adding texture. If you’ve been looking for a simple protective style that won’t have you stressed out, opt for very simple french braids.
14. Accessorize with Bows
Image Source: @thegirlhabit
This updo is super easy and has maximum impact. Ensure you create a lot of texture with your waves with products that enhance the volume. Twist two sections of hair across the back of your head and then secure with a romantic accessory like a bow.
Did you bookmark your favorite hairstyle? Before you begin styling, learn How to Wash and Style Your Wavy Hair for Gorgeous, Defined Waves.
You may think that brushing curly hair is a no-no because it can cause breakage and it conjures up childhood memories of that big cloud of fluff caused by well-meaning parents vigorously brushing out our curls in the name of neatness! It may come as a surprise to learn, therefore, that using a brush on curly hair can actually help with curl formation.
Read on to find out which types of brushes are out there for styling curly hair and when to use each one.
Types of Brushes
Despite the brush aversion many people have in the curly world, there are actually several cases in which a brush can be a key part of your regimen: dry detangling, wet detangling, and styling.
Dry Detangling Brushes

Many curly guys and girls swear by dry detangling to prepare their hair for washing, conditioning, or styling. This can be terrifying because it can:
- Remind us of the aforementioned cloud of fluff and
- Feel like you’re damaging your hair
Here are some tips to make dry detangling work for you:
- Always work from the ends up to the roots, gently brushing section by section.
- Use oil, conditioner, or hair cream to help the brush to glide through.
- If you come across a persistent knot, don’t forcefully drag the brush through; instead, add more oil and try to separate it with your fingers before continuing.
Good dry detangling brushes to try are The Original brush from Tangle Teezer or the Rizos Curls Detangling Flexi Brush.
Wet Brushes
Image Source: @thewetbrush
Wet brushes (not to be confused with the brands named above) do what they say on the tin – they are for use on wet hair! Because wet hair is more fragile than dry, these brushes are made to be flexible and gentle on the hair. They generally have clearly separated rows for detangling that glide through the hair. They may also have vents to help air and water flow through them. Some are curved to fit the shape of the scalp, and some have prongs that separate as they move through the hair so as not to pull on the strands.

Use wet brushes to detangle, distribute the product, and form curl clumps by brushing through when very wet once stylers have been applied. Wet brushes come in a variety of different shapes and sizes; a great one to try is the Curlkeeper Flexy Brush which has an open cushion to eliminate bacteria and product build-up, and flexible silicone bristles which are gentle on the scalp.

The wide paddle is good for helping people with wavy hair to style big smooth waves, or for those wanting to create larger curl clumps by brushing under the hair away from the scalp, once stylers have been applied. Stylist Felicia Leatherwood’s Detangler Brush is another curly cult favorite especially with tighter textures because of its flexible bristles that move through your hair without pulling on or breaking your strands.
In this article, we are focusing on styling brushes, but if you are looking for a tool to help you with detangling then these are the best brushes for detangling curly hair according to curl stylists.
Styling Brushes
Image Source: @emily.demian
Moving on to the magical bit! Brush styling can be done on any hair type or texture and of course, can wield varying results. Generally speaking, brush styling can help enhance any curl pattern and smooth frizz. So which brushes should you use and when?
Below are a few that are widely loved and can produce wildly differing results.
The Best Styling Brushes for Curly Hair
The Cult Brush: D3 Denman Brush

The most commonly used brush for brush styling is the famed Denman brush. This brush glides easily through coily, curly, or wavy hair (when wet or damp). The D3 with seven rows is the most popular for achieving smooth curl clumps. The other amazing thing about the Denman is that you can dismantle it and remove the rows to create fewer, more widely-spaced rows. This means less tension is placed on the hair which is gentler to the hair shaft and to sensitive scalps. The wider rows can help to create larger curl clumps too if that’s your goal.
What is this best for?
The Denman D3 is used by all curl patterns and can be modified (like I mentioned above”> depending on your preference. The Denman D4 is good for thicker, coarser, and more coily hair. This has nine closely packed rows and therefore creates higher tension in order to work through denser hair.
How to Use a Denman Brush
When styling with the Denman, style in sections for ease. Clip sections out of the way and divide sections into the width of the curl clump you desire. Try to avoid sections that are too big; this can lead to over-sized curl clumps that may need to be separated later on which can cause frizz.
When styling, place the brush under the curl clump and brush up or away from the scalp all the way through to the end of the clump, curling it slightly at the end (think about curling a ribbon with scissors). This method of styling is especially effective when trying to eliminate ‘bald’ patches at the crown area. You can then gently shake the curl clump by holding it at the root with the fingertips which will clump the hair together and/or you can scrunch the curl clump up gently towards the scalp.
An alternative method of styling is to hold the brush upside down, brush up or away from the scalp and twist the hair around the brush pulling the brush down so the hair twists around the handle. Pull and twist the brush all the way through until it slips out of the curl clump. This can create smooth ribbon curls, but it also means curls can be more stretched out.
The New Kid on the Block: Behairful Brush

Many curly girls are branching out from their Denman to try the Behairful brush. This brush is flexible in that it can be used for dry detangling as well as styling due to its gentle nylon and boar bristles.
Users claim that it creates incredible definition and rounded, bouncy curls with a high level of shrinkage as opposed to the looser curls created by the Denman. It can create high tension on the hair because of the closer-spaced rows so if your hair is damaged this may be something to watch out for.
What is this best for?
The higher tension can be good for wavier girls though who will need something that doesn’t just slip through the hair without creating any curl or wave.
The Quirky One: Scrunchitcurls Scrunch It Brush

If you are looking to create perfectly smooth ringlets, then look no further than the Scrunch It Brush from Scrunchitcurls. The texture of these bristles is combined with a smooth, rounded, aluminum body to create frizz-free silky curls. It also has a small handle on the tip to help you when twisting it through the hair and a pointed sectioning tip on the handle.
What is this best for?
This brush creates good tension for tighter curl patterns because of its tightly packed row of two vegan bristle types.
You can use it to style as with the Denman brush above, simply brushing out and away from the scalp and then shaking the curl clump; however, for maximum ringlet impact, use it upside down and twist the curl all the way around the barrel and down so it twists around the smooth, rounded handle. This brush is great for refreshing when you want to target the odd wayward or frizzy curl; simply wet the offending clump and twist and smooth into place with the Scrunch it Brush.
Do you use a brush in your curly styling routine? Share your favorite in the comments.
Happy curling!
OUR EDITORS INDEPENDENTLY SELECT ALL PRODUCTS FEATURED ON NATURALLYCURLY. HOWEVER, WE MAY EARN AN AFFILIATE COMMISSION WHEN YOU BUY SOMETHING THROUGH OUR RETAIL LINKS.
Finding the perfect curly haircut for your boys can seem like a minefield to parents, but curls can be super versatile and can help you achieve all sorts of trends! Whether your child wants to grow out their curls, coils, and waves or keep them short and low maintenance, we have a range of curly boys haircut ideas to help you decide!
1. Frohawk with a temple fade

Image Source: @lamos_barbers
We kick off with a statement cut. The frohawk allows curls to grow freely on top but gives your little boy the freedom of not worrying about it in his face by keeping the sides short with a fade at the temple.
2. Long Loose Curls

This cut for medium to long curly hair is great for looser ringlets. Ask for chin length all over with some shorter face-framing tendrils for bangs.
3. Full Natural Afro

Let those natural coils shine in a full afro. This is gorgeous for young children and allows them to feel proud of their curls. Ask for a cut with the same length hair all over.
4. Side-parted Curls

In this cut, coily hair is trimmed short and uniform with shorter sides. A short but distinct parting enhances the volume of the top and creates a neat and on-trend look.
5. Rainbow Frohawk

The ultimate statement haircut for confident kids! This curly rainbow frohawk is a mix of an ultra-cool cut and a full-range of colors. Great for festivals, summer time, parties or just for having fun.
6. Buzzfade or High Fade and Undercut

Textured hair is the best type for a buzzfade which can look uber-cute on little kids and super-cool on older boys. The top layer can be tightly curls or it works with looser waves.
7. Short Afro

This style requires in relatively low upkeep and is perfect for active boys who don’t want to worry about their hair. It suits all types of coily hair.
8. Curly Undercut

This cut is practical and edgy at the same time. The longer waves on top soften the very short undercut.
9. Afro with Line-up and Temple Fade

Image Source: @villadoscachos
Rocking their natural hair is important for curly kids but if they want to give it a little edge, a sharp line-up and temple fade can do just that. Ask your stylist for a distinct line with sharp angles cut into your hair, which can highlight the eyes. This cut will require more maintenance to keep the line-up sharp.
10. Wavy Caesar

Image Source: @loxx_hair_leichlingen
The Caesar cut is created by cutting the same hair length all around the head with a blunt fringe. It can work on short curls or with a longer length all-over or simply a longer fringe. The Wavy Caesar is fantastic because the cut can be done on tight curls and loose waves.
Have you found your kiddo’s Holy Grail product yet? These were the most popular curly kids products of 2024.
“Don’t brush curly hair!” We’ve all gotten used to that mantra over the years, haven’t we? But actually, more and more curlies are getting fabulously defined clumps from using a brush to style their hair.
From ribbon curls to shaking, there are plenty of ways to make a brush work for you. Remember, curly hair is fragile when wet, so always use these techniques gently!
Brush Styling Techniques and How to Do Them
1. Brush and Shake
Image Source: @curlyyhairboo
By far, this is the easiest technique and the best way to create natural clumps and looser waves. It works best with upside-down styling and can be done on wet or damp hair—although very wet hair will give the most definition.
Method:
Tip hair forward and gently brush through upside down without scrunching. Once all of the hair has been brushed, gently shake your head until the clumps fuse together. They should come together naturally. If clumps don’t form, try adding more water. Scrunch clumps carefully to avoid separating them. You can then either diffuse upside down or flip the hair back up and leave it to dry naturally.
2. Ribbon Styling
Image Source: @kenzacurlie
This method will probably create the most defined curls. The best way to describe this is to think of curling the ribbon on a gift. You need to apply pressure with your hand on the hair along the edge of your brush.
Method
This can be done upside down or right side up and is best done on wet or very wet hair. Choose a clump of hair; the size you pick will determine the size of the final clump. Firstly, brush through the clump so it is completely smooth.
Next, place the brush as close to the root as possible and brush out and away from the scalp. Pinch the top of the clump gently and shake until the clump forms. For extra definition and smoothness, place pressure on the hair over the uppermost edge of the brush as you brush through, and you will see the hair curl in on itself. This will also give the hair a tighter spiral, like those pretty gift ribbons!
3. Handle styling
Image Source: @curly.glorii
For perfect ringlets and smooth barrel curls, try using the brush handle as well. This method takes a little practice, but once you’ve got the hang of it, your curls will be popping!
Method
This can be done upside down or right side up and is best done on wet or very wet hair. The size of clump you pick will determine the size of the final clump. Firstly, brush through the clump so it is completely smooth. Hold the brush upside down so the handle is pointing upwards.
Then, holding both ends of the brush, place the brush close to the root of the clump and brush out and away from the scalp, twisting and pulling it down gently as you go. Eventually, the curl will spiral through the teeth of the brush and around the handle until the brush pops out of the bottom of the curl. You will be left with a perfectly formed ringlet! Scrunch it gently to avoid disturbing it.
Common brush styling issues and questions
How do you avoid tangles?
Image Source: @genamarie.co
Some curlies find it difficult to avoid their curls tangling up with each other, particularly with the Handle or Ribbon Styling. Try using clamps or pins to section off your hair before you begin. You could also brush through your hair completely before styling to avoid tangles.
How do you deal with flat roots?
Image Source: @bouncecurl
When brush styling right side up, some curlies – particularly types 3a or below – find that their roots become flattened to the hair with the pulling action of the brush. This is particularly a problem with Handle Styling as you tend to pull the curls down the brush. Try practicing the techniques upside down so the roots are pulled away from the scalp. Another tip is to section your clumps using root clips which will keep the hair lifted off your scalp while you style.
Brush styling recommendations
Denman D3

By far the most common brush used for brush styling is the Denman D3 because of its versatility and relatively wide-spaced rows. You can make the gaps wider by removing rows as well. It’s particularly excellent for coily, thicker hair.
Bounce Curl Original Define EdgeLift Brush

For more tension, many curlies are now trying out brushes designed to help create volume and definition. Bounce Curl’s patented brush design has become a viral hit for curlies of all hair types.
LUS Detangle & Style Brush

The new LUS Detangle and Style Brush is designed to help you pull and have pressure on your curls while you brush. It easily glides through knots and tangles and helps you distribute styling products evenly.
Happy brushing!
OUR EDITORS INDEPENDENTLY SELECT ALL PRODUCTS FEATURED ON NATURALLYCURLY. HOWEVER, WE MAY EARN AN AFFILIATE COMMISSION WHEN YOU BUY SOMETHING THROUGH OUR RETAIL LINKS.
Have you ever seen someone with perfectly smooth ringlets and wondered how they achieved that definition? Well, some people are just lucky to have naturally perfect tornado ringlets without any manipulation. But you’ll be pleased to know that smooth, defined curls are achievable on any curly or wavy hair, no matter your curl pattern. One of the best ways you can achieve perfectly uniform curls is through finger rolling.
What is finger rolling and what are the benefits?
Finger rolling is slightly more complicated than finger coiling, but once you learn the technique, it becomes quite easy to do. In finger coiling, you simply twist a curl clump by holding the end between your finger and thumb and twisting the curl around and around itself until you can no longer twist it.
Watch @curlswithkeish‘s tutorial on how to do it!
Finger rolling is where you take the end of the clump and roll the curl around and between your fingers up towards your scalp. The tension on the curl, as it rolls between your fingers, causes the curl to hold tightly – a bit like the tension you get when you brush style – and the rolling motion makes the curl smooth and sleek.
Are there any cons?

Pictured: @curlswithkeish
There’s no getting away from it: It’s time consuming! At least if you do your whole head. I would recommend finger rolling a couple of curls at the front and crown of your head so your smooth ringlets sit on top of the rest of your curls.
Another con can be that the curls turn out so uniform and sleek that you might end up looking a bit like a china doll! But with some fluffing of roots and flipping your part about, you can avoid this if it’s not your desired look.
How Do You Finger Roll Your Curls?
Step 1: Start with wet hair
Firstly, make sure hair is fairly wet, rather than damp. You need hair to be quite slippery to achieve smooth finger rolls, so deep conditioning first or applying a leave-in should help.
Step 2: Section your hair
Section hair and take a clump roughly the size you want the curl to be – remember it will expand when dry. If you wish to do your whole head, complete in sections starting with the underneath layer and finishing at the crown.
Step 3: Brush the section
Brush or comb through the clump so it’s smooth. If you ever get into a muddle or your hair becomes tangled while using this technique, release the curl carefully, brush it through, and start again.
Step 4: Coat your fingers with styler
Image Source: @curlswithalexa
Apply a small amount of styler – cream or gel – to both forefingers and your right middle finger. Make sure you have enough product on your fingers to keep the curl smooth.
Step 5: Roll from end to root
Take the end of the curl between the end of your right index finger and your right middle finger and create tension by pulling it straight away from your head.

Begin to roll the curl towards your head. As you do, remove the right index finger and replace with the left index finger so the curl roll between your left index finger and your right middle finger.
Keep rolling the curl all the way up to the scalp.
Step 6: Release the curl

Image Source: @pujitamirwani
It’s essential to release the curl carefully; slowly remove the index finger from the middle of the curl allowing the curl to spiral down from your scalp. Repeat!
Once you’re done, glaze over the top of the curls with a final layer of gel for hold. To speed up the drying process, hover diffuse over the curls to as not to disturb them.
Do you use the finger rolling technique in your styling routine?
Putting oils on our hair seems counterintuitive; most of us spend time trying to reduce the amount of oil on our hair, after all. But did you know that oils can resolve many of the issues faced by curly people?

Image Source: @matymahera
Curly hair doesn’t hold moisture as well as straight hair. As a result, a lack of hydration can cause dull, brittle hair. Interestingly, this can result from curl pattern, rather than a natural propensity for drier hair. The oil on your scalp – sebum – hydrates your hair, adding shine. On straight hair, the oils spread down the shaft easily, and brushing can aid with this; on curly hair, however, the oil can’t travel as easily, and curly-haired people also tend to brush hair less often – if at all! This is where adding oils to your hair routine can help.
Which Oil is Best for Your Hair?
It’s important to understand which type of oil you need to use. There are two types of haircare oils – sealing oils and moisturizing oils. Sealing oils do just that – they seal in moisture from water or conditioner. Examples of these are jojoba, olive, and castor oils. Moisturizing oils have smaller molecules that penetrate and moisturize hair – think coconut, olive, and avocado oils.
Image Source: @itsdavianaa
Whether you should use heavier or lighter oils depends on your curl pattern, hair density and porosity. The simplest solution is to use products with them already mixed so the lighter oils thin out the heavier; for example, the 100% natural Mielle Organics Mint Almond Oil which contains a mixture of olive, castor, almond, avocado, sweet almond and flaxseed oils for incredible nutritional properties.
Read on to find out which oils you should use depending on your hair type attributes.

Best Oils Type 2 Wavy Hair
Lighter oils work well on this hair type which can get weighed down. Wavy hair tends to be less dry than curlier hair so lightweight jojoba, grapeseed and sweet almond oils are good for sealing in moisture that is already present. Try The Jojoba Company 100% Natural Australian Jojoba Oil. Argan oil is also light enough to use daily, easily absorbed by the hair and is therefore good for moisturising your thirsty waves. Carols Daughter Black Vanilla Moisture & Shine Hair Sheen contains sweet almond oil and jojoba oil to help leave hair manageable and shiny.
Best Oils for Type 3 Curly Hair

Get down to your kitchen! Curlier hair can handle small amounts of heavier oils like olive and avocado oil. Try the African Pride Moisture Miracle Strengthen & Protect 5 Essential Oils which can be used on hair and body. Alternatively, you can add heavier oils to lighter ones to thin them out.
Best Oils for Type 4 Coily Hair

Denser textured hair requires heavier oils, such as Jamaican Black Castor Oil, to travel along the tightly packed spirals. The thick consistency is amazing for locking moisture in. Try tgin Jamaican Black Castor Oil Hair & Body Serum. Olive Oil is another great sealant and avocado oil is a wonderful moisturiser for coily hair.
Not sure what your curl pattern is? Take our hair type quiz!
Hair porosity

Porosity is the measure of your hair’s ability to absorb and hold onto moisture, which means that your porosity greatly impacts how your hair reacts to the products and ingredients you apply to it.
Best Oils for Low-Porosity hair
Argan oil works wonders on low-porosity hair because its small molecules easily penetrate the hair shaft, providing moisture. Jojoba and grapeseed are other excellent oils for their absorbent properties.
Best Oils for High Porosity Hair
Coconut oil is a blessing for high-porosity hair, which loses moisture easily. It is also great for your scalp. It fortifies the gaps in high-porosity hair, providing protein and locking in moisture.
Hair Density

Hair density refers to the number of hair strands per square inch on your scalp. A quick way to determine if your hair is low-density or high-density is to see your scalp easily through it. If it is hard to see your scalp through your hair, then it is high-density.
Best Oils for Low-Density/Thin Hair
As it’s similar to sebum (the natural oil in your hair) jojoba oil is perfect for low-density or fine hair that is easily weighed down. Sweet almond oil is also lovely and light for finer hair.
Best Oils for High-Density/Thick Hair
Coconut and olive oils are beneficial for thicker/coarser and higher-density hair as they are heavier oils and easily absorbed. Avocado oil is also good for thicker hair and with its amino acids, vitamins and minerals, it can boost hair growth as well as health.
There are a whole host of products containing different oils so you can mix and match to suit your hair!
Now that people are embracing their textured hair with more gusto than ever, many are braving shorter curly hairstyles to stand out! We’ve seen an explosion of short curly hairstyles hit the runways, magazine covers, and being reinvited by celebrities like Ice Spice and Lori Harvey.
Here is a round-up of the most up-to-date short Type 3 hair looks.
1. The High Top

Image Source: @janayediggs
The high top is not just for the guys. This can look great on type 3a, 3b or 3c hair for an edgy look.
2. The Short-Stacked Bob

Image Source: @aiyanaalewis
This cut gives height to softer 3a/3b curls. This is ideal if you have finer curls but still want a full look.
3. The Curly Medium Length Bob

Image Source: @mo_beautii
This bob works well with looser 3a curls and is a timeless look for curly hair.
4. The Feminine Voluminous Bob

Image Source: @breendaki
A voluminous bob adds volume buckets to 3b hair, giving hair lift and bounce.
5. Curly Asymmetrical Bob

Image Source: @raeraerizzle
Add some wow to your 3b/3c hair with the Curly Asymmetrical Bob. This manageable hairstyle gives instant glamour and height to your curls.
6. Curly Bangs

Image Source: @slickback_buttahtoast
This pretty Curly Hair with Bangs is a super cute look for 3a curls, bringing height to flatter roots. Regular trims are needed to maintain this rounded shape.
7. The Natural Tapered Cut

Image Source: @barberiasdelmundo
This tapered cut adds wow to 3c hair with long bangs, curls piled on top, and trimmed sides.
8. Short Rounded Cut

Image Source: @iamthedaisha
For more long Type 3c bangs-glamour, try adding a few bantu knots on the side of this Short Rounded Cut.
9. Pixie Cut

Image Source: @katrisharose
Who says Pixie Cuts are just for straight hair? 3b curls can create the most beautiful, cropped look, complete with curled sideburns.
10. The Faux Hawk

Image Source: @cherrychy_
The faux hawk is for curlies who want a cutting-edge look. The natural 3b/c curls here are enhanced with color for extra sass!
11. The Tapered Undercut

Image Source: @shortnaturalhairstyle
This undercut is perfect for 3a/b hair because of the contrast between the curls on top and the straighter underlayer. Colour has been used to highlight the stunning ringlets piled on top here.
12. The Classic Bob

Image Source: @divinecurlz
You can’t go wrong with the Classic Bob for all Type 3 curls. With longer face-framing pieces at the front and shorter curls at the back for volume and height, this cut can be fun and elegant.
13. The Asymmetrical Pixie Cut

Image Source: @jennifer_pixie
The Asymmetrical Pixie Cut is bold and fresh. Side parts always add volume, and this one-sided cut brings attention to the cheekbones and neck whole, allowing the curls to tumble down on the other side.
14. A Fluffy Curly Pixie Bob

Image Source: @heydonae
A Fluffy Curly Pixie Bob adds a soft, whimsical look to short 3a curls. Allow longer spirals to frame the face.
15. The Layered Bob with a Side Parting

Image Source: @manesbymell
The layered bob with side parting is a modern take on the layered cut for stunning type three blended curls.
If you’re ready to make the big chop and embrace a new hair transformation this season, check out these 20 Bob Hairstyles For Every Hair Type for inspiration.
Many people embark on their Curly Girl Method journey with the ambition of achieving ultimate ringlets or maximum volume; however, what most end up realizing is that healthy hair is the real goal. Nourishing your hair is as important as nourishing your body when trying to achieve thicker, shinier, bouncier hair. Below is a bountiful banquet of CG-friendly products that curly people love for nourishing and feeding their hair to achieve healthy, glorious curls, coils and waves.
What is the Curly Girl Method?
The Curly Girl Method, from Lorraine Massey’s book “Curly Girl: The Handbook,” is a hair care method that trades in damaging habits (like shampooing and heat styling) for a healthy curly hair regimen using just conditioner and gel. While this set of recommendations has been shown to have incredible results for many curlies in our community, you should always feel free to modify them to suit your hair!

1. Garnier Ultimate Blends Banana Hair Food Hair Mask Treatment
Kick off the feast with this healthy appetizer for tired, malnourished hair. It packs a nourishing punch with its 98% natural ingredients and 100% vegan formula blended with banana and shea and its smell will tickle your tastebuds! This widely loved, flexible treatment can be used in 3 different ways: as a conditioner, rinse-out hair mask or leave-in conditioner, plus it’s easy on the bank balance too!

2. Oyin Handmade Hair Dew
You can use Hair Dew to moisturize freshly cleansed hair or use it as a refresher throughout the week for second, third and fourth day hair. This light leave-in will refresh your curls and coils, making them feel more pliable without fully rinsing and re-styling your hair. It also serves as a great moisturizing base for your styling products, or as the “L” in your LOC method.

3. Infinitii Oils Luxury Hair Oil
The ultimate indulgent treat for hair, Infinitii’s Luxury Hair oil is made up of a heady cocktail of purely natural penetrative oils including olive, castor, sweet almond, flaxseed and avocado oils. Infinitii claim their clients have noticed ‘an immediate visible improvement’. Infinitii Oil can be used as a pre-poo treatment by applying a few drops to the scalp and lengths of hair, massaging in and leaving for 30 mins or overnight before washing out and following up with your usual routine. It can also be used to ‘scrunch out the crunch’ or in other words break the crunchy cast caused by applying gel, mousse or other stylers on wet hair, once the hair is dry. Rub one or two drops of oil between your palms and scrunch your curls to reveal glossy, healthy hair.

4. Curls Blueberry Bliss Reparative Leave-in Conditioner
We all know how good blueberries are for us and this also applies to our hair. Formulated with certified organic blueberry extract, aloe leaf juice and chamomile extract, this deliciously-scented conditioner detangles, moisturizes, conditions and hydrates your curls. It also contains a healthy dose of protein with hydrolyzed quinoa and silk amino acids. Use after your usual shampoo/co-wash and conditioner and comb through with a wet brush for even distribution. Squish-to-condish for maximum moisture absorption and nourishment.

5. Ecoslay Rice Pudding Leave-In Conditioner and Moisturizer
Add another dish to your healthy hair menu with this glorious leave-in conditioner. Containing a plentiful dose of rice water, as well as chamomile flower extract, slipper elm extract, nettle leaf extract, melissa leaf extract, peppermint leaf extract, horsetail leaf extract and yucca vera leaf extract, it includes many nutrients that your curls need. It also smells incredible with jasmine and vanilla oils. Apply after shampoo/co-wash and conditioner to keep hair bouncy and healthy.

6. Kinky-Curly Knot Today
Kinky-Curly Knot Today is the ultimate multi-tasker. It has won a total of 9 Editors’ Choice and Best of the Best awards over the years, making it a member of our Hall of Fame, so you can feel that this will be a $12 well spent. Use it in the shower while detangling, as a rinse-out conditioner, as a leave-in conditioner, and in your product cocktails.

7. Umberto Giannini Banana Butter Nourishing Superfood Scalp and Hair Oil
This 97% natural, super-lightweight oil contains a blend of banana and coconut and is jam-packed with antioxidants, potassium and vitamins A, B and C. Umberto Giannini recommend applying a few drops to the lengths of your hair between shampoo and conditioner, but curlies also use as a pre-poo or for a scalp massage. It’s also light enough to use for refreshing hair to bring life back to dull curls.

8. Flora and Curl African Superfruit Shampoo
This botanical shampoo contains a natural cocktail of coconut-derived cleansers, fortifying wheat proteins and tangerine fruit oils, rich in vitamin C; it also contains sweet almond oil and argan oil to restore the health of the scalp. Its citrus aroma leaves your scalp energised and hair refreshed. Massage well into the scalp before rinsing and following up with Flora and Curl Honey & Rose Cream Conditioner.
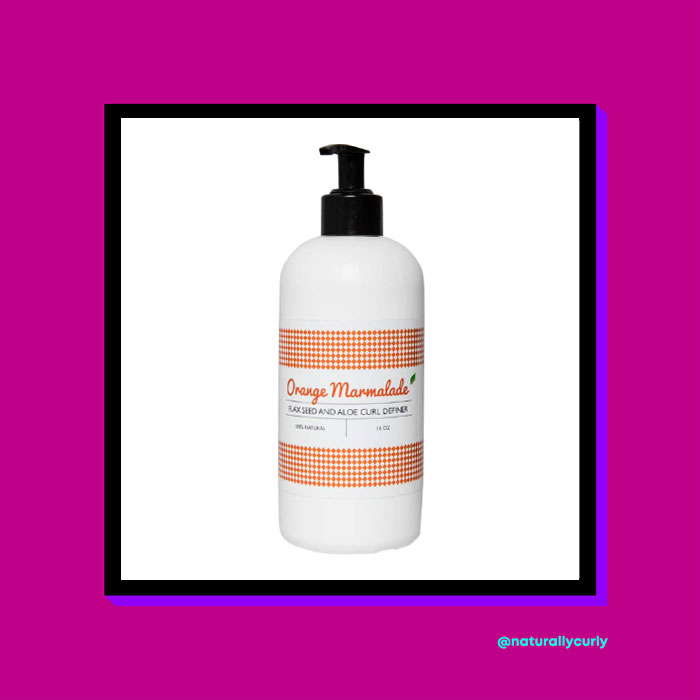
9. Ecoslay Orange Marmalade
A curly cult favorite, this gel is like a superfood breakfast for the hair! Flaxseed extract, agave nectar extract, pectin, aloe vera juice, marshmallow root extract, vitamin E, xanthan gum, and sweet orange essential oil combine to create this impressive gel which is so natural, you have to store it in the fridge! As a styler, it gives a powerful hold and combines well with the Ecoslay Rice Pudding Leave-In. Apply a few pumps to the lengths of the hair and scrunch to create smooth, healthful ringlets.

10. Camille Rose Naturals Aloe Whipped Butter Gel
This Whipped Butter Gel is a product that receives high marks from tight coilies and loose wavies alike. It can be used for a soft wash and go, twist outs, and refreshing hair. This moisturizing, all-natural gel gives curls, coils and waves a light hold for natural curl definition that doesn’t crunch. If you like a hard cast or strong hold, you may want to cocktail this with another styler.

11. Sumilayi Ooh So Soft Conditioner
Many curlies are raving about this plant-derived formula containing moisturising aloe vera, nourishing grape seed oil and zingy, refreshing orange peel oil. It boasts of being able to replenish and strengthen hair, while reducing frizz and stimulating hair growth. Apply as a light conditioner after shampooing with the Ooh So Soft Shampoo.

12. Jessicurl Deep Conditioning Treatment
An extra moisturizing formula like this Jessicurl Deep Treatment works best when you apply it to the hair, wear a shower or heat cap and allow it to sit for 20 minutes, then rinse. Another thing we love about Jessicurl is that they have a unique offering of fragrance-free versions of their products for those of us who are sensitive to fragrance or have skin sensitivities.

13. As I Am Hydration Elation Intensive Conditioner
This rich, nutritious conditioner is a unique mixture of extracts of coconut, sugar cane, green tea, apple, lemon, shea butter and vitamin E. Curlies love it for its deep conditioning properties which promote healthy hair from the follicular level. Asiam recommends feeding your hair with this delicious concoction every 2 to 3 weeks but it’s possible to use it more frequently if your hair needs the nourishment!

14. Jessicurl Gentle Lather Shampoo
While some curlies choose to cut shampoo out of their regimens completely, others prefer to use it occasionally. A gentle, sulfate-free shampoo like this one by Jessicurl won’t be drying or harsh. Ingredients such as cocamidopropyl betaine (which this product contains) or coco betaine are mild cleansers that you can use when you’re CG.

15. Bouncecurl Avocado and Rose Clump and Define Cream
Finally, adding this sumptuous styling cream to your repertoire can help to replenish dry or damaged hair. This aromatic cream contains exotic oils such as organic black seed oil, avocado oil, Egyptian Abyssinian oil, Moroccan rose oil and argan oil from the Middle East, North Africa and Mediterranean regions. It is enticingly scented with exotic fruits, white jasmine, magnolia flowers, sandalwood and vanilla. This cream can be applied before or after other stylers and, as it is thick, it’s best to use small amounts on sections of hair.
Go ahead and indulge your curls in some of these scrumptious treats. Bon appetit!
This article has been updated with new products.
Sleep protection is one of the most effective ways of protecting your curls and ensuring your washday results last longer. Most curlies tend to pineapple their hair on top of their head to protect curls from friction and tangles from moving around at night. However, what do you do if your hair is too short to pineapple? Fear not; help is at hand.
1. Buff it Up
If silk or satin scarves are too slippery and come off too easily, and a bonnet is too roomy, try a buff. Many curlies use these to protect their curls at night, and these can work just as well for shorter curls. You pull it down to your neck and then pull the edge of the buff up and over your hair. Tie it in a small knot at the top to contain your hair. This can stop curls from being flattened and helps to create volume overnight.
2. Medusa-clipping
You may end up looking like a snake-headed Gorgon, but Medusa-clipping can be great for protecting shorter curls overnight! Using small jaw clips, clip small sections of hair up onto the top of your head. As with mini-pineappling, you need to make sure you clip in places that won’t be uncomfortable when you lie down, preferably on top of the head if your hair can reach that length. This method gives great volume and is really effective for keeping those curls in place.
Check out FitKat Style’s tutorial for a looser, wavy texture.
3. Silk is a Curl’s Best Friend
One of the first things all curlies should do is invest in a silk or satin pillowcase (or two for when you need to wash it!”>. Not only do silk pillowcases reduce friction, but they also don’t draw the moisture out of your hair (or skin”> like cotton can. You know those creases you get on your face in the morning? Silk eliminates those, so you can imagine what a difference it makes to your hair too.
4. Scarves and Bonnets
Another silk accessory to invest in is a silk scarf. Not only will you be your most glamorous version of yourself going to bed, but your curls will be wrapped neatly in place.
You could try a silk or satin bonnet to protect your hair, but quite often, short hair does not fill the bonnet enough, which allows for a lot of movement at night and can lead to flattened or misshapen curls.
Watch this tutorial for guidance on how to wrap shorter curls in a silk scarf:
5. Mini-Pineapple
If you feel like you need to keep curls in place a bit more firmly, you can still pineapple – try mini-pineapples! Divide your hair into sections and create mini-pineapples around your head. Some people might find this uncomfortable to sleep on so you may wish to avoid a pineapple at the back of the head, for example. Invest in some cute small satin or silk scrunchies like these from Curly Girl Silks to avoid overnight tangles.
Sweet dreams!
10 Curl Products from Small-Businesses
There’s only one thing better than finding a curly hair product that you love and that’s when it’s the product of a small-business. Supporting people who have dedicated their time to creating bespoke products for curly hair gives us a warm glow. We’ve rounded up ten of our favourite products by small businesses so that you can buy in the knowledge that your money is going to worthy recipients!
1. Ecoslay Orange Marmalade

Formed in 2015, Ecoslay has gone from strength to strength, but products are still produced in founder Adria’s kitchen! Along with their positive ethos of lifting each other up, and being environmentally friendly, Ecoslay are passionate about teaching others about haircare, so they won’t just list an ingredient in a product, they’ll explain why it’s there. Their signature Orange Marmalade Gel has acquired cult status amongst the online curl community and for good reason. It contains flax seed and aloe vera for the perfect combination of hold and moisture. A must-have gel!
2. Jessicurl Rockin’ Ringlets Styling Potion

Jessicurl’s inspiring story began in founder Jess’ own kitchen in 2002 where she brewed up her own gel on the stove! An original NaturallyCurly Curltalk member, Jessicurl’s business has grown to include a whole range of products many of which are ride-or-die products for many curlies. We’re focusing on the product that started it all Rockin’ Ringlets Styling Potion. Made with natural flaxseed, this lightweight styler has a light-to-medium hold and leaves hair soft and bouncy.
3. Only Curls All Curls Conditioner

Another story that begins at the kitchen table! Lizzie founded Only Curls with the goal of inspiring people to embrace their curls through her cruelty-free products. It still remains a small family business dedicated to quality products. Our pick of the bunch is the Only Curls All Curls Conditioner which contains Jojoba, Coconut and Avocado for super moisturised and soft waves and curls.
4. Treluxe Hi! Definition Curl Enhancer Styling Gel

Starting off as a small business with the goal of creating salon-worthy products to help people develop good relationships with their curls, Treluxe has the added bonus of supporting under-resourced communities in Chicago, where the brand was born. Our favourite Treluxe product is the Hi Definition Curl Enhancer Styling Gel. It’s a moisture and nutrient rich puree containing avocado, sage and honey for shine and medium-high hold.
5. Oyin Burnt Sugar Shine and Seal Pomade

Jamyla Bennu founded Oyin in 2001 in the first wave of the curly hair movement and it remains a family, female and Black-owned small business. They believe in ‘nutritional density’ in haircare and all products are self-manufactured from food-grade ingredients. We love their Burnt Sugar Shine and Seal Pomade, a vegan blend of oils, butters, and veggie waxes which acts as a humectant and protectant for curls.
6. Miribel Powerhouse Protein Cream

Originally named MySoigne, Miribel was created when its founder Jackie wanted to create products with clean, natural ingredients. Another business founded in a kitchen, Jackie experimented with different ingredients until she came up with her initial products. MySoigne changed to Miribel with the goal of focusing on healthy hair rather than just curly hair. Their Powerhouse Protein Cream is definitely one for curls however; its powerful protein punch will boost strength and bounce to any lacklustre curls!
7. 2 Girls With Curls Hair Lotion

Erin and Leigh-Ann bonded over their troubles with managing curly hair and set up their business in their kitchens researching and trialling different combinations of ingredients. 2 Girls With Curls now produces high-quality, plant-based, cruelty-free products for moisturied healthy curls. Their lavender and grapefruit Hair Lotion is a lovely light-weight daily moisturiser for soft manageable curls.
8. Curl Junkie Repair Me! Reconstructive Hair treatment

Founded in 2006, Curl Junkie’s customer base has grown impressively due to the fact that it’s a Black-owned haircare business that provides for all hair types. Their best seller Repair Me! Reconstructive Hair Treatment repairs and strengthens the hair shaft with amino acids, apricot and sunflower oil, bringing life back to the most brittle, frail curls.
9. Moptop Curly Custard

A portion of Moptop’s profits goes to support anti-bullying programs in playgrounds and behind closed doors. Their goal is to promote self-confidence in all curlies to embrace their curls in all their glory. Their Curly Custard contains seaweed, honey and silk to promote moisture and shine in all curls.
10. Pink Root Products Curl Enhancing Lotion

Designed to help ease the transition from chemically-damaged to natural hair, Pink Root Products was founded by Mariel Mejia in 2015 began experimenting with different ingredients in her mother’s kitchen to help her own damaged, brittle hair to recover. Best of all they provide products for all hair types. Their Curl Enhancing Lotion means business with Avocado Oil and Boabab Protein to help boost your journey to healthy, natural hair.
Wavy-haired people are often wary of going short because wavy hair can be, well… difficult at times! However, with the right cut, wavy hair can behave impeccably. Our round-up of the most flattering and on-trend short wavy styles might help you to work out the right cut for you.
,0 1px 10px 0 rgba(0,0,0,0.15″>; margin: 1px; max-width: 540px; min-width: 326px; padding: 0; width: calc(100% – 2px”>;” data-instgrm-permalink=”https://www.instagram.com/p/3wCy1_F9Z5/?utm_source=ig_embed&utm_campaign=loading” data-instgrm-version=”14″>View this post on Instagram
Photo @annettaprimadonna
1. The Wavy-Curly Pixie
We’re starting with a bang with this impactful look! This short cut suits a curlier wave that can create volume for a tousled look. Shorter bangs also give that extra edge to this sassy cut.
@alissa.iris a fast #hair360 #pixiecut ♬ original sound – wonder ?
2. The Wavy Pixie
For a looser wave, this close-cropped pixie is a winner. Take it shorter on the back and sides and allow the waves to be longer and freer on-top.
@marietechouse cutting it soon and I’m so excited ? #shorthair #wavyhair #curlyhairroutine #mullet #diffusercurls #shaghaircut #70shair ♬ insane in the brain – mars
3. The Short Wavy Wolf Cut
Give your pixie cut an trend-forward edge by adding short bangs and choppy layers for the popular wolf shape. This shape has also been called a “shullet,” a mix between a shag and a mullet.
@chloehelenmiles Reply to @moonastarr69 she’s a lil frizzy today #frenchbob #microbob #wavybob #shorthairstyles ♬ Texas Sun – Khruangbin & Leon Bridges
4. The French Bob
Moving into slightly longer territory, this wavy, jaw-length bob is ultra-flattering and feminine. This is ideal for a looser wave texture as it’s less about curl definition and requires some manipulation of the bangs.
,0 1px 10px 0 rgba(0,0,0,0.15″>; margin: 1px; max-width: 540px; min-width: 326px; padding: 0; width: calc(100% – 2px”>;” data-instgrm-permalink=”https://www.instagram.com/p/BrOyCoKlVDp/?utm_source=ig_embed&utm_campaign=loading” data-instgrm-version=”14″>View this post on Instagram
Photo @soraverly
5. The Shaggy Wavy Bob
We’re getting vibes of heroines from ‘80’s movies with this relaxed, sexy bob. Go for a centre part, long bangs and lots of layers to achieve this look.
,0 1px 10px 0 rgba(0,0,0,0.15″>; margin: 1px; max-width: 540px; min-width: 326px; padding: 0; width: calc(100% – 2px”>;” data-instgrm-permalink=”https://www.instagram.com/p/CPONEKyJvVQ/?utm_source=ig_embed&utm_campaign=loading” data-instgrm-version=”14″>View this post on Instagram
Photo @shelbyyjaye
6. Short-Layered Wavy Cut
For a soft, romantic look go for this short-layered cut. This cut is also good for adding the illusion of thickness to finer hair.

7. The Face-Framing Bob
This flattering face-framing cut is perfect for wavy hair as it looks effortlessly cool. Wear in a side part to add volume on top.

Photo @aoki_hair
8. The Young-Mature Bob!
Wavy, silver hair has the unfair reputation of being old-fashioned. Just look how gorgeous silver waves can be when cut in a flattering bob with a side-part. Go for shorter layers on top to make waves bounce up.

Photo @philly_curl_creator
9. Blunt Bob with Bangs
Adding bangs to a blunt wavy bob can immediately freshen up your look. This look is great for 2a- 2c waves. Encourage your waves to curl out at the ends to create a flirty, fun style.

10. The Wavy Tapered Pixie
Perfect for thick hair, the tapered neck of this cut helps to control volume, and the longer wavy bangs give the hair body and movement.

Photo @allthingsneena
11. Long On Top Pixie
Love your wavy texture but want to spend less time styling it? This may be the cut for you. (Just keep in mind you’ll need to schedule regular trims to keep the back and sides short”>.

12. The Asymmetrical Textured Pixie
Keeping one side super short and one side longer flowing waves is the best way to show off cheekbones, necks and shoulders. The dramatic side sweeping fringe allows your waves to do their thing, while the shorter layers on top and back are flirty and sassy.
,0 1px 10px 0 rgba(0,0,0,0.15″>; margin: 1px; max-width: 540px; min-width: 326px; padding: 0; width: calc(100% – 2px”>;” data-instgrm-permalink=”https://www.instagram.com/p/B481fvJAADc/?utm_source=ig_embed&utm_campaign=loading” data-instgrm-version=”14″>View this post on Instagram
Photo @hollygirldoeshair
13. Wavy Curtain Fringe
This transformation says it all. The layered level bob is softened with the waved curtain bangs in a center part. Gorgeously whimsical and romantic!
Silicones were once touted as the wonder ingredient in hair care. However, in recent years, silicones have started to get a bad rap, especially in the curly world. In fact one of the common first steps to many curly journeys is to cut silicones out of your hair product regimen.
Why avoid silicones?
Because, while silicones in hair products make the hair smooth and shiny, they can also build up over time, leaving the hair ultimately dull and brittle. The way silicones work is by coating the hair strand, smoothing the cuticle. However, this barrier can also prevent necessary oils, other nourishing ingredients and, more importantly for curly hair, water from getting into the hair follicle. Over time, the hair is starved of the moisture it needs and can become brittle.
Many curly girls simply avoid silicones altogether but scanning ingredients lists can be time-consuming and confusing. We’ve rounded up a handy list of silicone-free curl styling products to help with some of the leg work!
Going cone-free? Here’s Everything You Need to Know.
1. Camille Rose Natural Kids Brown Butter Melt Mandarin Oil Hair Balm 40z $8.99

Start off on the right foot! Children’s hair can be particularly delicate. Applying healthy, gentle products from early one will help their curls to flourish. Try this hair balm to help tame unruly curls and frizz.
2. Cantu Care for Kids Curling Cream 8oz $5.29
![20 Silicone Free Curl Styling Products name 700×700 2]
Another gorgeous products for little curlies, this winner of the Best of the Best Awards in 2020 defines, softens and strengthens with shea, coconut oil and honey.
3. SheaMoisture Coconut and Hibiscus Curl Enhancing Smoothie 12 oz $12.99

Another Best of the Best Award Winner, this leave-on curl cream smells divine and contains silk protein and neem oil to moisturise and smooth unruly curls.
4. Kinky Curly Curling Custard 8oz $16.99

A favourite amongst curl influencers, this styling gel creates definition, hold and shine all in one product. The price tag is slightly higher but it’s very concentrated so a little goes a long way. It claims to give weight to hair, define curls and remove frizz, without going crunchy.
5. Ecoco Eco Styler Professional Styling Gel with Olive Oil 32oz $5.29

This is a great gel for people starting out, either on a healthy curl journey or for going silicone-free. The price tag is low, while the product goes a long way and is not too complicated. If you’re worried olive oil will be too heavy, fear not. This is a lightweight gel with good hold to last you throughout the day.
6. Jessicurl Gelebration Spray 8oz $16.95
![20 Silicone Free Curl Styling Products name 700×700 1]
This product has been specifically designed for finer-haired curlies. Its’s strong enough to give definition to curls but won’t weight them down. Easy application with a spray bottle too!
7. Curly Hair Solutions CurlKeeper Refresh Styling Spray (3.4 oz”> $10.99

This water-based curl booster to refresh and reactivate curls claims to remove odours and restore volume and shine. The ultimate in time saving!
8. Curls The Green Collection Avocado Hair Mousse 8oz $14.99
![20 Silicone Free Curl Styling Products name 700×700 3]
Moisturising and vitamin-packed, this mousse nourishes hair while providing hold and body to your curls.
9. Curls Dynasty Twisted Definition Twisting Cream 8oz $13.99

With its gorgeous packaging, this cream is already a winner. Apply it to your twist outs for real definition and shine.
10. Ampro Pro Styl Protein Styling Gel Super Hold 32oz $5.99

For the ultimate in value and hold, this strong hold gel is perfect for moulding and sculpting curls and styles that last.
Check out Silicones: Where They (Sometimes”> Fit in a Curly Girl Routine
11. Oyin Handmade Whipped Pudding 4oz $13.99

A rich moisturising cream combining shea butter, coconut butter and castor oil which is great for denser, coilier curls. An added benefit is it can be used as a body butter too!
12. Soultanicals Can’t Believe It’s Not Butta 8oz $15.99

Another mix of butters – this time mango and shea, combined with honey and castor oil – creates this super creamy, rich butter for smooth, coily curls.
13. OGX Moroccan Sea Salt Spray $5.99

Texturising sprays often include silicones, but this lovely lightweight spray uses argan oil and sea salt instead to create gorgeous, tousled beach waves.
14. Innersense I Create Hold $26

This super-hold gel contains organic aloe and honey to moisturise as well as locking in curls. A little goes a long way. Try emulsifying in water for a lighter hold on the curls.
15. Cantu Shea Butter Coconut Oil Shine and Hold Mist $5.99

For a cheaper refresh spray, try this rich mist that will add shine and tame flyaways. Also good for twists and braids.
16. Maui Moisture Frizz Free and Shea Butter Elongating Gel 10oz $7.99

Aloe vera, shea butter and macadamia oil help to tame frizz while elongating curls to add length to your mane!
17. CURLS Cashmere + Caviar Hair Gelee 8oz $18.99

A bit of luxury for type 4 curlies, this lightweight gel reconstructs damaged hair while adding shine and definition to kinks and coils.
18. Shea Moisture Jamaican Black Castor Oil Strengthen, Grow and Restore Styling Lotion 8oz $10.99

An oil based lotion which adds protection while heat styling and helps to moisturise and strengthen damaged or stressed curls.
19. The Doux Mousse Def Texture Foam 7 floz $15,99

A 2021 Best of the Best winner, this mousse provides definition and hold for every hair type and pattern.
20. Rizos Curls Curl Defining Cream 10 oz $21.99

Shea butter and coconut oil in place of silicones help to define and moisturise curls, while reducing frizz and dandruff. A firm favourite of curlies of all hair types!
Find next: Top 20 Silicone-Free Daily Conditioners
Those with naturally wavy hair know only too well that it’s often difficult to judge how your waves are going to form, which can lead to damaging habits such as smoothing our waves with a straightener or curling wand. This is where the TikTok bathrobe belt hack for heatless waves comes in. Read on to find out how to achieve these heatless damage-free waves using a bathrobe belt.

Pictured: @cierafaith
Who Does this Technique Work Best For?
This technique works best on long hair as shorter hair may not reach all the way around the belt as you braid. However, you could try doing it just on the top part of your hair, so you have waves on top.
People with tighter curls may struggle with this technique as your natural curls may work against the waves. The best hair type for this technique is Type 2A-C; it can enhance your natural wave and curl pattern.
@maaltoks Reply to @hlangsam ♬ original sound – maalvika
Step 1. Prepare your hair for bathrobe waves
The basic method for bathrobe waves involves splitting your hair into two sections and braiding each side with your bathrobe belt.
The key to achieving perfect bathrobe waves, is to do it on dry hair rather than damp to avoid wonky waves. Brush or comb through your hair carefully with a boar bristle brush or your favourite detangling brush.
The next thing to do is to decide where you want to part your hair. Flipping your hair after you’ve formed the waves, might cause them to break up so decide beforehand which way you want it to fall. With the handle of a comb, divide your hair clearly into two sections. A middle part works best for even waves. Make sure the part goes all the way to the back of your neck and pull the two sections forward over your shoulders.
Next lay your bathrobe belt flat across the top of your head, about two inches from the hairline. Make sure the belt is even on each side. Then create two loose ‘bunches’ and secure the left-hand bunch (including the belt”> just below your left ear with a spiral hair bobble to keep it in place. You will work on the right-hand side first.
Your next important choice is how thick you want your finished wave ‘clumps’ to be. You are going to effectively French braid your hair with two sections instead of three, using the bathrobe belt as one of the sections so for large glamorous waves, take larger sections of hair to braid with the belt. For smaller, lighter wave clumps use smaller sections to braid the hair.
You also need to decide how tight or loose you want the wave. Braiding tightly will create curlier waves and braiding loosely with large sections between each twist will create looser, more beachy waves.
@bacardibri123 This is cringeworthy but 10/10 would recommend #fyp #foryou #DecadesofHair #coronavirus ♬ Buttercup – Jack Stauber
Step 2. Braid with the bathrobe belt
Divide your right section of hair in two. One section towards the front and one towards the back. You will braid the front section first.
Starting at the top of your head, take a small section of hair and twist over the top of and then under the belt so the hair is at the front of your head again. Collect another section and incorporate it into the first section. Again twist it over and under the belt. Continue to take sections of hair close to the hairline and braid the hair and belt together, twisting the hair and belt away from your face as you move down the section. Once you can no longer include any more sections of hair, simply twist the two sections (hair and the belt”> together, all the way to the end of your hair. You will end up with a long braid with the belt weaved throughout. Seal the end of the braid with another spiral bobble or a small elastic band. Don’t use a scrunchie or it may fall out, especially if you are leaving them in overnight.
Next you will braid the back section of this right hand ‘bunch’ into the first braid. You will do the same routine, but with the hair going towards your face. Take a smaller top section of hair and braid over and under the belted braid where it is not tight to the head (usually by the bottom of the ear”>. In the same way you braided the front section, pick up another section and braid it over and under the belt. Repeat, picking up sections as you go until you have included all of the hair in the bunch. Twist the two sections (the original belted braid and the hair together”> all the way to the end of the hair.
Remove the spiral bobble from the left side and repeat the braiding.
Lightly spray with hairspray and leave the belt in overnight or for a few hours throughout the day. The longer the belt is in, the longer the waves will hold.
Step 3. Remove the Belt
Remove the bands and untwist the belt, carefully releasing the waves. You then need to decide how much you want to manipulate the waves. You might want to just leave them as they are, but you may find you don’t have much root volume. To lift the roots, use a pick to lift the roots slightly from the head and spray with hairspray.
You can run fingers through the waves to break them up if you want them looser and less smooth.
Alternatively, you can add a couple of drops of oil so smooth them even further.
Finally add more hairspray to hold the waves.
Top Tips
Use bobby pins to secure the belt if you wish while you’re braiding.
Play around with the shape of your waves, by switching the direction of the hair as you braid.
Try a silk scarf or long socks if you don’t have a belt! The best thing about this technique is how adaptable it is!
If the bathrobe belt isn’t working for you, there are also silk tubes that you can buy that create a similar effect.
@mypawfectfamily Heatless curls are the only reason I have any hair left on my head ? #bathrobecurls #heatlesscurls #longhairtips ♬ Lady Gaga Paparazzivmaperformance – ladygaga
Have you tried the bathrobe belt on your waves? Let us know how it worked for you!
Wondering what on earth to do with your hair once the heat and humidity kicks in? Don’t despair. We’ve got a round-up of lovely curly hairstyles to keep you going through the humid weather
1. Chic High Ponytail with loose and Wispy look
Image Credit: @thecurlstory
In the summer months, it’s nice to be a bit more relaxed with our look as we head to the beach or park to soak up some sun. look no further than this casual but chic ponytail. Now, you may worry about curly ponytails sagging in the heat, but with two hidden accessories, this look stays put all day. Watch April’s tutorial above.
2. Easy Curly Side Bun Updo

Image Credits: @marisascurls
Another low maintenance updo to keep the hair off your neck is the classic side bun, elegant and easy. Marisa shows us how it’s done in this simple tutorial.
3. Dutch Braids
Image Credit: @curly_candace
Dutch braids are all the rage this summer. Cute and oh-so pretty, braids also offer up some protection from the sun’s rays and keep hair neat on windy days. Candace shows us four different ways of wearing them.
4. The Flat Twist
Image Credit: @blkcurlsbuy
For coily hair, this is an easy way to protect your curls in the summer heat. Shalanda shows us her version in this tutorial where she twists using foam.
5. Half updo!
Image Credit: @curlykiet
The half-updo is a classic and gives a lovely carefree vibe for summer. Nikki – shows us a super simple updo with two twists!
6. Sectioned Braids
Image Credit: @jasmeannnn
Follow Jasmine’s tutorial for perfect sleek braids ready for days at the beach! Watch out for sunburn on your scalp if you wear sectioned braids! Apply sunscreen to those partings.
7. Bubble Braids!
Image Credit: @curly.hair.boo
@curly.hair.boo walks us through this on-point simple summer hairstyle which is great for curly or wavy hair as well as straight. Great for summer festivals!
8. Half-up with Bubble Braids
Image Credit: @divinecurlz
Sometimes you still want your curls to do the talking so this cute half-updo with a bubble braid twist from Erika has the best of both worlds! Watch how she does it here.
9. Half-up Space Buns

Continuing with the half-up look, why not try this twist on the space buns? Franchelli makes sure her ringlets are on show while making an impact with the high buns. Allowing some ringlets to escape from the buns adds a relaxed summer feel. Perfect for summer parties!
Image Credit: @chelliscurls
10. Silk Scarf

Image credit: @julianalouiise
In summer we can flirt with pretty light silk scarves to brighten up low ponies or half-updos. Make sure they are silk or satin to keep friction of your curls to a minimum!
11. Cute Clips and a Low Pony

Image credit: OK Chicas
Wanting to keep things sleek but worried about wispy curls in the summer? Use pretty, patterned clips to keep your hair slicked back when you wear a low pony.
12. Pineapple with Butterfly Clips

Image Credit: @oliviacalbio
Sometimes there’s nothing for it but a stylish, sleek pineapple. It’s the best updo for those hot days and allows you to show off summery earrings and tanned shoulders. And dress it up with a few butterfly clips, Olivia got hers from Princess Polly. To get the look, she says “I use a refresher spray to dampen my scalp, then I use a brush to comb it back in place. I also glaze my scalp with gel and hairspray which helps to brush out all the bumps and keep it slick all day. I use hair elastics to then secure a tight ponytail near the top of my head. To get that extra slicked effect, I use a toothbrush and gel to brush back my baby hairs.”
13. Romantic Half-up Fishtail

Image credit: bebonia
For dreamy summer days or even summer weddings, this whimsical look suits floaty summer dresses and long warm evenings. This look can also be done with a simple braid. Liv Judd shows us how to do a fishtail-braid in this tutorial.
14. French-Braided Low Ponytail

Image Credit: Hair Romance
This elegant look can go from day to night whilst keeping you cool. Watch Miss Sue’s tutorial on how to do a French braid.
15. Scarf Updo

Image credit: Perfectlocks
Perfect for protecting coils and curls in the summer heat and for keeping you cool! Loosely tie hair in a high pineapple and then wrap around the back underneath of your hair with a patterned, summer scarf, tying at the front or the back. Simple.
13 Curly Hair Transformations You Have to See to Believe
If you need any more proof that taking some time to look after your curls properly is worth it, take a look at these incredible transformations. Warning: you may get curl envy!


1. Charlette aka @naturally_charlette
Charlette’s bubbly personality is reflected in her incredible hair. This is the story of her journey to a huge transformation:
I think so many curly hair stories start with damaged hair. I had relaxed hair for many years. I made the decision to cut down on relaxing my hair as I didn’t want to be relaxing my hair into old age. From January 2018 I allowed my new growth to grow out. I tried to manage the two textures with heat. This stressed both textures and broke off my relaxed hair.


I big-chopped the remaining relaxed and heat-damaged hair in November 2018. At the start of my journey I put a lot of importance on products but the biggest realisation for me was how much technique matters. I don’t over manipulate my hair and typically stick to wash and go, twists and twists out which suits me as I’m a lazy natural throughout the week.
I only wash and style my hair once a week and I don’t touch it or do anything else until the next wash day. I don’t try every new thing that comes out. I stick to what tools work in my hair. I always work in section when washing or styling my hair and am very gentle. Simplicity is best.


2. Owen aka @owen_janes
Owen has been flying the flag for long-haired curly lads for a few years now and it’s garnered him a huge online following. His transformation from short crop to Viking mane is incredible:
In my twenties I had a buzzcut and had no idea I had curly hair. In 2013, I started growing my hair out and my curls appeared! While my hair was long though, I didn’t think I needed to use any products in my hair and I was also shampooing and conditioning every week.


In the last twelve months, you can really see the difference in my hair. Now I know what styling products to use and I’ve learned I can go an extremely long time (up to eight weeks”> without having to shampoo or condition my hair. I just dampen it in my morning shower, scrunch the water in, get out of the shower, scrunch in a product – usually gel – and leave to air dry. Once it’s dry, I scrunch out the crunch.


3. Marisa aka @marisacurls
Anyone versed in the Instagram curly world will recognise the giant of curly knowhow that is Marisa. Her curl transformation has been incredible:
For me the main keys to changing my hair were firstly learning about styling techniques like squish to condish, how to diffuse properly and how to apply styling products. And secondly giving up the hair dye! My hair was super damaged from lightening it for almost 20 years and growing it out completely transformed my hair.


4. Shosh aka @welshiecurlgirl
Another curly Instagram star with a huge following due to her detailed curl knowledge, Shosh’s transformation has to be seen to be believed:
The key to transforming my hair? Embracing it as it is and not trying to it into something it isn’t. My hair is very fine, naturally super soft and wavy curly. Working WITH these things, instead of trying to force my hair to be super-duper curly and voluminous really allowed me to get the best out of my own hair. I used to hate it. Now, it’s one of my favourite features.


5. Vesna aka @vesna_goldencurls
Vesna’s blonde bombshell curls have undergone a radical change over the last couple of years:
Beginning a curly care routine has been a crazy rollercoaster ride: so many failed experiments; protein overloads; moisture overloads; product build ups; unicorn cuts gone wrong. But: I REGRET NOTHING! I would do it all over again, knowing how much the health of my hair improved nevertheless.
My words of advice:
- Don’t get discouraged through the transitioning phase in the first few months
- You will never get the same result twice!
- Don’t compare to anyone
- Your curl pattern will change as your hair becomes healthier, but be realistic. If you’re naturally wavy for example, you will never get coils naturally and vice versa.
- Learn your porosity, density and pattern. It will massively help in choosing the right products for you
- Modify the rules of CGM if you want. A litlle sulfates or silicones every now and then won’t reset all the progress you’ve done so far

6. Saroja aka @curly_saroja
While Saroja’s hair was already lovely, her more recent bouncing ringlets are gorgeous to behold. Here’s how she coaxed them into their current beautiful state:

The biggest differentiating factors for me when improving my curls were definitely a good haircut; I went from long layers to rounded layers which gave me more volume. I am also a fan of brush styling which gives me these rounded clumps. I also found working out a protein/ moisture balance made a huge difference to my curls. I learned from this that my curls prefer more protein than moisture!


7. Kelly aka @2bornot2bwaves
Kelly’s fiery-red waves are to die for and here’s how she achieved them:
I never knew I had curly potential. My journey to healthy wavy curls has been a long one, but so worth it. My before photo is from 3 months into my journey – there were absolutely no curls or clumps, but my hair felt much healthier, so I kept going.

Some of the things that helped on my journey were finding my ideal protein and moisture levels (turns out, my hair loves tons of protein”>, learning how to brush style, clarifying and cleansing often, understanding my hair type (it’s denser and coarser than it looks”>, and mostly importantly, setting realistic expectations for my hair. I didn’t get here overnight, but with the support of my Insta curlfriends, my hair is finally living its best life!


8. Lisa aka @curlszen
Embracing her natural curls and has been an integral part of Lisa’s journey of self-love. Here she describes how she recaptured her beautiful coils:
I was always a curly girl but during my pregnancy and subsequent transition to a single parent, I did not have time or energy to care for myself. My self-worth and mental health was very low. I think I just gave up on me. I neglected my hair and it grew long and tangled.


As my mental health and energy improved, I decided to commit to doing one thing for me. That was my hair. I slowly started a routine (CGM”> and it became a haven and place of accountability to myself.
Two years later came another big life transition to a new country where I built a new life alone with my son. I needed to become strong and superhuman. I cut off all my hair as a way to harness my inner power. I needed focus and hard work to stabilise my life. It worked.
Caring for my hair taught me to put myself first and learn a very deep inner love. Almost three years later, my passion for curls and the online curl community has opened a world I never imagined. As a result, I’m currently training to become a curly hair stylist.
My transition was not about learning curl care. It was learning selfcare. Three things I did to transition to my current curls.
- Accepted my texture. It’s a big explosion of curls. For many years I wanted wavy curls and totally smothered my natural curl pattern
- Followed a simple consistent routine that fit in with my life as a mother. I had no time for complicated styling and faffing about. Wash, condition, dry, repeat!
- Centering my routine around hair health. Scalp care, effective products and hydration

9. Klavdija aka @all_aboutcurls
Klavdija’s voluminous curls are awe-inspiring. Here’s how she overcame extensive color damage to return them to their former glory:
I used to have quite beautiful curls, but then after a lot of bleach and colour damage, they turned to a frizzy mess. I lived with my hair in that condition for quite a while and then in 2018 I discovered CGM.

I started with some drug store products and then the big chop followed. When you have so much damage, there is no way you can fix it. My curls slowly started to come back. When I switched my drugstore products for higher quality ones, I noticed the biggest change in my curls.
I had huge struggles along my journey because in Slovenia quality curly products are not available, plus the curly community here is pretty small. Because of my extensive personal experiences on how to take care of curly hair, I created an Instagram profile to help others starting on their journey.


10. Sophie-Marie aka @sophiemariecurly
Sophie-Marie’s corkscrew spirals have garnered her a huge online following. Here’s how she went from frazzled locks to perfect ringlets:
I started the process of embracing my natural curls properly at the beginning of 2020. Previously, I had straightened my curls for as long as I could remember because I didn’t understand them. What did I do to get them back?
- Stopped straightening my hair immediately
- Started deep conditioning treatments
- Cut off about 4 inches of bad damage myself in lockdown
- Nursed the rest of it by washing my hair less, changing to moisturising shampoos and conditioners; at first I followed CGM but after four months, I noticed terrible build up on my scalp and started introducing sulfates which helped clear it up
- Started using UV/heat protectant
- Incorporated leave-in conditioners and or curl creams after washing hair
- Included mousses into my routine for hold
- Learned some cool hairstyles to make me feel more confident during the more awkward stages when I wasn’t comfortable yet

I think the biggest thing for me has been no straightening during the phase of getting optimum hair health and gradually trimming off those ends that are beyond repair
I was very patient – this did NOT happen overnight and I got extremely frustrated in the beginning. I finally love my hair, something I’ve never said ever!
You can learn more about Sophie-Marie’s lockdown transformation and her favorite products here.


11. Lily – aka @curlylily
Lily’s glorious smooth ringlets have undergone a huge change from her earlier, damaged hair. Here’s what was key to her transformation:
- Letting my natural hair color grow out
- Cutting off eight inches of damaged hair
- Stopping straightening my hair daily
- Switching to air drying and diffusing on low heat
- Reading tons of articles
- Watching hours of YouTube videos
- Tracking my progress with pictures and downloading the hair journal app to write my full wash day routine in detail
- Deep conditioning and oil treatments
- Sleep protection
- Lots of patience!


12. Jenni – aka @allamerican_curly
Jenni’s wholesome all-American curls haven’t always been this perfect! Here are some key things that helped transform her hair:
- I stopped using heat styling tools (other than diffusing on low/medium heat”>
- I practiced styling techniques I learned from others. There was a lot of trial & error!
- I shifted my mindset from getting my hair as curly as possible to getting it as healthy as possible.
- A learned to have a whole lot of patience; after three months I saw minor improvements, after six months there was significant improvement, after one year, my curls were transformed but I’m still learning!


13. Pamela aka @silverglittercurls
Pamela’s fabulous tornado curls are the envy of many a curly girl. How did she go from her flowing waves to these tumbling spirals?
I feel like the key to transforming my hair was to understand what I was working with. I had no idea my hair was curly! Once I did, curl cream, gel and diffusing became everything to me. These were game changers! Thanks to the amazing curly community I found, I’ve learned so much.


14. Olivia aka @curly_livy
Olivia’s magnificent curls are enough to bring a smile to any curl lover’s face. How did she manage to achieve such and incredible voluminous mane?
I started my curly journey because I was postpartum and getting so much hair loss that I was at my wit’s end. I never had heat damage but I used any products I could get my hands on – usually a lot of gel and I never broke the cast. By learning new styling techniques and learning about ingredients that are better for my hair, it flourished over the last three years.


15. Victoria aka @curlycooper26
Victoria’s bouncy curls look completely different to their former state. Here’s how she managed to coax the best out of them:
I always wanted to have the big juicy ringlets you see online or in magazines. I always thought I was using the best products for my curls; it wasn’t until we hit lockdown and I had time on my hands that I decided to look in to the Curly Girl Method. I haven’t looked back! I’ve been doing CGM just over a year now and my hair is at its healthiest. When I look back at my before photos, I was using good products but I didn’t know HOW to use the products. I’ve learnt so many techniques along this journey to bring out those bouncy curls and most of all I’ve learned what my hair needs from a wash day and how to care for it properly. It’s been the best journey and I’m part of such a wonderful curly community!


16. Ash aka @miss.curlyfit
Ash has managed to maintain her fabulous ringlets whilst also keeping up a fitness regime. Read on to find out how she got her hair into such a healthy state:
I had been playing about with my natural texture a few years but I didn’t really embrace it. This was mostly because I was never happy with how it would turn out – I would wear it curly, I’d hate it because it was a mess, people made fun of it so then I’d go back to straightening. I’d do the same thing again a couple of months later and the whole cycle would start again. Then I heard about the Curly Girl Method. That was the big turning point for me. I learnt how to really care for my curls. Six months later, I stumbled upon all these gorgeous curls on Instagram. Cue the curly community! This is where I realized that there wasn’t a “One size fits all” method, and that was definitely the biggest turning point for me – with having low porosity, high density hair, it has its own unique needs and so learning from others with similar hair really helped.
This article has been updated with new transformations.

Photo by Ilyuza Mingazova on Unsplash
We received this question from a NaturallyCurly reader: “My roots are very frizzy but the rest of my hair is curly. What do I do?” This predicament is known in the curly world as halo frizz.
Halo frizz makes it sound angelic, but the frizz that concentrates around the crown of your head can be a curly’s worst nightmare. Your ends and layers underneath are curling beautifully but you still seem to get this flyaway fuzz around the roots. If this sounds like you, then read on.
What causes frizz at the roots?
The main cause of frizz is dehydration. We usually assume the ends of the hair will be the driest, but this is not necessarily always the case. If you only co-wash or low-poo, natural oils and products can accumulate around the crown which in turn can block moisture from entering the hair. In addition to this, your crown is exposed to the sun and is open to the elements. The lengths and curls underneath don’t get as much of a bombardment from environmental factors. So, what can you do about it?
11 Tips to reduce halo frizz
1. Wash less
Constant washing of your hair will cause friction and removal of some natural oils. See if you can stretch out the time between washdays to allow the sebum from your roots to spread along the hair shaft which will help to smooth some of that frizz.
2. Clarify
You may need to wash less often, but you may also need to wash more thoroughly. Yes, we all know harsher shampoos containing sulfates can dry hair which seems the wrong thing to do to dehydrated hair. However, clarifying now and again will remove product and oil build-up, allowing moisture to enter the hair. As long as you deep condition or use a very moisturising conditioner afterwards, a regular clarifying wash can work wonders.
3. Use an Apple Cider Vinegar rinse
Many shampoos and conditioners have a more alkaline PH which can disturb the acidity of your scalp causing the cuticle layer to open up and become more apt to frizz and tangles. As well as removing some build-up, Apple Cider Vinegar lowers the PH of your scalp which in turn smooths the cuticle – thus eliminating frizz – and soothes the scalp, so it’s a win-win all-round.
4. Turn down the heat!
While you’re doing all this washing and clarifying, turn the heat of your shower down. Your crown is the area where the water hits first so if it’s boiling hot, your hair is going to get damaged.
5. Turn down the power!
Similarly, powerful showers hitting the top of your head can also damage the top layers and roots. We tend to be gentle with our curls in every other way, so why not lower the force with which your water hits your head?
6. Go upside down
Think of how many years you’ve allowed hot water to hammer the top of your head. Of course, this is going to have an impact. Think how healthy and smooth the curls at the bottom layers seem to be, because they are never exposed to the full force of the shower or other environmental factors like the sun. Try washing your hair upside down, maybe every other wash if you can’t handle it all the time. This will give your crown a break and allow the underlayers to take the strain for once.
7. Deep Condition thoroughly
When applying conditioner or deep conditioner, we tend to apply it to the ends, thinking they are the driest and more flyaway and for fear of weighing down the hair if we apply it to the roots. However, if you are rinse carefully and clarify regularly, then this won’t matter. Make sure you apply your conditioners from root to trip, maybe using a wet-brush to distribute it thoroughly.
8. Plop
Yes you read that right. Plopping is a method where you remove excess moisture from your hair through wrapping it in a t-shirt or microfibre towel. Don’t rough-dry your hair with a towel as this is a sure way to disturb the hair cuticle and cause friction and frizz.
9. Brush from underneath
Just as you could try washing upside down to move the pressure to the less damaged underlayers, you could try brushing or detangling from underneath too. Make sure your fingers and brush are facing upwards and work from underneath rather than raking them through the top layers. We tend to go over and over the top layers while trying to get tangles out underneath, thus causing more damage to the crown area.
10. Glaze with gel
Make your final layer of stylers a gel and glaze it over the top of your head, to smooth down those flyaways at the root.
11. Seal it in
Seal that moisture in with a fine layer of oil. Rub a few drops between your palms and then smooth over the roots and crown. Oils can seal in the moisture that’s already there and stop it from escaping.
Following these steps can make sure your curls are your crown, not your halo!

Pictured: @ricciperfavore whose finger coiling technique is featured below
“But it’s so expensive!” is the response of many people when they are first introduced to a natural curly hair routine. Many products without silicones, sulfates and other nasties often come with a hefty price tag – often, but not always. You can find products that won’t break the bank, that are classed as curl friendly; some examples include So Good It’s Noughty, Cantu and Maui.
However, there are other ways you can save the pennies when getting started on your curl routine. Read on to find out how!
1. Skip the Co-Wash, Use Conditioner
Instead of buying expensive co-washes, you can use your conditioner. Especially in the early days while you’re trying to work out if co-washing is for you, use your conditioner and massage it into your scalp to loosen and remove dirt.
2. Clarify with ACV, Not Shampoo
Most people need to clarify at some point if they are co-washing and not using low-poo or shampoo. But instead of buying a range of clarifying and cleansing products, you can use something from your kitchen cupboard – Apple Cider Vinegar! As well as clarifying the hair of dirt and product build-up, ACV smooths the hair cuticle, and soothes the scalp, leaving you with soft, shiny, healthy curls. Be sure to dilute the ACV before applying and focus it on your scalp.
3. DIY Your Deep Conditioner
You can stay in your kitchen for your deep conditioner. Shop-bought treatments often cost a bomb, but you can whip up some incredible homemade treatments using food items from your fridge. Try making DIY deep conditioners with avocado, honey or banana for super soft curls.
4. Style with Flaxseed Gel
Amazingly, you can even make your own styling products! Flax-seed gel is easy to make and, according to die-hard followers of the Curly Girl Method, the only styling product you really need. Flax-seed contains omega three fatty acids, vitamin E and magnesium for a healthy boost to your hair. It leaves hair moisturised and has incredible hold without any nasty added ingredients.
Read next: The Best DIY Flax Seed Gel Ever
5. Finger Detangle
If you need to detangle your hair, there is a great free tool you can use for this – your fingers! Start from the bottom of the hair and work you way up towards the root, as gently as you can. We recommend detangling on dry hair for less breakage, as wet hair is more fragile. Here are 2 ways to finger detangle if this method is new to you.
6. Plop with a Long-Sleeved T-Shirt
For plopping or removing the initial moisture from hair after washing, you may have seen some curlies using expensive microfibre towels, wrap or turbans, but did you know a t-shirt will do? If you can get a t-shirt with long sleeves, even better as you can use them to wrap around your head and secure in place.
7. Air Dry or Diffuse with a Strainer
Many people buy expensive diffusers to dry their hair, but you can simply air dry, if you don’t mind walking round with wet hair for a while. You can also create a diffuser using a colander or strainer and blowing cool air from your hair dryer through the holes; alternatively, cup your hair in your hand as a make-do diffuser cup!
8. Finger Coil Instead of Brush-Styling
For super defined curls, you can finger coil or twist instead of using a brush to style. Take a section of hair and curl it around the fingers coiling it up towards your scalp, before pulling your finger out of the ringlet.
,0 1px 10px 0 rgba(0,0,0,0.15″>; margin: 1px; max-width:540px; min-width:326px; padding:0; width:99.375%; width:-webkit-calc(100% – 2px”>; width:calc(100% – 2px”>;”>
9. Satin Over Silk
Sleep protection doesn’t need to cost the earth; many people swear by silk, but you can get great results from satin pillowcases and scrunchies at a fraction of the cost!
10. Seal with Jojoba
If you want to pre-poo, seal in moisture or scrunch-out-the-crunch with a hair oil, you don’t have to buy expensive blended oils; you can simply order a bottle of unprocessed jojoba or almond oil instead – or better yet, coconut or virgin olive oil from your kitchen!
So don’t let your budget put you off taking care of your curls. You can spend as much or as little as you like to get your curls back into a healthy, natural state!
- 1
- 2

